9.3 TIMERS
������������There are four fundamental types of timers shown in Figure 101. An on-delay timer will wait for a set time after a line of ladder logic has been true before turning on, but it will turn off immediately. An off-delay timer will turn on immediately when a line of ladder logic is true, but it will delay before turning off. Consider the example of an old car. If you turn the key in the ignition and the car does not start immediately, that is an on-delay. If you turn the key to stop the engine but the engine doesn't stop for a few seconds, that is an off delay. An on-delay timer can be used to allow an oven to reach temperature before starting production. An off delay timer can keep cooling fans on for a set time after the oven has been turned off.

A retentive timer will sum all of the on or off time for a timer, even if the timer never finished. A nonretentive timer will start timing the delay from zero each time. Typical applications for retentive timers include tracking the time before maintenance is needed. A non retentive timer can be used for a start button to give a short delay before a conveyor begins moving.
An example of an Allen-Bradley TON timer is shown in Figure 102. The rung has a single input A and a function block for the TON. (Note: This timer block will look different for different PLCs, but it will contain the same information.) The information inside the timer block describes the timing parameters. The first item is the timer 'example'. This is a location in the PLC memory that will store the timer information. The preset is the millisecond delay for the timer, in this case it is 4s (4000ms). The accumulator value gives the current value of the timer as 0. While the timer is running the accumulated value will increase until it reaches the preset value. Whenever the input A is true the EN output will be true. The DN output will be false until the accumulator has reached the preset value. The EN and DN outputs cannot be changed when programming, but these are important when debugging a ladder logic program. The second line of ladder logic uses the timer DN output to control another output B.
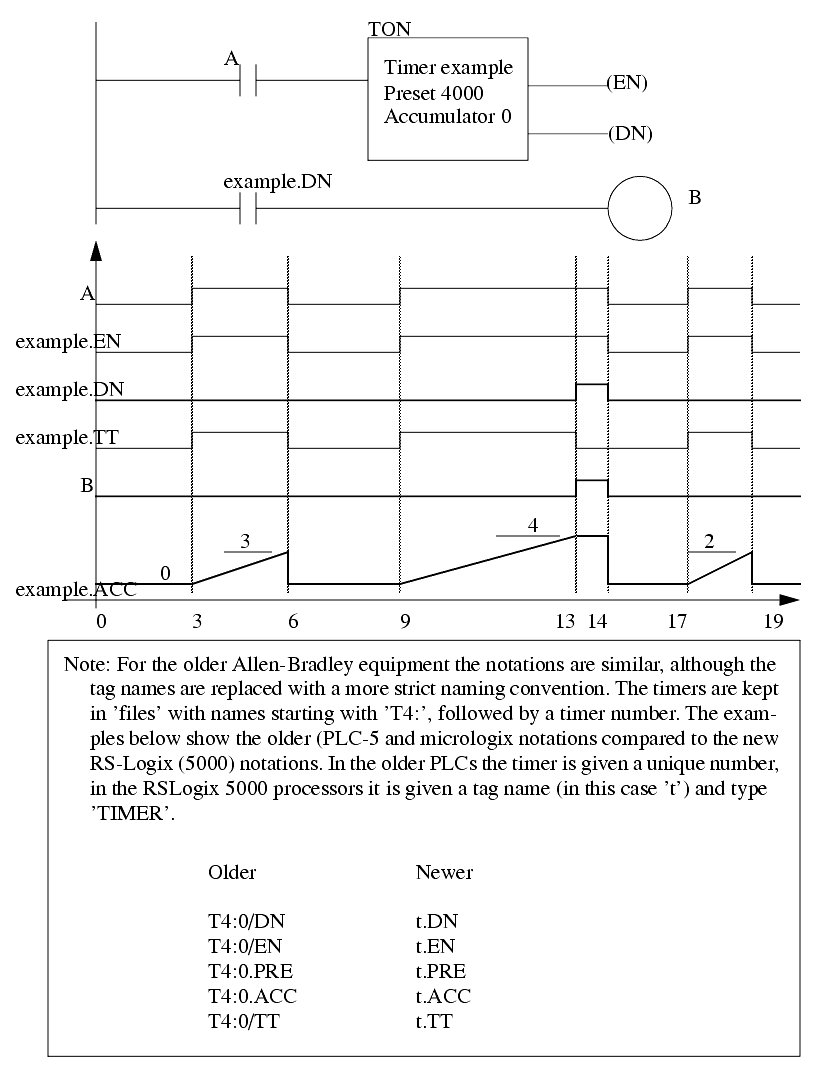
The timing diagram in Figure 102 illustrates the operation of the TON timer with a 4 second on-delay. A is the input to the timer, and whenever the timer input is true the EN enabled bit for the timer will also be true. If the accumulator value is equal to the preset value the DN bit will be set. Otherwise, the TT bit will be set and the accumulator value will begin increasing. The first time A is true, it is only true for 3 seconds before turning off, after this the value resets to zero. (Note: in a retentive time the value would remain at 3 seconds.) The second time A is true, it is on more than 4 seconds. After 4 seconds the TT bit turns off, and the DN bit turns on. But, when A is released the accumulator resets to zero, and the DN bit is turned off.
A value can be entered for the accumulator while programming. When the program is downloaded this value will be in the timer for the first scan. If the TON timer is not enabled the value will be set back to zero. Normally zero will be entered for the preset value.
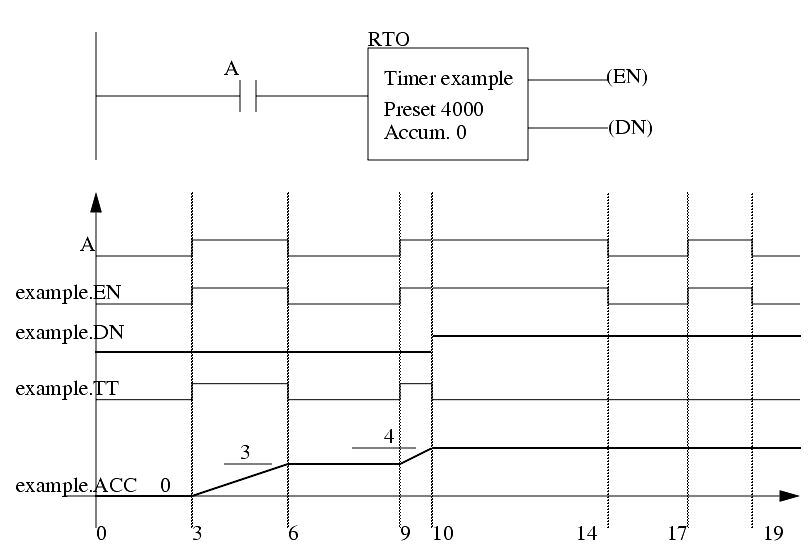
The timer in Figure 103 is identical to that in Figure 102, except that it is retentive. The most significant difference is that when the input A is turned off the accumulator value does not reset to zero. As a result the timer turns on much sooner, and the timer does not turn off after it turns on. A reset instruction will be shown later that will allow the accumulator to be reset to zero.
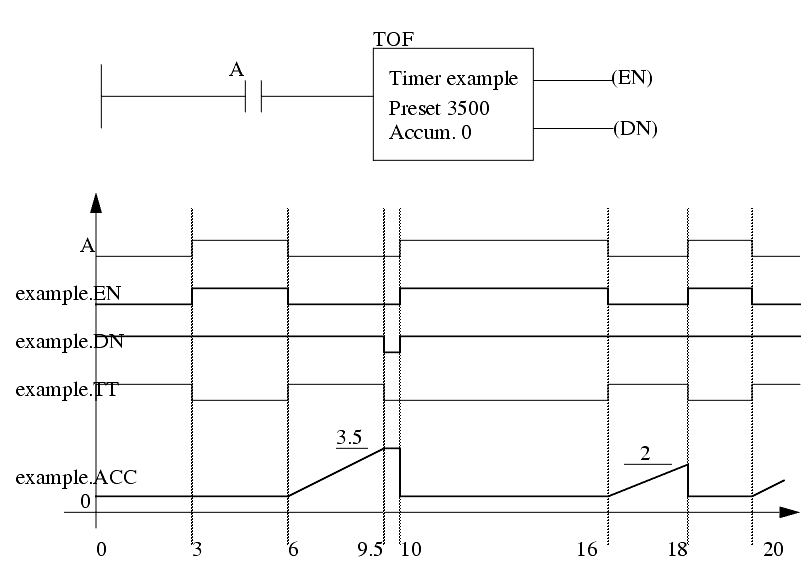
An off delay timer is shown in Figure 104. This timer has a time base of 0.01s, with a preset value of 3500, giving a total delay of 3.5s. As before the EN enable for the timer matches the input. When the input A is true the DN bit is on. Is is also on when the input A has turned off and the accumulator is counting. The DN bit only turns off when the input A has been off long enough so that the accumulator value reaches the preset. This type of timer is not retentive, so when the input A becomes true, the accumulator resets. Off-delay timers are normally off (DN is false) until activated the first time.
Retentive off-delay (RTF) timers have few applications and are rarely used, therefore many PLC vendors do not include them.
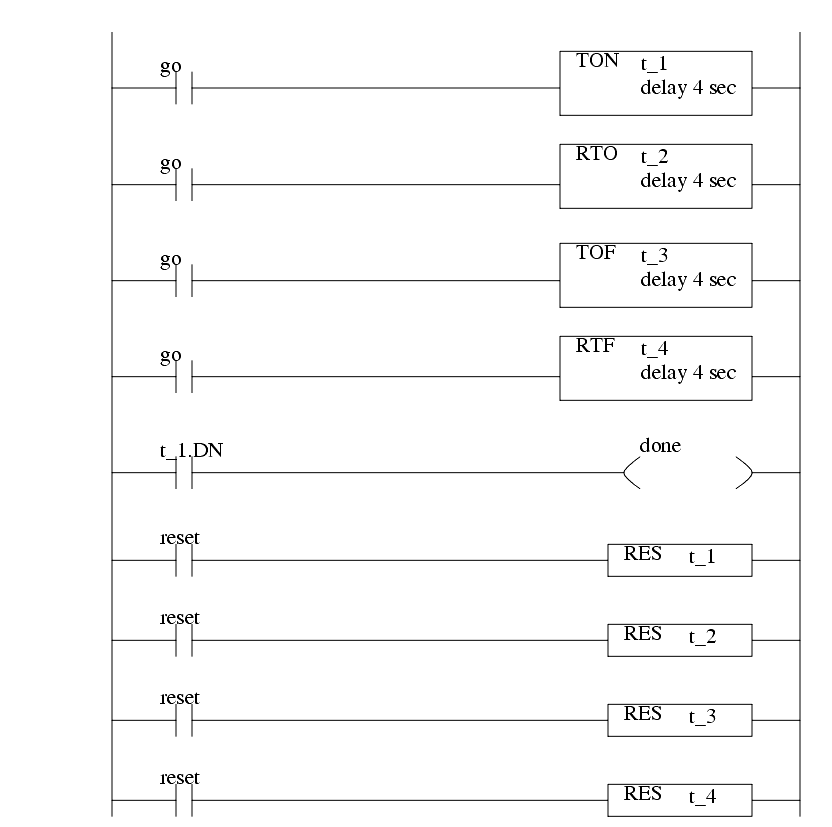
An example program is shown in Figure 105. In total there are four timers used in this example, t_1, t_2, t_3, and t_4. The timer instructions are shown with the accumulator values omitted, assuming that they start with a value of zero. All four different types of counters have the input 'go'. Output 'done' will turn on when the TON counter t_1 is done. All four of the timers can be reset with input 'reset'.
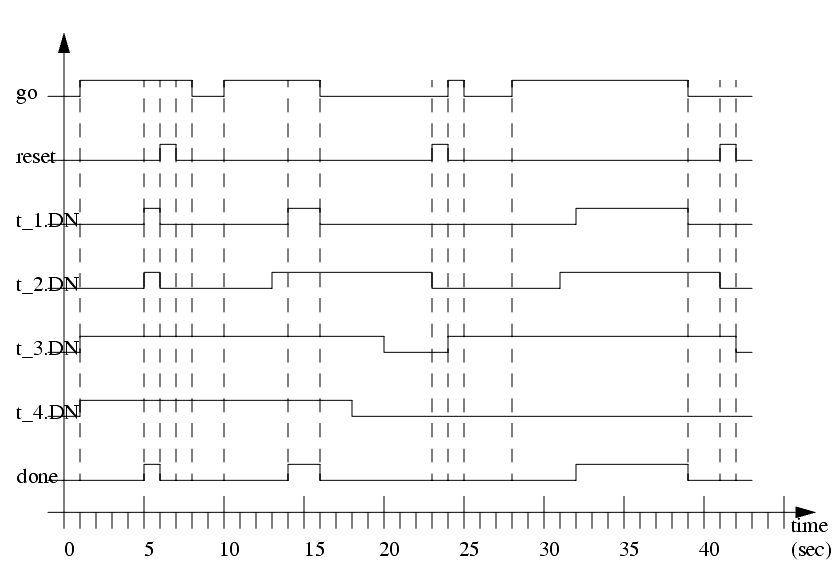
A timing diagram for this example is shown in Figure 106. As input go is turned on the TON and RTO timers begin to count and reach 4s and turn on. When reset becomes true it resets both timers and they start to count for another second before go is turned off. After the input is turned off the TOF and RTF both start to count, but neither reaches the 4s preset. The input go is turned on again and the TON and RTO both start counting. The RTO turns on one second sooner because it had 1s stored from the 7-8s time period. After go turns off again both the off delay timers count down, and reach the 4 second delay, and turn on. These patterns continue across the diagram.
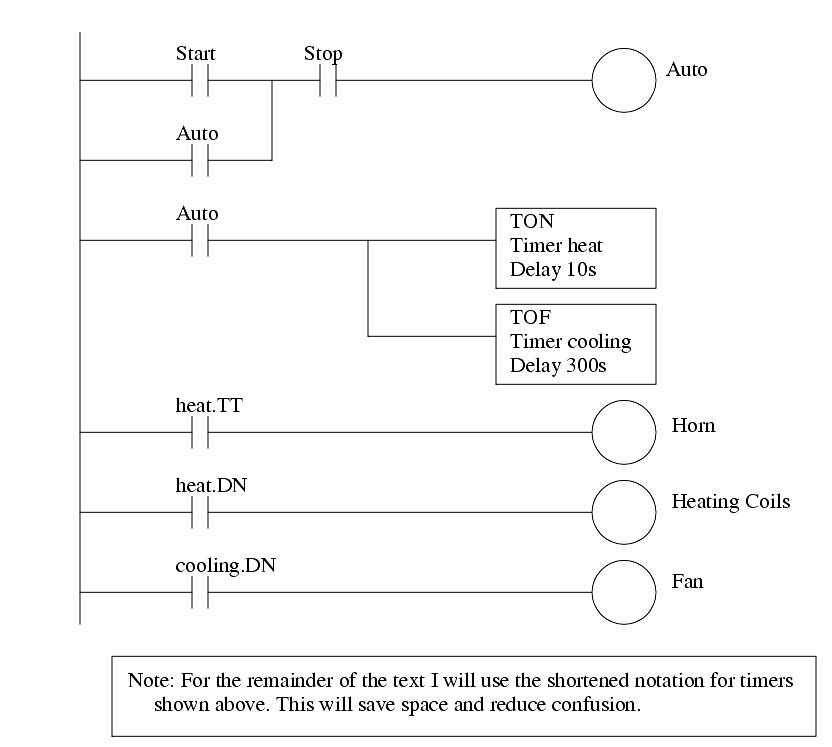
Consider the short ladder logic program in Figure 107 for control of a heating oven. The system is started with a Start button that seals in the Auto mode. This can be stopped if the Stop button is pushed. (Remember: Stop buttons are normally closed.) When the Auto goes on initially the TON timer is used to sound the horn for the first 10 seconds to warn that the oven will start, and after that the horn stops and the heating coils start. When the oven is turned off the fan continues to blow for 300s or 5 minutes after.
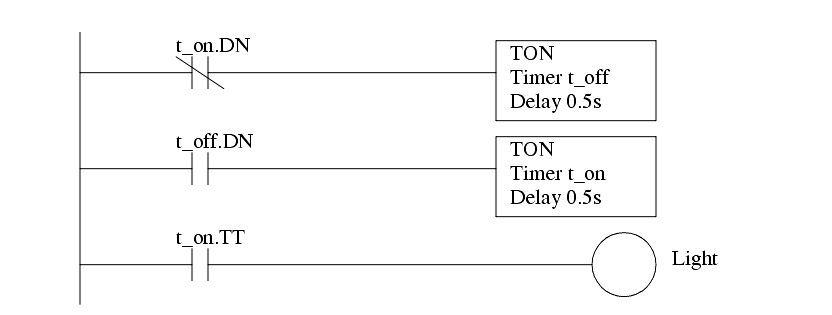
A program is shown in Figure 108 that will flash a light once every second. When the PLC starts, the second timer will be off and the t_on.DN bit will be off, therefore the normally closed input to the first timer will be on. t_off will start timing until it reaches 0.5s, when it is done the second timer will start timing, until it reaches 0.5s. At that point t_on.DN will become true, and the input to the first time will become false. t_off is then set back to zero, and then t_on is set back to zero. And, the process starts again from the beginning. In this example the first timer is used to drive the second timer. This type of arrangement is normally called cascading, and can use more that two timers.