9.2 LATCHES
������������
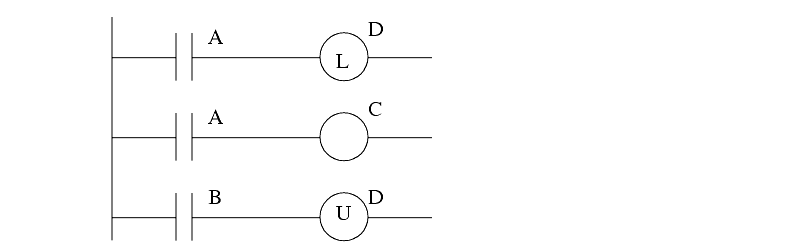
A latch is like a sticky switch - when pushed it will turn on, but stick in place, it must be pulled to release it and turn it off. A latch in ladder logic uses one instruction to latch, and a second instruction to unlatch, as shown in Figure 96. The output with an L inside will turn the output D on when the input A becomes true. D will stay on even if A turns off. Output D will turn off if input B becomes true and the output with a U inside becomes true (Note: this will seem a little backwards at first). If an output has been latched on, it will keep its value, even if the power has been turned off.
Figure 96 A Ladder Logic Latch
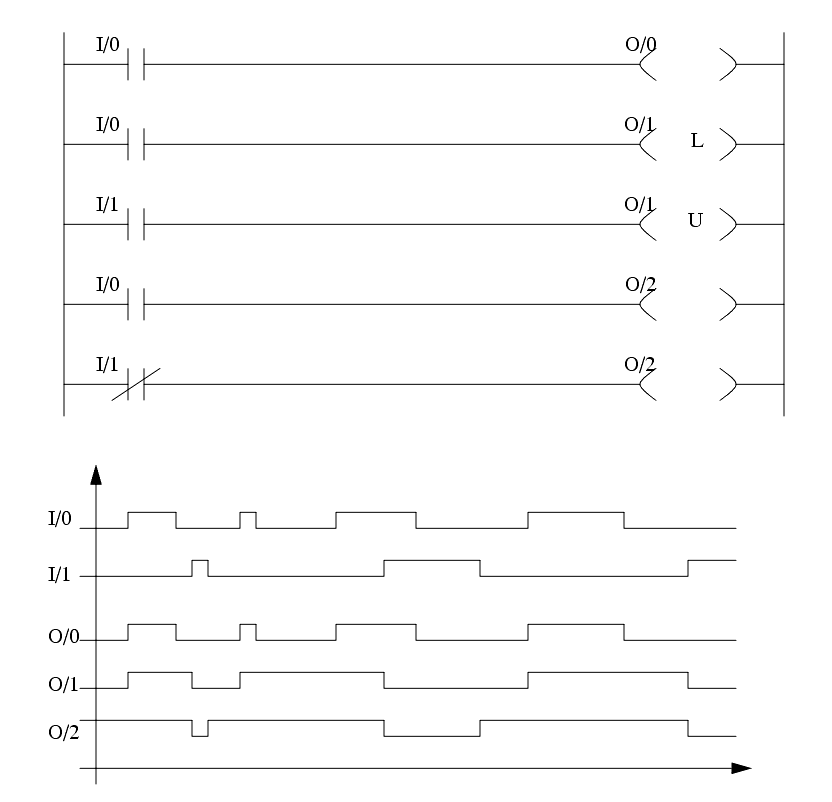
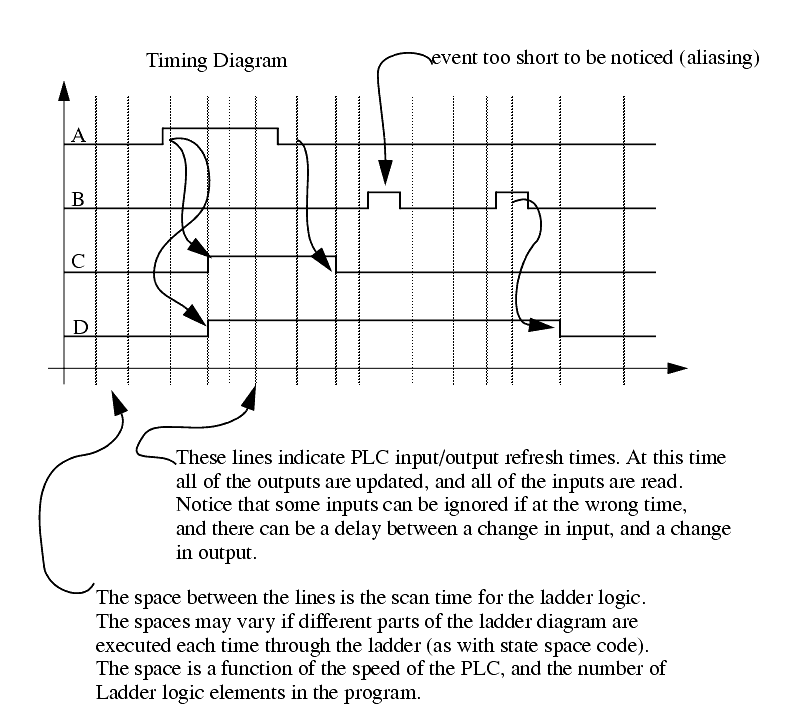
The operation of the ladder logic in Figure 96 is illustrated with a timing diagram in Figure 97. A timing diagram shows values of inputs and outputs over time. For example the value of input A starts low (false) and becomes high (true) for a short while, and then goes low again. Here when input A turns on both the outputs turn on. There is a slight delay between the change in inputs and the resulting changes in outputs, due to the program scan time. Here the dashed lines represent the output scan, sanity check and input scan (assuming they are very short.) The space between the dashed lines is the ladder logic scan. Consider that when A turns on initially it is not detected until the first dashed line. There is then a delay to the next dashed line while the ladder is scanned, and then the output at the next dashed line. When A eventually turns off, the normal output C turns off, but the latched output D stays on. Input B will unlatch the output D. Input B turns on twice, but the first time it is on is not long enough to be detected by an input scan, so it is ignored. The second time it is on it unlatches output D and output D turns off.
|
Figure 97 A Timing Diagram for the Ladder Logic in
Figure 96
The timing diagram shown in Figure 97 has more details than are normal in a timing diagram as shown in Figure 98. The brief pulse would not normally be wanted, and would be designed out of a system either by extending the length of the pulse, or decreasing the scan time. An ideal system would run so fast that aliasing would not be possible.
Figure 98 A Typical Timing Diagram
A more elaborate example of latches is shown in Figure 99. In this example the addresses are for an older Allen-Bradley Micrologix controller. The inputs begin with I/, followed by an input number. The outputs begin with O/, followed by an output number.
Figure 99 A Latch Example
A normal output should only appear once in ladder logic, but latch and unlatch instructions may appear multiple times. In Figure 99 a normal output O/2 is repeated twice. When the program runs it will examine the fourth line and change the value of O/2 in memory (remember the output scan does not occur until the ladder scan is done.) The last line is then interpreted and it overwrites the value of O/2. Basically, only the last line will change O/2.
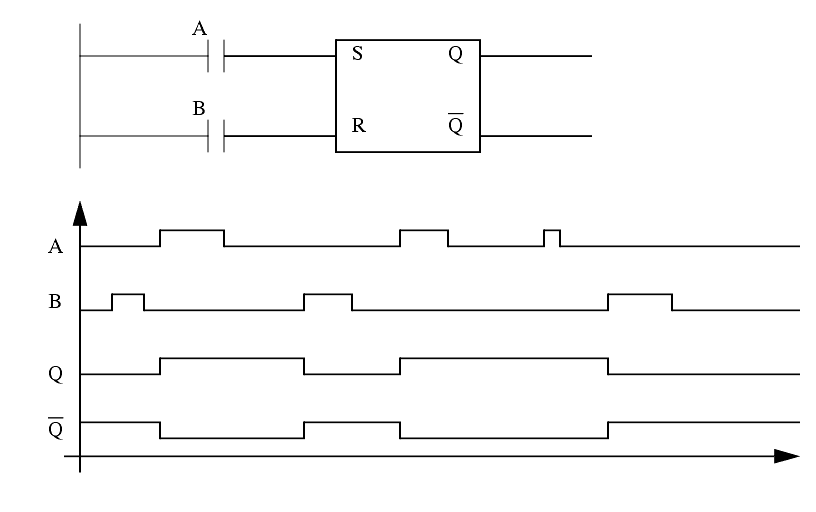
Latches are not used universally by all PLC vendors, others such as Siemens use flip-flops. These have a similar behavior to latches, but a different notation as illustrated in Figure 100. Here the flip-flop is an output block that is connected to two different logic rungs. The first rung shown has an input A connected to the S setting terminal. When A goes true the output value Q will go true. The second rung has an input B connected to the R resetting terminal. When B goes true the output value Q will be turned off. The output Q will always be the inverse of Q. Notice that the S and R values are equivalent to the L and U values from earlier examples.
Figure 100 Flip-Flops for Latching Values