|
|
|
11.4 PRACTICE PROBLEMS
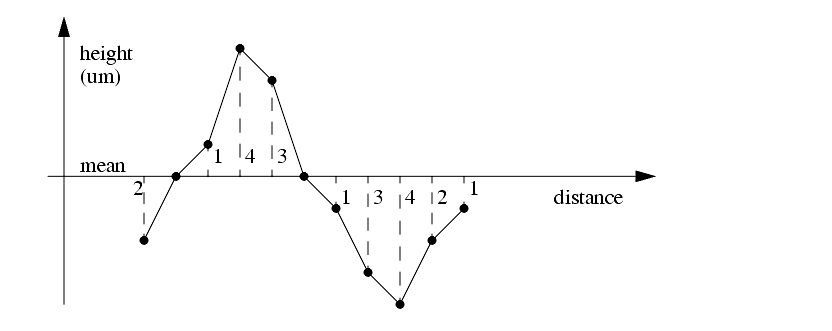
������������1. Calculate the CLA/Ra value for the wave form below.


2. What is the difference between surface texture and integrity?
ans. Surface integrity refers to all of the properties of the surface of a material, while surface texture on refers to the geometry of the surface.
3. Describe roughness, waviness and lay.
ans. Roughness is semi or completely random variation in the surface height, these are typically smaller in size. Waviness is a period or larger variation in surface height. This can be caused by warping or buckling, ripples, etc. Lay refers to a direction of a roughness pattern. For example when cutting with a lath the roughness will be different in the axial and radial directions.
4. What methods are used for measuring surface roughness?
ans. Surface roughness is normally measured with an instrument that drags a stylus across the surface (called a profilometer). The movement up and down is measured and used to calculate a roughness value.
ans. Cutoff is the length of the surface that the stylus of the profilometer is allowed to move over.
6. Two different surfaces may have the same roughness value. Why?
ans. A surface roughness value gives an indication of the rms value, but this can come in many forms. A regular looking roughness pattern may have the same roughness value as a shallower wave form with an occasional deep pit.
7. What will be the effect of a difference between the stylus path and the surface roughness?
ans. If the stylus path does not align with the lay of the roughness, then the roughness reading will be lower (or higher) than expected.
8. When is waviness a desirable and undesirable design feature?
ans. Waviness of a surface can be desirable when the surface is to have a rough appearance. If there is a moving mechanical contact between two surfaces waviness can lead to premature wearing of the parts.
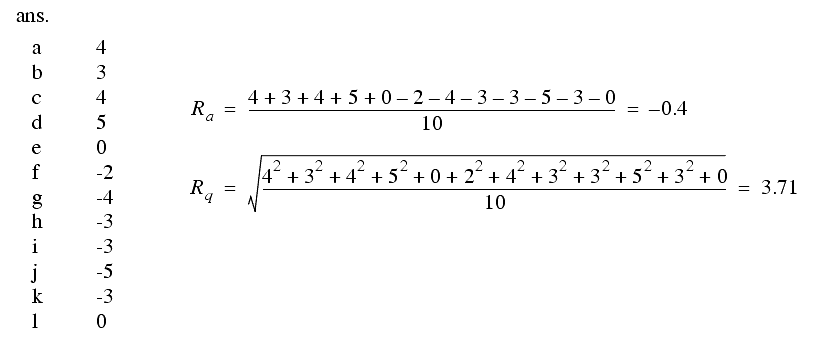
9. Given the figure below indicating stylus height values for a surface roughness measurement, find the Ra and Rq value.


10. How are surface roughness and tolerance of the process related?
ans. Surface roughness is a good indication of the ability of a process to control final dimensions. Therefore if the process cannot control the surface roughness, it will be unlikely that the dimensions can also be controlled.
11. How are tolerances related to the size of a feature?
ans. The tolerance/surface roughness graph is based on an important concept in manufacturing. There is a relationship between the scale of a dimension and the scale of a tolerance. In other words, if we make two parts in the same machine, but one is twice the size of the other, then its tolerance must be twice the size. Here we can see the more precise processes are near the bottom with a ratio of tolerance to dimension of 1/10000, the highest is about 1/10. Note: polishing and lapping are used to finish the production of gage blocks.
Search for More: |

Custom Search
|

|