19. Lab 1: Programming the Atmel Atmega32 Thumb BoardTo use the Atmel Mega32 microcontroller boards to input and output digital, analog, serial, and wireless data. A method for generating variable analog outputs, called Pulse Width Modulation (PWM), is shown in Figure 19.1 Pulse Width Modulation (PWM). If the output is on all the time, the effective output voltage is the maximum voltage of the output. If the output is only on half the time, the effective output voltage is only half. By varying the ratio of on-time to off-time, the effective voltage is varied. The percentage of time that the signal is on is called the duty cycle. So, if the voltage is only on half the time, the effective voltage is half the maximum voltage, and the duty cycle is 50%. This method is popular because it can produce a variable effective voltage efficiently. (Aside: The frequency of these waves is normally above 20KHz, above the range of human hearing.) 
Figure 19.1 Pulse Width Modulation (PWM) An analog to digital (A/D or ADC) converter converts an analog input voltage to a digital value. A successive approximation A/D converter is shown in Figure 19.2 Analog to digital converter. This device is like the one in the AtMega. The main operation concept is based on the successive approximation logic. Once the reset is toggled the converter will start by setting the most significant bit of the 8 bit number. This will be converted to a voltage Ve that is a function of the +/-Vref values. The value of Ve is compared to Vin and a simple logic check determines which is larger. If the value of Ve is larger the bit is turned off. The logic then repeats similar steps from the most to least significant bits. Once the last bit has been set on/off and checked the conversion will be complete, and a done bit can be set to indicate a valid conversion value. 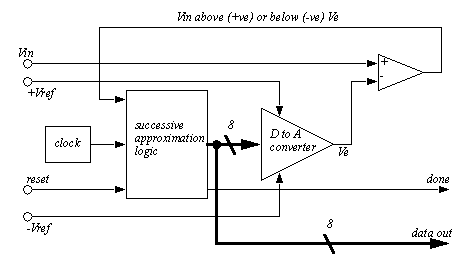
Figure 19.2 Analog to digital converter In the ATMega 32, the A/D converter is 10 bit, and there are up to eight 0-5V inputs available on port A. To operate the A/D converter the following steps must be used. Once the analog input value has been read it can be converted back into a voltage using equation (2). 
Microcontrollers are often used in real-time applications. Real-time systems must respond to events with time constraints. In other words they must always respond to inputs and cannot ’go to sleep’ as normal desktop computers do. To achieve this responsiveness interrupts are used. An interrupt can be generated by an external event, such as input change, or by an internal timer. When an interrupt occurs the computer will stop whatever it is doing and store its current state. It then runs a designated interrupt subroutine. The interrupt subroutine should run briefly and then allow the computer to restore its previous state and return to normal operations. In a realtime controller the interrupt routine typically runs 100 to 1000 times per second to check motor positions and update outputs to control the motors. Serial communication typically involves sending bytes between devices. These bytes are often ASCII encoded characters. Multiple bytes make up a string. For our purposes we will use serial communication to send commands to the microcontrollers, and to get responses (including data) back. Serial communications can be done multiple ways. The simplest method will be over the USB port, using a virtual serial port under windows. We may then use a program such as Hyperterminal to interact with the microcontroller. Communications may also occur without wires. Many wireless communication standards are already in use, however the boards we are using include hardware for a new wireless networking method called Zigbee. This is meant for consumer products with low power consumption and slower data rates. One interesting difference between simple communication and networking is that there may be multiple clients able to talk at one time. And, each client on the network will have a unique identifier, known as a network address. For Zigbee this will be a value between 0 and 255. 1. Review C programming using previous course materials. 2. Review the EGR 226 course materials from EGR 261 and 226.. 3. Review the analog I/O chapter in the textbook. 4. Skim the Atmel Mega32 manual (www.atmel.com) to become familiar with the processor. 5. Review the fundamentals of ASCII strings, including end-of-line and carriage-return characters. 6. Investigate Zigbee networks on the internet. Computer with an Internet connection Assembled controller thumb board 1. Boot your PC and login to the network. (Note: don’t forget to use a browser first to login to the campus network first.) Plug the board into a USB port. At this point windows (XP) should recognize that new hardware has been inserted and look for a driver. If not already installed you will need to do the following --> A message "Welcome to the Found New Hardware Wizard" should appear. For the prompt "Can Windows Connect to Windows Update to search for software?" use "Yes". Select "Install the Software Automatically". You should see something that says "USB->Serial". This process will be repeated for "USB Serial Port". An LED on the PCB may flash indicating that the board has power: if this does not occur don’t worry. 2. Open "Start/Control Panel" then "System/Hardware/Device Manager". Open the "ports" item and find the com port number. 3. Install the following software packages in the order shown. These packages are available on the course home page (http://claymore.engineer.gvsu.edu/~jackh/eod/egr345.html), or on the C2D2 web page. Note: Be careful to install the packages in the order shown below. WinAVR 3.5 or newer: a basic set of tools and the C compiler. Megaload 5.0 or newer: a tool for downloading programs. Gvim 6.1: (on C2D2) an editor for modifying programs. AVR C Compiler Update: (on C2D2) to provide a shell for compiling GVim Editor Update Installation: (on C2D2) adds some shortcuts test.hex: a test program for the thumb board 4. Run megaload and select the com port found in step 2. In Megaload set the "File to be program in the flash" to be "test.hex", and set the baud rate to 38,400. You should then be able to push the reset button on the board and load the program. If all was successful you will see a few lines of text in the "messages" window and the last line will be "Flash Prog Done!". 5. Run ’AVR Studio 4’ and do the following steps. Note: If the software crashes look on-line for help. This seems to be a particular problem with Windows Vista. a) Select ’New Project’: Note: This is also the point where you can open older projects later. b) Select ’GNU GCC’: This is the free compiler that you used in EGR 226. If you do not see it make sure ’Win AVR’ is installed. c) Enter a ’Project Name’ of ’lab1_a’.: Notice that the project directory is shown below. If this directory is not acceptable. Write down the location. Select ’Next’. d) Under ’Debug Platform’ select ’AVR Simulator’: Many of the other choices require hardware for incircuit debugging. Under ’Device’ select ’ATMEGA 324P’: If this choice is not present you will need to install a newer version of the software. e) Select ’finish’ and the programming IDE (Interactive Development Environment) will show up. On the left are project files. By default the main c program editing window is already open. f) Enter the program in Figure 19.3 Test program (simple.c). g) Open ’Project/Configure Options’ and Enter a ’Frequency’ of 8000000 (8 million): this tells the compiler what default CPU frequency is so that it may calculate delays properly. Verify that the ’Create Hex File’ option is selected: this will create the ’hex’ file that we can download. Select ’OK’ to close the window. h) Select ’Build/Build All’ to compile the program. If any compiler errors occur they will appear on the bottom of the screen. Double click on any errors to go to that line in the program. Once the program is compiled correctly go to the next step. 
Figure 19.3 Test program (simple.c) 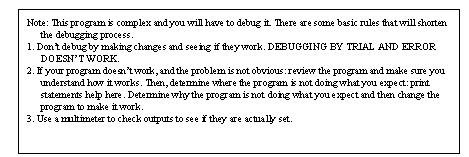
6. Use the simulator to test the program. Select ’Build/Build and Run’, then ’Debug/Run’. The program simulation should now be running. Go to the right hand side of the screen and expand ’PORTC’. 7. Start the Megaload program and make sure that the ’File to be programmed in the flash’ is pointing to the ’lab1_a.hex’ file in the project directory. Press the reset button on the board to download the program. A message will appear if the download was completed successfully. The program will now be running. 8. The program toggles the output on Pin 6C. This is slowed by the ’delay’ function. Connect the positive side of a multimeter to the PC6 output. Connect the negative side of the multimeter to a common/ground terminal. Change the delay and download the program again. 9. Enter, compile, and download the program in Figure 19.4 Digital inputs. Test it by changing inputs on port A and verifying that the same output changes on port B. Note: if an input is not connected, it will tend to assume a random value. 
10. Enter, compile, and download the program in Figure 19.5 Analog inputs. Test the program by setting an analog input with a variable power supply connected to PA0. The 5 most significant bits of the outputs will be on port B. Set the input voltage to different voltages and measure the digital outputs. Convert the binary values to a decimal value and plot the results. 
11. Enter, compile, and download the program in Figure 19.6 Analog Outputs with Pulse Width Modulation (PWM). The program will accept the input voltage on PA0 and output a corresponding voltage on PD7. Use a DMM to verify that the input and output voltages match. Use an oscilloscope to verify that the output wave is PWM and trace a few examples at different duty cycles. 
Figure 19.6 Analog Outputs with Pulse Width Modulation (PWM) 12. Enter, compile and download the program in Figure 19.7 A system clock using interrupts. The outputs on port B will change in a binary pattern. 
Figure 19.7 A system clock using interrupts 13. Download the files sio.c and sio.h to your working directory. Enter, compile and download the program in Figure 19.8 ASCII Communications. You will then need to close ’megaload’ and start hyperterm. Choose ’com1’ with 9600baud, 8 data, 1 stop, no parity and Xon/Xoff handshaking. You should see text messages on the screen. 
Figure 19.8 ASCII Communications 14. Put a Zigbee program to exchange bytes --------------------------- |