2.2 NOTATIONS
������������Typically these are a number of notations added to drawings to describe features, or explain operations.
Some abbreviated terms are given below,

2.2.1 Basic Dimensions and Tolerances
������������The size of an object, and the required accuracy can have a significant bearing on the cost
Limits can be used to exactly define the size boundaries of a feature.

Tolerances use a nominal dimension and differences.

2.2.2 Geometric Dimensioning and Tolerancing (GD & T)
������������Specified in standard ANSI Y14.5 (1983).
Combines rules and independent symbols in addition to the normal tolerancing symbols
Allows old style tolerances, but adds new methods that cover geometrical forms.
Allows easy specifications of datums, etc.
Advantages of this method are,
The main purpose of GD&T is to ensure,
2.2.2.1 - Feature Control Symbols
������������The basic of GD&T is the feature control symbol.
This indicates what the tolerance is, its value, the reference datums, and any modifiers needed.
An example of a feature control is given below,

not all of these symbols/categories will be used on a regular basis, but they provide the designer added flexibility in how they specify tolerances.
2.2.2.2 - Symbols and Meaning
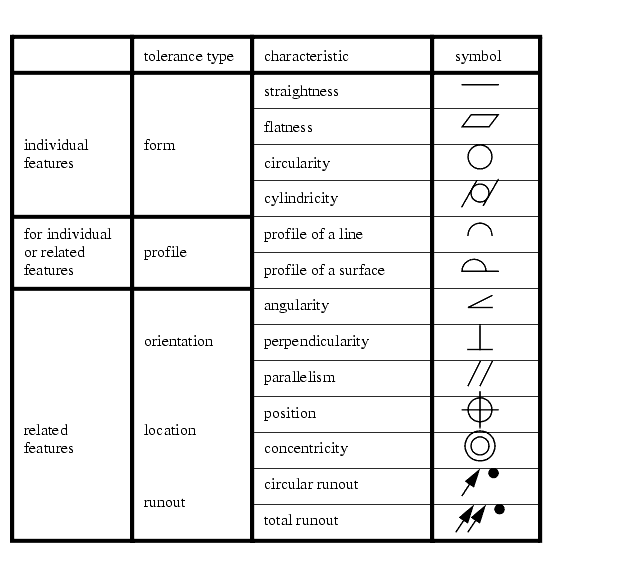
������������The basic symbols are shown below,

Flatness - basically, all the surface elements are constrained to lie within two parallel surface places, separated by the tolerance

Straightness - basically, one the surface elements is constrained to lie within two parallel surface places, separated by the tolerance. In effect, this means that if any line across the surface is within two parallel lines, the part is acceptable. This can be tested by running a comparator across the surface (using a reference plane)

Circularity - all of the points on a cylindrical surface are constrained to lie within two circles. This can be tested with a talyrond.

Cylindricity - an extension to circularity that specifies the tolerance along the cylinder.

Angularity - requires that all points on a specified feature must form an angle with a datum. This could be measured with a sine bar and a height comparator.

Perpendicularity - this has the same meaning as angularity, but it is specifically applied to 90 angles. This could be measured with squares and reference plates.
Parallelism - all points on a surface are to be parallel to a given datum, within a specified tolerance

Line Profile - the amount of deviation that is allowed (typically for irregular lines)

Surface Profile - the amount of deviation that is allowed for a surface

Circular Runout - when dealing with a surface of revolution, this determines the amount of deviation allowed from the central axis. This specifically refers to a specific point

Total Runout - similar to circular runout, but this applies to the entire part. In effect, circular runout uses two circles, whereas total runout uses two surface planes.
2.2.2.3 - Datums
������������These are reference features, that other features are to be measured against.
These can be used when setting up parts, for manufacturing or production
A datum reference frame can be constructed with,
A datum is specified with a boxed letter with two dashes,

2.2.2.4 - Modifiers
������������to overcome shortcomings in symbols, modifiers can be added to change their meanings.
