1. What are measurement standards?
ans. Standards are objects of known size, quantity, roughness, etc. These standards are used to calibrate and verify measuring instruments. As a result, measured values are more accurate.
2. What effect will temperature variation have on precision measurements?
ans. Temperature control during measurement is important because as materials are heated they expand. Each material expands at a different rate. This leads to distortion of parts and measuring devices that results in measurement errors.
3. How can a vernier scale provide higher accuracy?
ans. A vernier scale uses a second elongated scale to interpolate values on a major scale.
4. What are dimensional tolerances, and what are their primary uses?
ans. Dimensional tolerances specify the amount a dimension may vary about a target value. These are supplied by a designer to ensure the correct function of a device. If these tolerances are controlled the final product will work as planned.
5. Why is an allowance different from a tolerance?
ans. A tolerance is the amount a single dimension can vary. An allowance is an intentional difference between two dimensions to allow for press fits, running fits, etc.
ans. There are standard for different types of fits (e.g. press fit, running clearance). These specify the allowance of two parts, so that they may be made separately and then joined (mated) in an assembly.
7. What is the difference between precision and accuracy?
ans. Precision suggests a limit of technology, accuracy is the ability to achieve a value consistently. These are often interchanged because we are usually concerned with the accuracy when producing precision parts.
8. If a steel ruler expands 1% because of a temperature change, and we are measuring a 2” length, what will the measured dimension be?
ans. If we assume that only the steel rule expands, and not the steel part, we can calculate,

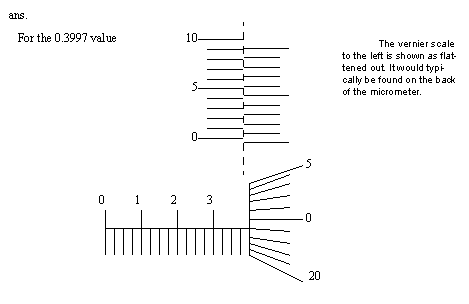
9. Draw the scales for a vernier micrometer reading 0.3997”.

• Light waves can be used to measure various attribute, such as distance by generating interference patterns.
• In general, if we take a single beam of light, and split it, the two separated beams will have the same frequency, and phase. If the two beams take different length paths, but eventually intersect each other, then they will form interference patterns, much as is found in wave tanks.
• In reality normal light from the sun, or a light bulb, etc. has many frequencies, directions, and phases. But when we use special light sources, such as lasers, the light is monochromatic. Each photon is in phase, and has the same frequency as all the others. In effect we have a ‘super-photon’.
• Aside: as a simple review, recall that light is just an electromagnetic field the is becoming more and less intense at a very high frequency. If you could shake a simple magnet fast enough (this is impossible physically) you could make light, radiowave, X-rays, heat that you can feel, etc.
• another principle of importance to our discussion is superposition, and interference.If we have two or more photons in phase, their individual intensities will add together to a new higher intensity.

• The superposition approach where waves are added, also has the effect of reducing wave heights when waves are out of phase. At the most extreme, when the waves are 180° out of phase, the resultant wave is the difference in height.

• If the two out of phase waves are the same magnitude, then they will cancel out (interfere) completely,

• Optical Flats use a transparent surface with high precision finishes.
• a monochromatic light is shone through the optical flat, at the bottom interface, some of the light is reflected back, while some light escapes to reflect off the surface, and back through the flat. It is when some of the light is reflected at the back side of the optical flat that the beam is split. The distance between the flat and the surface then changes the pathlength of the two beams. As they are reflected back, the light waves interfere, and create light/dark fringes that are a function of distance between the flat and the plat.

• There are some mathematical relationships that should be observed,

• Lets consider a lapped surface that is examined under an optical flat, with a helium light (with a wavelength of 23.2 μin.).


• There are three basic types of interferometers for surface texture measurement
- flatness type interferometer
• Interference Microscopes - used for analysis of surface texture analysis. The example below shows the instrument being used to examine a gauge block.

• Flatness type interferometer - this type of interferometer is used to compare the parallelism of the top and bottom faces of the gauge blocks. This microscope has a base plate with a lapped finish. The gauge blocks are wrung to the surface, and then the patterns on the top and bottom are compared.


• Gauge Block Interferometer - This instrument is used for height measurements. using four different frequencies of light. (red, green, blue, violet). The example below shows and example of its use.


• To consider an example of measuring the height of a gauge block using the interferometer,


• The use of this magical slide rule is described below,
