|
|
|
|
|
|
|
|
19.5 TUTORIAL - EMCO MAIER PCTURN 50 LATHE
������������Part of this tutorial is based on work done by Jonathan DeBoer.
The lathe is shipped with software that is meant to emulate shop floor interfaces. We don't have the keyboard refered to in the manuals, so we need to use special key stroke sequences on the PC keyboard.
To quit the program at any time press <ALT><F4>.
2. Connect the air supply to the lathe and (the regulator on the lathe should be between 25 and 75 psi). Ensure that the lathe is connected to the PC with the DNC cable. The computer card must also have a terminator on the second connector - this is an empty connector. Turn on the lathe with the key on the side of the unit. Aside: notice the cable that connects the lathe and the control computer, it uses RS-485 for communication. The communication protocol is DNC.
3. Turn on the PC, once it is booted the emco control software should run automatically. (Note: if it doesn't run, find the 'winnc' software and run it.) If the lathe is running the screen should appear without warnings. Turn off the lathe for a few seconds and then turn it on again. An error message should appear on the screen - press <ESC> to clear it. If hitting <ESC> doesn't clear the erro messages ask the instructor for help.
4. There are two main display screen on the PC. The first is the 'operational screen', which is called with <F1>. The other is the 'display screen' which will display machine coordinates, it is called with <F12>. To see the general machine setup press <F3> for 'PARAM' details. Find the communication type by pressing <F4> to give the diagnostics of the RS-485 port and the software version.
5. We must zero the lathe before performing other operations. To do this first hit `F1' and then `F7-ZRN'. A small label `ZRN' should appear near the bottom of the screen. Press `4' on the number pad of the keyboard - the lathe should move in the `x' direction. Next, press `8' on the keyboard, the lathe should move in the `z' direction. After all motion has stopped the lathe is calibrated, and it will be put in jog mode. Function keys are the main method used for inteacting with the lathe. As these keys are pressed the key choices will be updated on the bottom of the screen.
6. You can move the lathe with the keys on the number pad as well as perform other function. Note that many functions can only be used with the door open or closed, and the chuck open or closed as indicated.
7. Put the computer into the display screen with <F12> and then <F3> to put the display into absolute coordinates. Move the tool about with the number keys (4, 6, 2 and 8). Notice that a positive 'X' (radius) value moves the tool out of the work, and when the tool is near the center of rotation for the work it is '0'. A negative value would cut entirely through the work (bad). Notice that the 'Z' axis has a value of zero near the chuck, and a positive values moves away. For both cases negative values, or values near zero are both dangerous and should be avoided.
8. Put the computer into relative move with <F4> and move the tool. Notice how the coordinates change.
9. Calibrating the coordinates for the machine is very important. To do this we begin by setting the 'Z' offset for the machine. In the display screen select 'POS' then 'ABSOLUTE' mode. In the operational screen select 'JOG' mode.
10. By default the center of rotation (X=0) will always be fixed but because different chucks with different length jaws can be added the Z=0 value may move. Before any other operations we must set the Z=0 location. Move the tool turret (note: not the tool) until the side touches the jaws of the chuck. DO THIS CAREFULLY!! A piece of paper can be placed between the two to give a safety margin of a few thousands of an inch. If the motion is too fast, slow the speed rate with '-', or increase it with '+'. When the paper between the turret and chuck jaws won't move write down the 'Z' value (call it A). We will use this as the Z=0 for the machine.
11. In the display screen select 'OFFSET' and then <F5> for 'WORK SHIFT'. Enter the negative of the value ("Z-"A) that was written down in the last step. For example if the Z value found earlier was "1.123" type in 'Z-1.123". At this point the Z=0 location is defined.
12. Each tool will have its own geometry, and each one must be defined separately before running G-code programs. In total, the lathe will store up to 16 tool geometries. These can then be related to one of three/six positions in the turret. When calling a tool in a G-code program use 'Txxyy' where 'xx' is the turret location of the tool and 'yy' is the geometry number to use. So a tool in position '2' in the turret using defined geometry '5' would be called with 'T0205'. Put a turning tool in turret position 3.
13. First set the Z offset for the tool by turning the turret so that tool is presented to the work. Move the tool so that it touches the jaws of the chuck as before. In the display screen select 'OFFSET' and <F4> for 'GEOMETRY'. Select tool number '8' and then hit 'Z' and then enter to store the Z=0 value for that tool.
14. To set the X offset for the tool, put a workpiece in the chuck and measure the diameter with a micrometer (as B). Carefully move the tool so that it touches the outside radius - don't use a piece of paper for this step. Go to the display screen and select 'POS' and <F3> for absolute position display. Write down the X value displayed (as C). Calculate the offset using 'D = C - B/2'. Select 'OFFSET' then <F4>, and select the tool number. Enter the offset using 'XD'. For example if the offset you calculated was '1.432' enter 'X1.432'. The tool geometry has now been set.
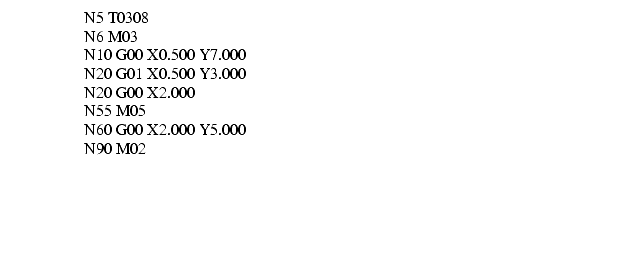
12. On another computer use a text editor to create a textfile like that below. Call the file test.nc. This will be a test G-code program to try with the lathe. When done copy it to a floppy disk, move the disk back to the lathe control machine.
13. Now we will load the NC code from disk into a program number. In the operational screen put the software in 'EDIT' mode, and on the display screen select 'PGRM' mode. Programs are numbered from 1 and 9499. There should be an upper case 'O' before the program number. A program can be selected from the list or a new program number created by entering zero........................
14. Before cutting the part it is always advisable to simulate the G-codes. This can be done on the operational screen by selecting 'GRAPH'. Important details to watch for are overcuts (negative in the X direction) and tool crashes, where the head-stock or tail-stock are hit by the cutter.
15. Now we will run the program. Before doing so locate the emergency stop button on the lathe. NOTE: Whenever running a program for the first time it is a good practive to keep your hand over the stop button, and watch the cutter to make sure it doesn't crash. To run the program, select the operation screen and choose 'AUTO'. If you are very unsure of your abilities also remove the work from the chuck and run the machine without a prt.
16. Remove the work from the chuck. In the display screen select 'PRGRM' mode and select the program number just loaded. Hit '0' on the numeric keypad to 'RESET' the machine and then <ENTER> to run the program.
17. Programs can also be entered directly into the WINNC software. To do this start in the operational screen and put the controller in 'EDIT' mode. Then enter the 'PRGRM' mode in the display screen. Select a program number and enter the program below. When done simulate and then run the program.
Search for More: |

Custom Search
|
|