
|
|
|
3.7 Gage Blocks
������������The purpose of gauge blocks are to provide linear dimensions known to within a given tolerance.
The requirements of gauge blocks are,
most gauge blocks are made by normal techniques, but the high accuracy is obtained by a process called lapping (discussed later)
The materials gauge blocks are made from are selected for,
there are four grades of blocks,
Original gauge block sets had lower tolerances and had a total of 91 pieces with values,
An 81 piece set of gauge block was developed by Johansson(s??) and is capable of covering wider ranges of dimensions.
An 83 piece set has also been developed and it has the values (in inches),
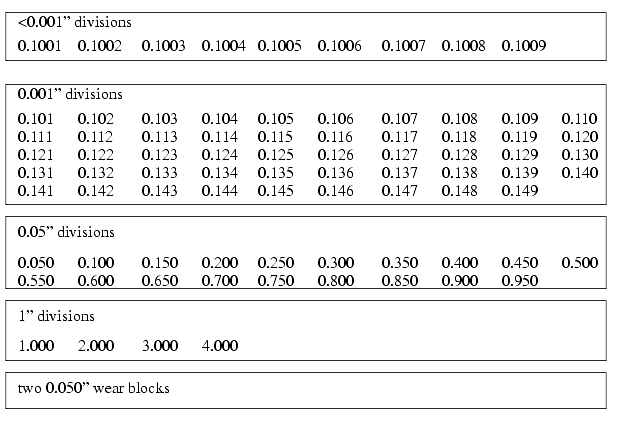
The metric set has 88 gauge blocks (in mm),
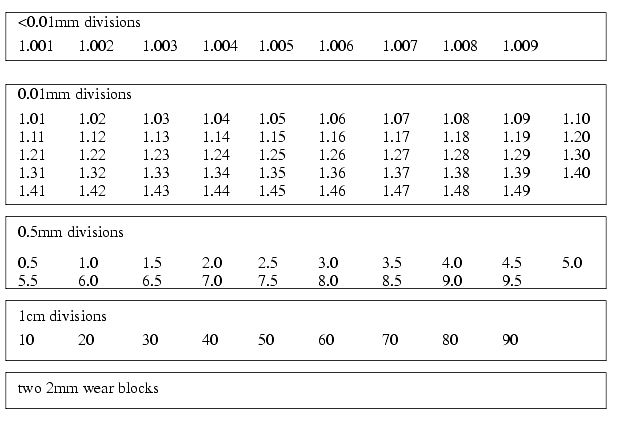
Most gauge block sets include thin wear blocks that should be included at the ends of a gauge block stack to protect the other gauge blocks.
How to select gauge blocks for an application
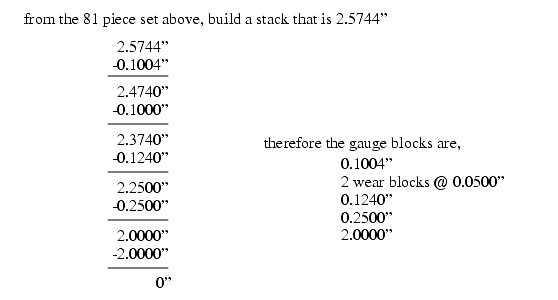
To assemble a gauge block stack,
2. clean of the oil that they have been coated in using a special cleaner. It is acceptable to handle the blocks, in fact the oil from your hands will help them stick together.
3. one at a time, hold the blocks so that the faces just overlap, push the blocks together, and slide them until the faces overlap together. This will create a vacuum between the blocks that makes them stick together (this process is known as wringing).
When using gauge blocks, minimze the number used. Each block will have tolerance errors, and as the stack of blocks becomes larger, so does the error.
Do not leave gauge blocks wrung together for long periods of time.
3.7.1 Manufacturing Gauge Blocks
������������The basic sequence of operations is,
Johansson's procedure to make the first set (????)
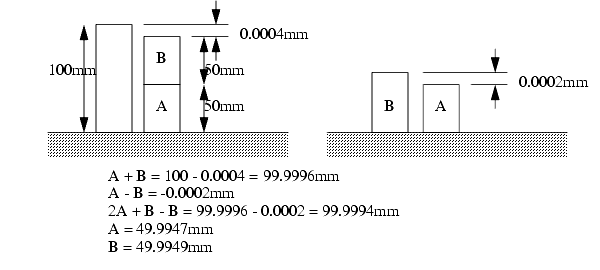
2. the parts to be lapped are secured to a surface plate magnetically (The positions are as shown below.
4. the lapping plate is removed, and the blocks are repositioned on the surface plate (as shown below) and the process is repeated.
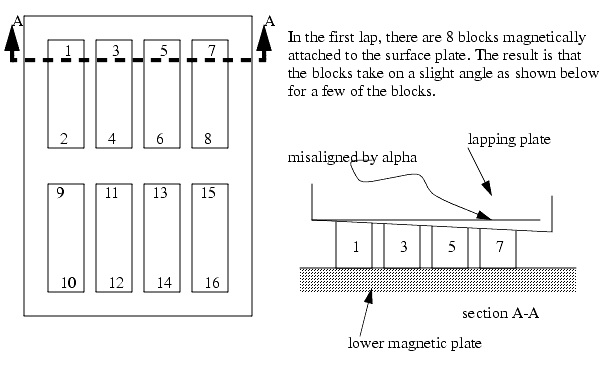
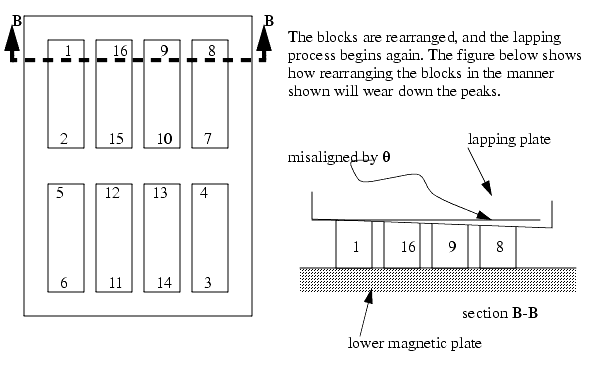
As each stage of lapping is done, the blocks become more even in size, and the lapping plate become more parallel with the lower plate.
Next, knowing the gauge blocks are all very close in size, the stack of 8 blocks are wrung together into one pile, and compared to the master block using a comparator. The difference in heights, divided by eight, is the error in each block.
3.7.2 Compensating for Temperature Variations
������������As gauge blocks change temperature, they also change size. The metals chosen for gauge blocks do resist this dimensional change, but will generally undergo some.
The gauge block sets will carry dimensional readings, as well as rated temperatures. It is advised that all readings be taken at these temperatures, but if this is not possible, then some estimate of the dimensional change can be done.
Basically this is done by using the difference between specified measurement temperature, and actual measurement temperature. This difference is multiplied by the coefficient of linear thermal expansion to give the change in size. This is obviously for small changes in temperature.
Typical coefficients of linear thermal expansion is,
Note the units are also ppm/°K
3.7.3 Testing For Known Dimensions With Standards
������������When a dimension is well known, it can be measured by comparison to standards, using high precision, but limited range comparison instruments.
Most gage blocks are steel which has a non-trivial coefficient of thermal expansion. But, considering that many parts are made of steel, these blocks will expand at approximately the same rate as the parts, and therefore no temperature compensation is required.
If the gage blocks are made of the same material as the parts temperture compensation is less significant.
For high accuracy measurements we want to allow temperatures of gages and parts to stabilize.
The ISO 1 and ANSI Y14.5 standards speify a typical dimensional ambient temperature as 20°C.
Materials may vary widely from the listed coefficient of thermal expansion. As a result it is best to take them to 20±0.1°C for high precision measurements, and 20±0.01°C for critical measurements.
3.7.4 Odd Topics
������������There are also a number of angular gauge blocks for the measurement of angles. The two common sets are,
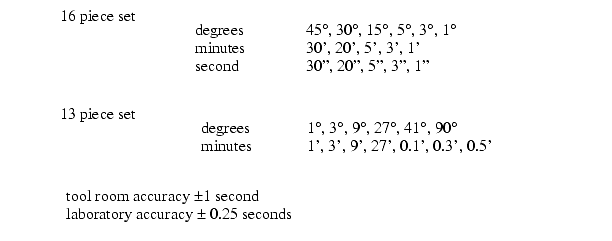
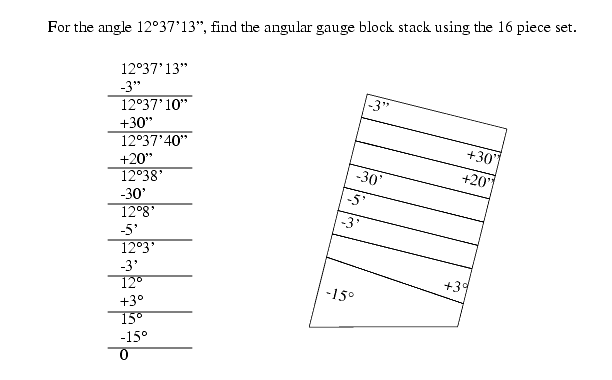
The selection of angular gauge blocks is similar to the selection of linear gauge blocks, except that subtration may also be required. (When the blocks are stacked, then angles are simply reversed.
3.7.5 Limit (GO & NO GO) Gauges
������������These gauges are made for simple pass/fail inspection
Basically there are two separate, or combined gauges for each feature to be measured.
One gauge must fit inside the feature, and the second must not. In other words the GO gauge must fit inside/outside the feature, the NO GO gauge must not. If the GO gauge does not fit, the tolerance is above the maximum metal tolerance. If the NO GO gauge goes, the feature is below the minimum metal tolerance.
This method is best suited to unskilled operators testing many parts, although more modern quality methods suggest this procedure should be replaced with Statistical Process Control (SPC).
This method can also be used for inspection rooms, and limited runs using gauge blocks.
3.7.5.1 - Basic Concepts
������������The GO gauge is made near the maximum metal condition. The GO gauge must be able to slip inside/over the feature without obstruction.
The NO GO gauge is made near the minimum metal condition. The NO GO gauge must not be able to slip inside/over the feature.
The terms minimum metal condition, and maximum metal condition are used to describe the tolerance state of a workpiece. If we assume (at least for now) that all parts are made by removing metal from larger pieces, then we are trying to remove a certain amount. If we are drilling a hole the maximum metal condition will be when the hole is small, and extra metal is `left behind'. The minimum metal condition would be when the hole has been overdrilled and as little metal as possible is left behind. The tolerances often set the acceptable maximum and minimum metal conditions. If features are external, the maximum metal condition is their largest size, and minimum metal condition is their smallest size.
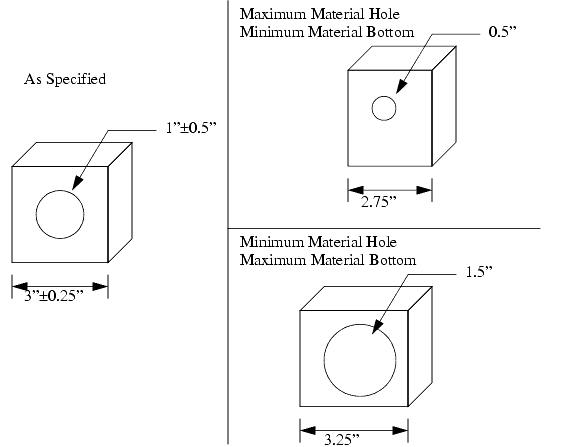
A basic set of shapes these typically deal with are,
These are good for work tolerances down to about 0.002" (anything less should use comparators)
3.7.5.2 - GO & NO GO Gauges Using Gauge Blocks
������������Simple GO & NO GO gauges for internal features can be made from gauge blocks.
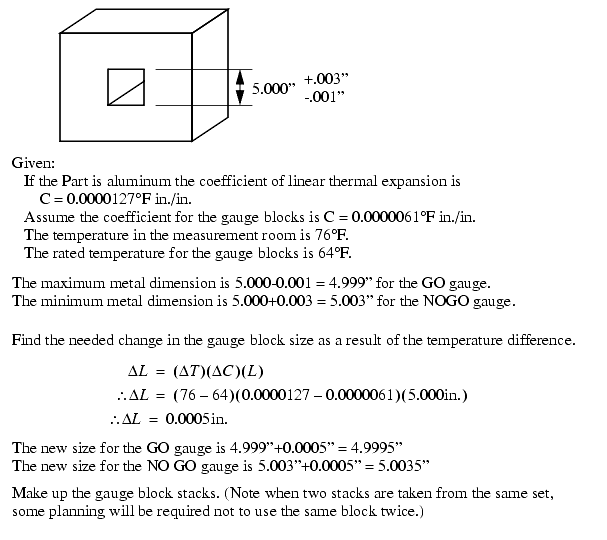
3.7.5.3 - Taylor's Theory for Limit Gauge Design
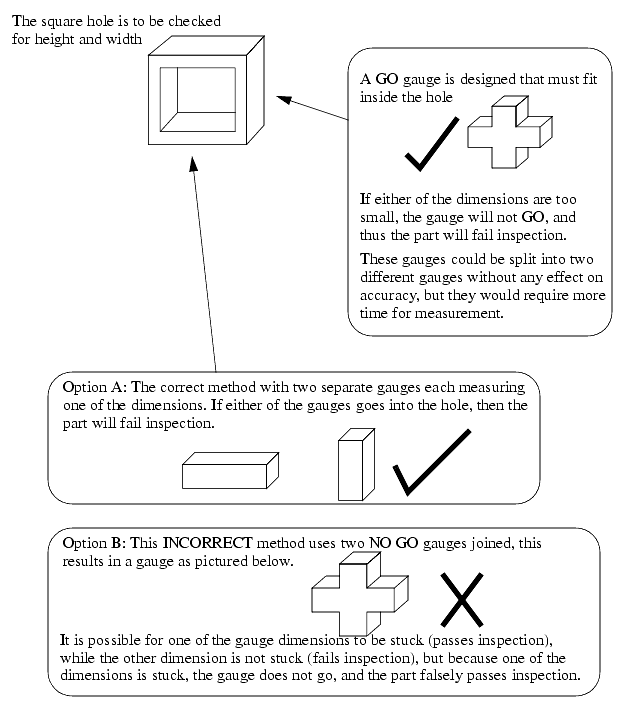
������������1. GO gauges should check all features for maximum metal condition at one time
2. NO GO gauges should check only one feature at a time for minimum metal condition
The example below should illustrate the two points,
3.7.5.4 - Gauge Maker's Tolerances
������������Because gauges have to be manufactured themselves, they must also have tolerances asigned.
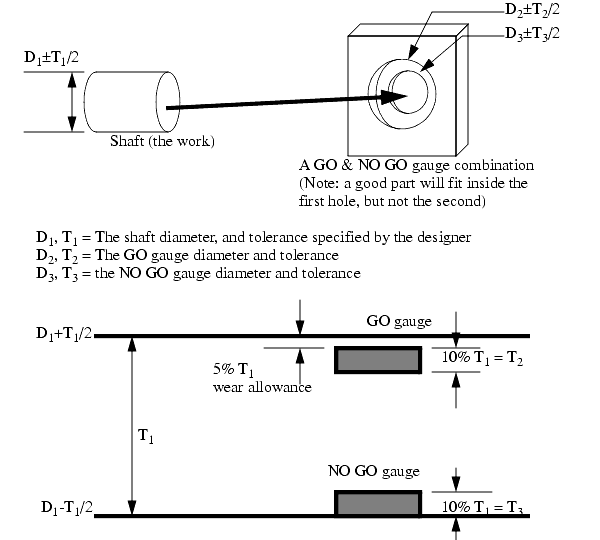
The Unilateral System is very popular,
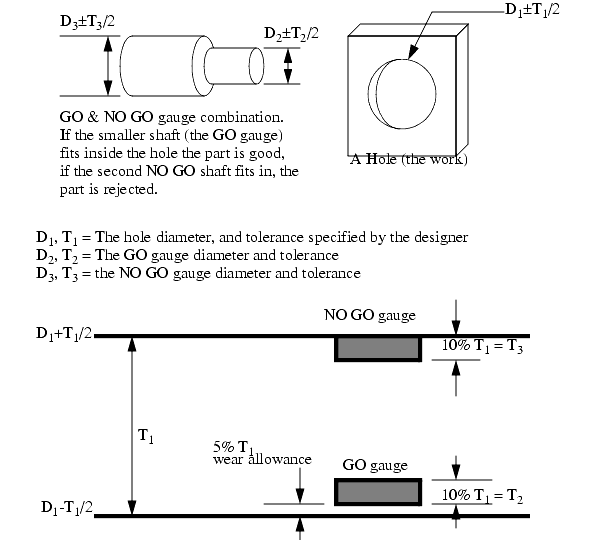
2. If work tolerances are above 0.0035", a wear allowance of 5% of the work tolerance is added to the GO gauge only
3. All gauge tolerances are made to fall within the work tolerance zones. The effect is that the gauges will always be between the maximum tolerance limits, and no bad parts should be accepted. The only downside is that some good parts will also be rejected.
An example of the Unilateral Tolerance System applied to GO & NO GO gauges is given below, as applied to a shaft (here we are measuring external features). The gauge shown is a gap and ring gauge.
We can also look at an example of a hole that is to be measured with GO & NO GO gauges (an internal feature). The gauge shown is a Plug Gauge.
3.7.6 Sine Bars
������������When a reference for a non-square angle is required, a sine bar can be used.
Basically a sine bar is a bar of known length. When gauge blocks are placed under one end, the sine bar will tilt to a specific angle.
The figure below shows a sine bar from the side,
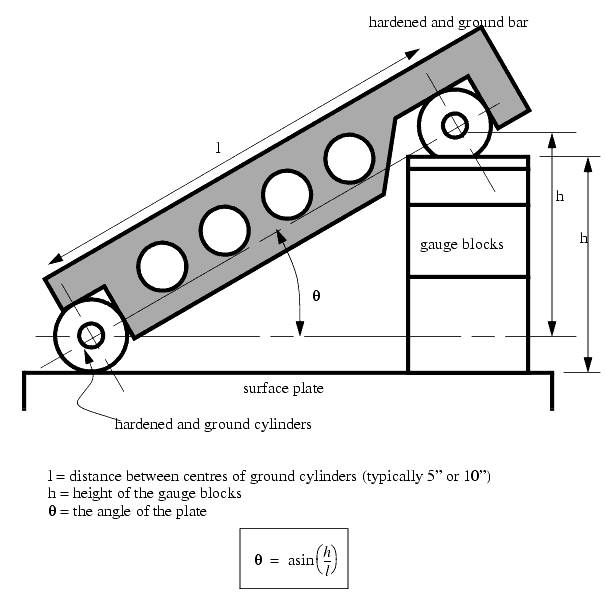
A simple example is - set up a sine bar with an angle of 24°-57', if the sine bar has 5" centres.

The sine bar shown above will only allow a single angle to be set, but in some cases we want to set two angles, for this a compound sine plate is used.
3.7.6.1 - Sine Bar Limitations
������������When using a sine bar, the height setting is limited by the gauge block divisions available (often 0.0001"). This results in an error that may be negligible, or in some cases quite significant.
A simple example to illustrate this effect is given below for two extreme cases. In the first case the sine bar is near horizontal, in the second case it is near vertical. Assuming a sine bar with 10" centres, and two angles of 1°-30' and 88°-00', and that an 84 piece gauge block set is used.
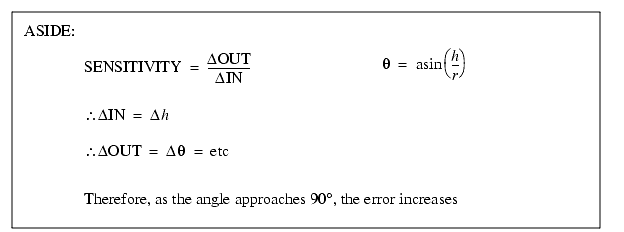
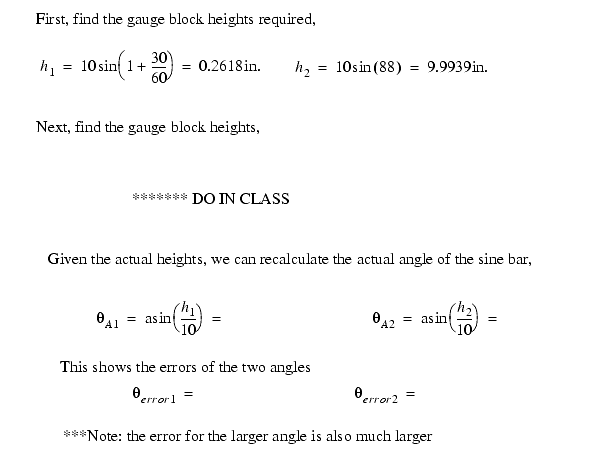
In any of these cases we can see that at larger angles, the sine bar is susceptible to errors in the length of the sine bar, as well as in the height of the gauge blocks.
3.7.7 Comparators
������������Accuracies commonly below 1/10 thousandth of an inch
These instruments try to reduce the friction that is such a problem for the dial indicators
There are four common principles used to design these instruments,
comparators have very limited ranges of motion, but very high sensitivities (and therefore accuracies). As a result the comparators are often calibrated against standards such as gauge blocks.
The basic requirements of these instruments are,
3.7.7.1 - Mechanical Comparators
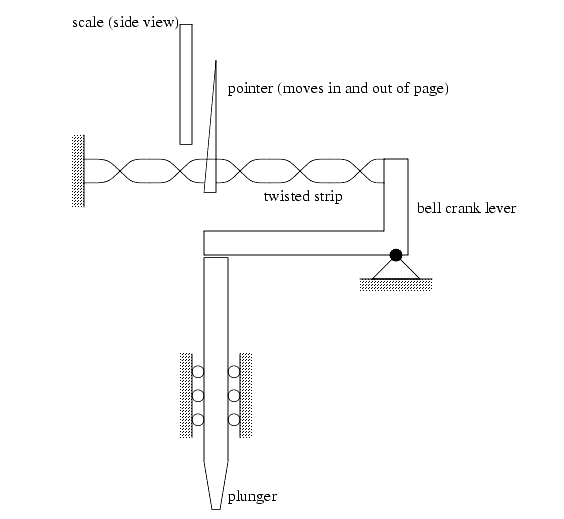
������������The Johansson Mikrokator used a twisted strip with a pointer attached. as the plunger is depressed, it causes the strip to stretch. As the twisted strip is stretched, it changes the angle of the pointer, and thus the indicated deflection.
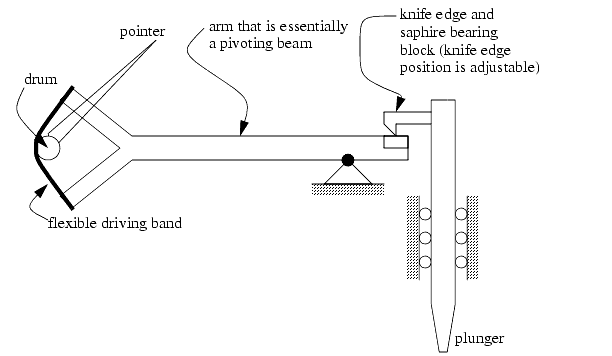
The Sigma Mechanical Comparator uses a partially wrapped band wrapped about a driving drum to turn a pointer needle.
3.7.7.2 - Mechanical and Optical Comparators
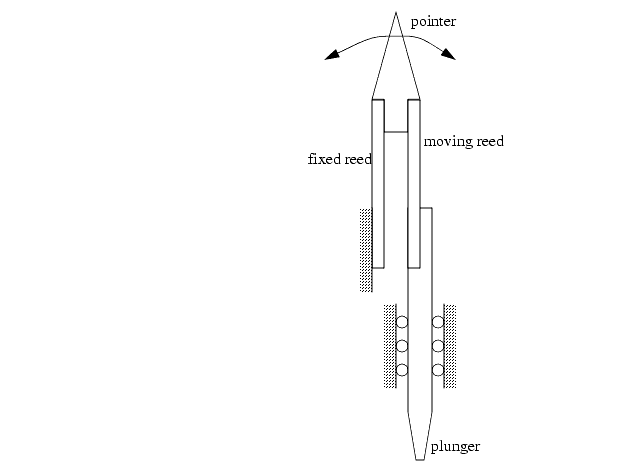
������������The Eden-Rolt Reed system uses a pointer attached to the end of two reeds. One reed is pushed by a plunger, while the other is fixed. As one reed moves relative to the other, the pointer that they are commonly attached to will deflect.
3.7.7.3 - Optical Comparators
������������These devices use a plunger to rotate a mirror. A light beam is reflected off that mirror, and simply by the virtue of distance, the small rotation of the mirror can be converted to a significant translation with little friction.
3.7.7.4 - Pneumatic Comparators
������������
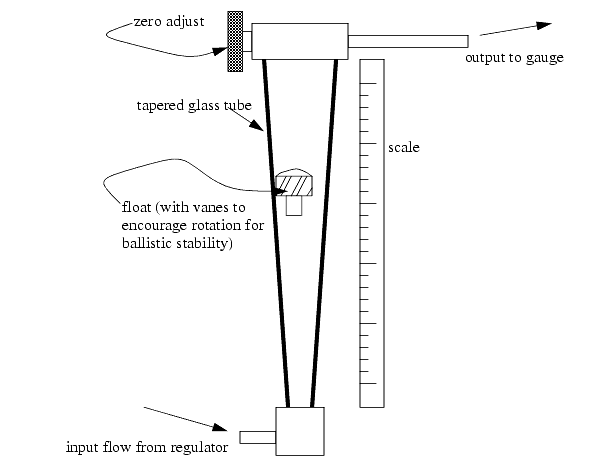
The Soloflex Back Pressure System uses an orifice with the venturi effect to measure air flow. If the gas is not moving, the pressure on both sides of the orifice will be equal. If the flow is moving quickly, the air pressure on the downstream side of the orifice will be at a lower pressure.
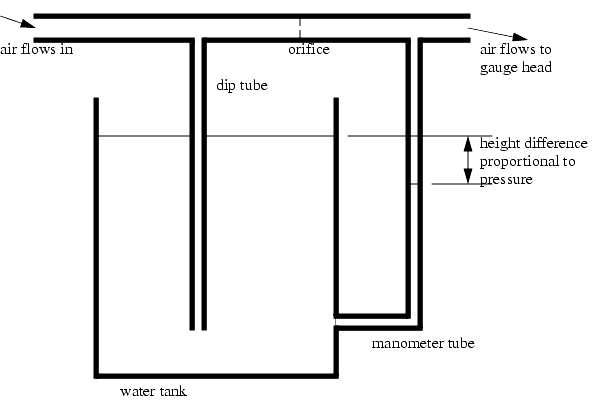
A Differential Back Pressure system uses a split flow channel, one flow goes to the gauge head, the other goes to a zero offset valve. A meter measures the difference in pressures, and thus gives the differences in pressure.
Search for More: |

Custom Search
|

|