Jack, H., “Fixtureless NC Machining for Rapid Prototyping”, A chapter in the book Rapid Response Manufacturing, edited by J. Dong, Chapman & Hall, 1998.
Fixtureless NC Machining for Rapid Prototyping
10.1. Introduction
Recent developments in Stereolithography and other related processes have challenged the role of cutting machine tools in producing prototype parts. The newer technologies propose faster turnaround at lower costs per part. But the initial expenditure and material costs for these processes is high and the varieties of materials is limited. Many manufacturers are not willing to experiment with newer methods would benefit by parts produced on conventional NC milling machines, but using the philosophy of the rapid prototyping processes.
A recently developed process uses composite layers of thermoset and thermoplastic polymers, among other possible combinations. These categories of materials are common and can be purchased at any local hardware store. Essentially a layer of thermoplastic material is heated, poured and allowed to harden. A cavity is then milled, and filled with the thermosetting material. This process of making layers is repeated above the bottom layer(s) until a complete thermoset shape is enclosed in a block of thermoplastic. This material is then melted away and the solid part remains. As an example, a ball could be made in two layers.
10.2. The State of Industry
The range of tools available for design engineers is steadily growing. Computer Aided Engineering tools such as Finite Element Analysis allow for estimates of stress/deformation, heat, magnetic fields, etc. Using these the designer is able to test virtual prototypes at lower cost and higher speed. Even with these tools the building of prototypes is sometimes necessary, but using the conventional machine shop can be expensive and slow. Prototype parts can be used to test look and feel, test assembly techniques, test function, and build tooling. New techniques for building prototypes include Numerical Control machining and Stereolithography. These processes focus mainly on decreasing part production times, and as a result they also become more economical.
The family of processes that are often considered to be the most successful Rapid Prototyping techniques are called Free Form Fabricators. A very simplistic list of characteristics for free form fabricators is,
complex geometries: including assemblies and hidden features
short fabrication times: typically hours or days
parts for testing: at worst parts will seem like a brittle plastic
the processes are automatic
Free form techniques tend to have little shape preference when building and are capable of producing parts with a topological genus greater than one (e.g. assembled chain links).
Of all the Rapid Prototyping tools available, we can dichotomize the types of processes into additive and subtractive [6]. Subtractive processes form a shape by removing small quantities of metal from a larger piece. The conventional machining techniques (eg, turning) would be classified as subtractive. On the other hand, additive processes build parts by adding material to a based part. The newer free form fabrication techniques are almost exclusively additive. Until recently the subtractive processes we the only major alternative available. Some manufacturers have begun to use the additive techniques. Some of the reasons for adopting these technologies are,
fast part production: very short turnaround times
CAD models used directly
reduced need for skilled supervision
to reduce prototyping costs
The additive technologies are quickly finding their place in the engineers office [3], within industries such as automotive and aerospace [6]. Outside of the typical applications they have been used for medical prosthetics [1], surgery models [17] and Molecular Models [14].
10.2.1. Additive Processes
Additive processes incrementally build a part by adding small amounts of material to a base part. This material is typically added in thin planar layers, or extruded along paths, with a thickness of 0.03mm to 0.5mm. Some of the well known techniques employing these methods include,
SLA: StereoLithography Apparatus
SGC- Solid ground curing
LOM: Laminate Object Manufacturing
SLS: Selective Laser Sintering
BPM: Ballistic Particle Manufacturing [5]
MJM: Multi-Jet Modelling
FDM: Fused Deposition Modelling
Sander’s Prototype
DDP: Droplet Deposition on Powder
MD*: Mask Deposition
These processes involve a number of unique approaches. (except where stated, all other references in this section are from [6]) SLA and SGC both use lasers and photopolymers to build parts. In both cases thin layers of the photopolymer are incrementally added in a liquid state. With STL each layer is hardened by a laser that scans across the surface in a combination of raster and vector patterns. With STL supports might be needed to make the part stable. With SGC the polymer is partially occluded by a mask (for the new layer) and is exposed under a UV light. The main differences between the techniques is that STL uses a large vat of polymer that the part is lowered into as it is produced, SGC removes unhardened polymer and replaces it with wax, as a result the supports needed in STL are eliminated. In both cases the materials are somewhat expensive, and the machine costs are relatively high. 3D Systems Inc, offers a system with a work volume of 0.5m by 0.5m by 0.6m with an accuracy of 0.05mm (accuracy is crudely chosen as the larger of resolution and repeatability) at a cost of $US450 thousand. Cubital Ltd. offers a machine with a work volume of 0.35m by 0.5m by 0.5m with an accuracy of 0.15mm at a cost of $US550 thousand.
LOM parts are built by adding material from rolls of material, and then they are cut using lasers using vector patterns. Typical materials include plastics papers, etc. One of the major problems with this technique is that during processing excess material is left to support the part, but in post processing this becomes difficult to remove. Also, any sloping surfaces not close to vertical cause problems. The materials for this process can be very low, but the equipment costs can still be relatively high. Helisys, Inc. Sells a machine with a work volume of 0.56m by 0.81m by 0.51m with an accuracy of 0.25mm at a cost of $US180 thousand.
SLS uses fine powders that are added in layers and sintered together using a laser. This process can use a wide variety of materials, but at this point they are generally low temperature plastics. Material costs for this process are generally low, but the equipment cost is high. DTM Corporation sells a machine that has a work volume of 0.3m by 0.38m by 0.38m with an accuracy of 0.25mm to 0.13mm at a cost of $US289 thousand. Materials such as ABS have been used [13]
BPM and MJM use moving heads to spray fine particles of material onto a lower part. MJM [11]: 3D systems produces a machine with a work volume of 0.20m by 0.20m by 0.25m with an accuracy of 0.08mm or more, at a cost of $US60 thousand [2]. BPM Technology markets a machine with a work volume of 0.15m by 0.2m by 0.25m with an accuracy of 0.13mm at a cost of $US34 thousand. [7][2].
Sanders’s uses and approach much like a 3D dot matrix printer. The print head can deposit either low or high melting-point materials as it scans across the part. When done the low melting-point material is melted to leave the high melting-point material. This process has the potential to become a low cost process.
FDM effectively uses a 3D plotter that moves about an object and extrudes a bead of material. This method is well suited to shells, but the variety of materials can be limited, the equipments costs have the potential to move into the midrange. Stratasys Inc markets a modeler with a work volume of 0.3m by 0.3m by 0.3m with an accuracy of 0.13mm at a cost of $US172 thousand.[3]
DDP sprays small jets of adhesive onto a powder base material. This hardens the material selectively, and as layers of powder are added and partially hardened, the final part is built. Eventually the loose powder is removed to liberate the completed part. Soligen, Inc., sells a machine that has a work volume of 0.4m by 0.4m by 0.4m with an unspecified accuracy, at a cost of $US250 thousand.
MD* is a research oriented process that uses sprayed metal through masks to form metallic parts [4]. This is of note because it shows an attempt to move towards metal prototypes, and away from the plastics and laminated materials.
At present these processes have a number of difficulties that are being overcome. All of these processes generally produce non-metallic parts from limited ranges of materials. These are not suited for rugged testing. The photopolymer based systems tend to be very expensive to operate because of high material costs (typically > $US100 per liter). Layer thickness results in a trade-off between surface smoothness and build times. The mechanisms (such as laser optics) tend to limit the work volumes, a cubic foot is considered large for many of these processes. Some of the processes are sensitive to setup parameters (eg, humidity and temperature). Some methods require that extra supports be added, requiring extra planning before and after processing begins.
An emerging area of research and development has been techniques for the production of metal parts and tooling directly from various free form fabrication parts. Metal parts can be produced from these using techniques such as investment casting [12]. Short run injection moulding tooling can be produced using spray metal coatings on RP parts [16]
10.2.2. Subtractive Processes
In subtractive processes we generally begin with a block of material and using standard machining techniques (i.e., milling, drilling, turning, etc) we remove material until only the desired part remains. The basic processes are available on most factory floors, and researchers are generating exciting new technologies at all times.
Of greatest note, numerical control machines were first demonstrated in the 1950’s but now are commonly used in most industries. It is possible to buy a desktop manufacturing system including a computer, CAD software, CAM software, and a desktop CNC milling machine to produce small parts for less than US$30 thousand. Giddings & Lewis, Inc. sells a mill that can machine volumes up to 22.4m by 4.5m by 4.5m, to an accuracy of 0.008mm and sells for US$2 to 8 million. Light Machines Corporation sells a desktop NC machine with a work volume of 0.3m by 0.15m by 0.23m with an accuracy of 0.013mm for US$12 thousand. [6]. Many of the problems in cutting processes result because removing material involves significant cutting forces. These cutting forces dictate that the part must be securely fixtures, and the machine tool must be rigid enough to resist deformation. Most subtractive processes have preferred or fixed work axis. For example a drill has a single approach axis, whereas a five axis mill can reach all positions and orientations. To further complicate the situation, the tool may collide with the workpiece (causing gouging for example) or with the fixture. These factors typically require a high level of human involvement for planning and fixturing.
There are alternative subtractive processes. For example EDM (Electro Discharge Machining) removes material using microscopic sparks that melt off small quantities of metal. A wire EDM machine is sold by Sodick Inc., and has a work volume of 0.75m by 0.54m by 0.31m with an accuracy of 0.005mm for $US250 thousand [6]. These processes can very slow, and require conductive workpieces, but there are no cutting forces.
10.2.3. A Case For A Compromise
The additive techniques are currently the subject of enthusiastic research and development by the academic and commercial sectors. By comparison the subtractive technologies have matured, and are well understood and respected in traditional industry. Most manufacturers that are considering additive technologies are faced with having to adopt new technological capabilities, design procedures and fabrication processes. It can be hard to justify rapid prototyping, and based on direct cost savings alone many companies would not be able to justify the expense[15]. Some companies are not willing to make this leap of faith for the promises of eventual payback.
We might be able to overcome the leap to free form fabrication if the initial step were not so large. What most companies would prefer is a technology that employs investments and skill already available in-house, but allows the benefits of the additive technologies. A free form fabrication technique that uses conventional CNC milling machines (note, a subtractive process) would be usable in facilities not willing to commit to additive technologies. There is an obvious conflict if a subtractive process is to be used to perform additive processes. Burns [6, pg.7] indicated that there have not been any processes to date that combine additive and subtractive processes, except for processes that cut sheets, and then bend them into layers. More recently CAM-LEM was developed [8] using stacked layers of laminates, such as green ceramics, that are cut then stacked.
10.3. How To Do Free Form Fabrication With Milling Machines:
Let us consider computer controlled milling machines that are capable of cutting a wide variety of features accurately. A three axis mill is capable of reaching all of the positions in the workspace of the part, but it is incapable of cutting ‘under’ the part. Even a five axis milling machine (that is sufficient to reach the part in any position or orientation) is not suited for cutting ‘under’ the part where fixtured. In both cases the part would normally have to be partially cut, then refixtured to complete the cutting. If we can do the undercuts first, then put the part in front, and then do the overcuts, then this eliminates the problem of tool access to the surface. To do this a layer of disposable material can be deposited, and the undercuts for the final part done first. This negative then acts as a mold for the workpiece. Once ‘cast’ into the mold, the undercut surfaces are complete, and the overcuts on the top surface are then made. This technique will result in a part with a full set of over and under cuts on the external faces.
The physical volume of the tool, chuck and spindle means that it may not reach inside the part to make cuts in hidden, deep, or tight locations. This problem may be overcome if the part is built in layers. Moreover when no internal features need to be cut, the layers can be made thicker.
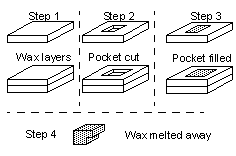
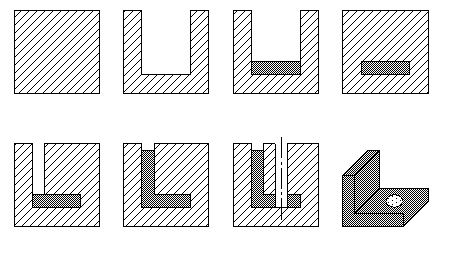
Figure 1: A Simple Example of the AMP Process
This process is called Additive Milled Pocket (AMP) manufacturing. In the example of Figure 1, the idea of cutting layers is illustrated. Basically, a layer of wax is poured and allowed to solidify. Once stable, a pocket it cut, and then filled with a polymer. This is then allowed to harden, and another layer of wax is added on top. Once set, the next layer of wax is cut, and filled with polymer. This process is repeated until the part is complete, and then the wax is melted to reveal the inner part.
10.4. Investigating The Method
The main goal of this method was to use a common CNC machine to do free form fabrication, as a result testing was planned to explore procedural steps for various features. To date testing has been done of the method in general. Future work will focus on the implications of material selection, and cutting conditions. Testing was divided into two steps, a) general procedures and b) normally unmachinable features. First, the general procedures were examined to identify potential problems, and details needed when using the technique. Second, features that cannot be machined easily were considered.
10.4.1. General Procedure and Results
To determine usability, the process has been tested in a number of machines using the general procedures outlined below (more detail is available in [9][10]).
1. Examine the part to find the best orientation, try not to have single surfaces that will both under and over cuts. Divide the part into layers; the layers do not need to not need to be separated by planar sections.
2. Select a container larger than the part to work in, and mount it on the milling machine.
3. Put down a layer of thermoplastic material (wax), it should be thicker than the current layer of the part. Keep in mind that the part is built from bottom to top. A Fan can be used to speed hardening of the wax.
4. Using the CNC Mill cut out the volume of the slice (generally the bottom facing surfaces of the part). At this point the undercut surfaces should be completed, and some material from the layer below. Use a vacuum to remove chips.
5. Fill the cavity with the thermoset polymer (autobody filler), and then allow it to harden. If the mixture is viscous, it may require some working to get it into the corners of the mold. It is advisable to overfill the cavity slightly, as excess material will be removed.
6. Do any overcuts at this point. If any material will join to the layer above it does not need to be cut even, this will happen when the next layer is added. The vacuum can be used to remove chips during cutting.
7. Repeat steps 3 to 6 until the part is complete.
8. The part is now encased in wax and this can be melted off. The wax should be kept and reused.
9. The chips that have been collected during cutting can also be melted. The hardened (and now inert) polymer settles out, and can be disposed of safely, the wax should be reused.
Generally early tests used Paraffin wax and autobody filler. The paraffin wax was chosen because it is easy to remove when the part is completed, but can provide enough strength to support and mold the part. The autobody filler was chosen to be dimensionally stable as it sets, and so that it would pour easily, not melt the paraffin while setting, and not melt itself when the paraffin was melted off. Both of these materials were purchased in hardware and craft stores.
Early tests were done using a drill press with an square end mill cutter. This resulted in crude parts. It was noted that when large volumes of Bodyfiller were used the heat from exothermic reaction rose significantly, requiring care to not melt the wax. Other tests were done using a manual turret mill, The quality of the parts was much higher, but the process was very slow. Dissimilar materials were used to show the capabilities of the process. This was followed with tests done on a large scale 3-axis horizontal CNC mill. The cutting time was very short. The wax setting time was significant, but a fan was used to speed the process. In general it was found that a set of small parts could be produced within a few hours. Recently, two desk top milling machines (and are described later) have been developed for cutting lightweight materials, and with special considerations for this process.
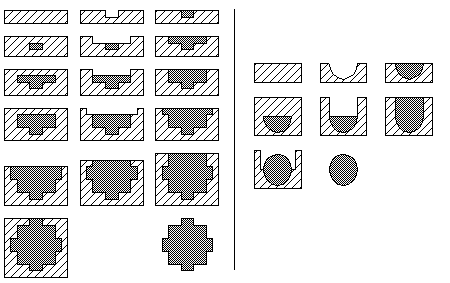
Figure 2: Various Techniques for Making a Sphere with AMP
A simple test geometry can be seen in Figure 2 that illustrates various techniques for producing a sphere. On the left is the sphere cut with stacks of cylinders. Here the cylinder heights create a staircase effect on the surface. This process is also relatively slow, but was found to be necessary when the heat generated by large volumes of setting polymer tended to melt the wax. The technique on the right contains two unique features. First the sphere is cut in two steps only, and second, by cutting rounded surfaces the sphere is smoother (equivalent to a large number of layers).Moreover, using a ball head cutter gave much better surface texture. The cutting process was fairly routine, but the wax needed up to 1/2 hour to set for layers a few inches thick. The polymer typically set in about 10-20 minutes, larger volume set faster because of higher temperatures. Other materials have been investigated as replacements for the wax and autobody filler, but these will be described in future publications.
10.4.2. Special Machining Cases
To determine how this technique extends the normal capabilities of NC machining, thought/practical experiments were conducted. The features considered were identified from a number of sources, including product literature, papers, books, and discussion groups.
10.4.2.1. Small and Special Features
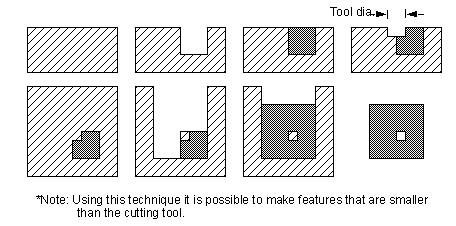
As feature dimensions become smaller than the cutting tool we may change the strategy of cutting layers. For example to cut a narrow square hole in a part we may cut only a few of the four sides first, effectively leaving a thin section of wax in the part, and then in a second operation, cut the slot to a small hole. The example below shows another possibility to create a small hole.
Figure 3: Cutting features smaller than the tool with AMP
It is also possible to use special form tools to obtain high quality features in the final part, such as taps to cut threads. I have also tried pressing shapes for texturing. For example a coin pressed into the wax will give a raised coin impression on the final part.
10.4.2.2. Constructive Solids Geometry (CSG)
Constructive Solids Geometry (CSG) parts use an addition and subtraction of solids to construct a part. It is possible to create a block of wax larger than the final part. This wax will act as a matrix to support the work. We can then cut cavities into the work and fill it with bodyfiller to add to the part, or add wax to subtract from the final part. Figure 4 below shows the creation of a simple primitive shape in the matrix.
Figure 4: Creation of a CSG primitive with AMP
This procedure would basically involved reduction of the CSG expression to a canonical form, and then selecting one primitive shape at a time to add or subtract. An example of this method can be seen in Figure 5 where a fairly common CSG example is shown here.
Figure 5: A CSG constructed part using AMP
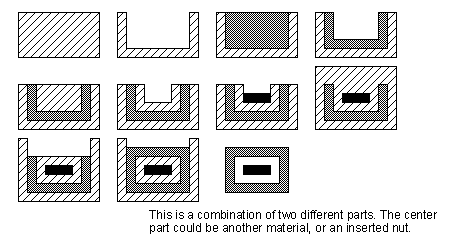
10.4.2.3. Inserts and Mixed Materials
It is possible for the process to be stopped, and special inserts such as nuts or reinforcement ribs to be added during processing. It is also possible to change the type of materials being used in the process, for example, materials of different color could be added. Typical variations that I have tried so far have included glass fibre reinforced plastics (strength), and aluminum filled plastic (thermal conductivity and metallic appearance)
Figure 6: Mixed materials and/or inserts using AMP
10.4.2.4. Assembly and Coatings
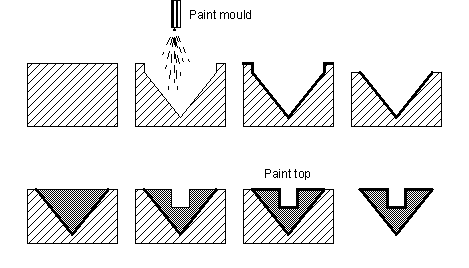
It is possible to have two parts preassembled. For example a hole-shaft pair could be made by putting down half of the shaft, applying a parting agent, then the shaft is built in place. Finally the uncollared part of the shaft is coated with parting agent, and the second half of the shaft constructed. Coatings, such as paint, could be applied to the part. To paint undercut surfaces the wax negative of the bottom facing surfaces are painted before the bodyfiller is added. Overcut surfaces are painted after they have been cut.
Figure 7: A part painted in the mould using AMP
10.4.2.5. Handy Extras
Unlike the methods that are purely additive, or subtractive, mistakes or random failures can be undone. For example a designer may notice during the build of the part that a feature is round when it should be square. The process could be stopped, and the hole replaced by the correct shape, and cutting could continue. Similar and common problems might be material runs out, a flaw in the part, etc. Cutting speeds and tools can be varied to suit various features and surfaces finishes. The use of lighter weight materials means that higher speeds and feeds are possible.
10.4.3. A Specialized Machine
As mentioned before, specialized machines have been designed and built for the AMP process. These were designed with the objective of making the structure lighter because of reduced cutting forces, and they have also endeavored to incorporate the wax and polymer feeders. The basic setup for one of the fully automated AMP machines is shown in Figure 8 below.
Figure 8: System diagram for a dedicate AMP machine
This system uses stepper motors for positioning in X and Y by moving the table. To do this the stepper motors drive gear boxes that in turn drive timing belts attached to the table. The Z axis is actuated using a rack and pinion driven mechanism. Because stepper motors are used on all axes, position feedback is not necessary. The vacuum is controlled by a relay that switches 115VAC. The milling head (a Dremel Moto-tool) has a relay switched 0V/3V/6V supply that allows variable speeds. The cutting head in use is a small hobby handtool that is essentially a hand held machine spindle. There is a wide variety of toolbits available for this handtool. It is recommended that a cutting tool with a low or negative rake angle be used because of the materials being used, and to reduce the upward forces on the material. The wax/polymer feeders use solenoid actuated valves and all tanks are under a light pressure to overcome viscosity of the liquids. The wax tank also has a small heater inside to keep the wax in a liquid state.
The sections of the system mentioned above have been completed, but a couple of outstanding tasks remain. First, the mixing head for the thermoset polymer is demanding in that it needs to be able to take two different materials with moderate viscosity (generally 1000-3000 cps) and mix them thoroughly. The mixed material is then dispensed. The difficulties come in dealing with any residue that will fully harden before the mixing head is used again. This issue is being examined and will be resolved in the near future. Another ongoing concern is the control software. At the low level this system requires a driver for the machine using some sort of numerical control code. Control software using G-Code has been implemented, but at the higher level a solid modeler is required to generate NC code automatically.
10.4.4. Identified Questions:
Some preliminary work on optimal cutting conditions for these materials have been done. But the fact that for best utilization of the technique these materials will be cut before they have fully hardened, thus introducing non-linearities. The search for alternate materials is an ongoing quest. As of the time of writing there were dozens of build materials, and a few matrix materials found to be suitable. The materials also have an effect on the accuracy and repeatability of the process.
10.5. Conclusion
In general the AMP process has shown a great deal of potential, and another set of investigations is being planned.
10.5.1. Advantages/Disadvantages
The advantages can be summarized as,
thicker layers decrease part production time
makes use of an existing base of NC mills
materials are inexpensive, and very easy to obtain
safety concerns are minimized
existing machining systems provide strong support
sizes well above 1m/1yd are possible
parts could be painted during production
inserts are easy to add
no assembly is required
the matrix (e.g., wax) can be collected and reused
The specific disadvantages of this techniques are,
more sophistication is required in the control software
intermittent mixing of thermoset materials can be difficult
shrinkage of materials may require dimensional compensation
10.5.2. Summary
A process was presented that uses a hybrid of additive and subtractive processes for rapid prototyping of parts. The basis of the operation is wax layers that are poured and allowed to harden. Pockets are then cut into these layers, and a hardening polymer is poured in. Once both are solidified, the top of both surfaces is milled flat, and a new layer of wax is added. This continues until the entire part is built up, at which time the wax is melted, and the encased part removed. This process can be done in any machine shop using standard milling machines. The total retail costs for consumable supplies could be less than $20 for a simple model, as compared to the initial capital costs of $US35 to 500 thousand for an additive process, and typically high material costs. Even more importantly, this process also draws on the experience base of existing machinists, and utilizes an existing infrastructure for machine tools.
Acknowledgments
I must mention my Research Assistants: Rob Tremblay made a major contribution, others include Kevin Moss, Mark Doogan, Andrew Duncan, Jim Vergas and Mark Phoa. This research was made possible through internal support by Dr. R. Guerriere and Dr. W. White.
References
[1] Aronson, R.B., “Spare Parts for the over 50 Crowd”, Manufacturing Engineering, pp. 87-92March 1996.
[2] Ashley, S., “Rapid concept modellers”, Mechanical Engineering, January 1996.
[3] Ashley, S., “A new dimension for office printers”, Mechanical Engineering, pp. 112-114, March 1996.
[4] Beck, J.E., “Manufacturing Mechatronics Using a Recursive Mask and Deposit (MD*) Process”, Carnegie Mellon University Report #EDRC 01-20-95.
[5] BPM Technology, phone (803) 297-7700
[6] Burns, M., Automated Fabrication; Improving Productivity in Manufacturing, Prentice Hall, 1993
[7] CAD Systems, “Desk-side Personal Modeler(TM) from BPM”, Kerwill Publications, Mississauga, Ontario, Canada, pg. 23, June 1995.
[8] Cawley, J.D., Heuer, A., Newman, W., “Solid Freeform Fabrication Directly in to Engineered Ceramics”, a presentation at the ASM Material Congress, Cleveland Ohio, October 1995.
[9] Jack, H., Fabrication Method, A U.S. patent application filed October 27th, 1995.
[10] Jack, H., “Additive Milled Pocket Manufacturing“, Canadian Society For Manufacturing Engineers Conference Proceeding, June 1996, Hamilton, Ontario, 1996
[11] Manufacturing Engineering, “Print 3-D Models Fast”, In the Techno Front Section of Manufacturing Engineering, pg. 24, January 1996.
[12] Mueller, T., “Developments in Rapid Prototyping Techniques for Die Cast Parts”, Rapid Prototyping, Rapid Prototyping Association of the Society of Manufacturing Engineers, vol. 1, no. 4, 1995.
[13] Rapid Prototyping Association, “Advances in Materials”, an article appearing in the Rapid Prototyping newsletter, Society of Manufacturing Engineers, Vol. 1, No. 4., pp. 5-7, 1995.
[14] Sims., D., “Molecules at Your Fingertips”, IEEE Computer Graphics and Applications, pp. 14-16, November 1995.
[15] Sorovetz, T., “Justifying Rapid Prototyping”, Manufacturing Engineering, pp. 25-29, December 1995.
[16] Wohlers, T., “Rapid Prototyping State of the Industry 1994-95 Worldwide Progress Report”, a reprint issued by the Rapid Prototyping Association of the Society of Manufacturing Engineers, 1995.
[17] Zollikofer, C.P.E., Ponce deLeon, M.S., “Tools for Rapid Prototyping in the Biosciences”, IEEE Computer Graphics and Applications, pp. 48-55, November 1995.