Jack, H., Karlesky, M., “A Virtual Manufacturing Laboratory”, ASEE National Conference Proceedings, Seattle, July, 1998.
A Virtual Manufacturing Laboratory
by Hugh Jack and Michael Karlesky, Padnos School of Engineering, Grand Valley State University, Grand Rapids, MI
Abstract
A virtual manufacturing laboratory is currently under development and will be in use by the summer of 1998. This laboratory allows students to access robots, CNC (Computer Numerical Control) machines, DAQ (data acquisition) cards and other equipment using the Internet. A standard web browser is used to access the laboratory (www.aml.gvsu.edu). The student can then use virtual reality (VR) devices to explore the equipment. At present students can simulate programs on the virtual robot. When the student is satisfied that a program is functional, he/she can download it to the real robot, and monitor the robot with a video link. Students are also able to read and write to a data acquisition card to read/write analog data values. The hardware architecture of the laboratory uses a number of networked computers running Linux and Windows NT. Software has been written in C/C++ as well as Java to interface with equipment and web clients. VRML (Virtual Reality Markup Language) has been used for displaying the geometry of the devices.
1. Introduction
As part of a newly created manufacturing emphasis, we have added a number of courses and related laboratories. Among these additions is a senior course in integrated manufacturing (EGR 474). It was decided to spend time and effort to develop an innovative laboratory that would overcome access barriers and develop an environment containing modern integration technologies.
Access is a common problem with laboratories. In particular a lab that houses robotic machines poses a danger when not properly supervised. As a result these laboratories typically have few open hours, and the equipment goes largely underutilized outside of scheduled times. An ideal model for usage is that students have access to the equipment any time of the day without having to travel to a single location. Manufacturers have also been facing similar problems. In a facility that contains thousand of operations and separate functions, timely access and response to information is critical.
The Internet/World Wide Web (Web) has been proven to be an excellent access tool. It can interconnect computers at any distance. The computers can then be connected to various devices to perform functions. By allowing students to access the equipment via the Web the following advantages are gained,
people and equipment may be in remote locations (for safety or convenience)
many people can access limited equipment (no standing room limits)
equipment can be monitored without a visit (efficient use of time)
users don’t have to monopolize equipment (hot seating)
An industrial application of a web browser used for remote collection of industrial data might include a browser running over phone lines connected to a company Intranet in turn connected to a computer interfaced to a device via GPIB (IEEE-488) [6]. In addition to data gathering we are also able to control and coordinate independent equipment in the lab,
two or more separated machines can work together (increased organization)
data collected and fused (understanding)
The use of networking software also allows additional enhancements not possible when the equipment is used directly,
error trapping
simulation
result tracking
homogeneous interface
Finally, we considered the effect of separating physical contact and use of the equipment. Our worry was that this might lead to a disassociation between the knowledge and the actual equipment. Therefore, we are attempting to take advantage of some of the concepts of Virtual Reality (VR).
This necessitates creating a virtual representation of the lab itself and the components of the work cell within it [2]. Furthermore, we have tried to create an augmented reality setting that introduces interactive control of devices in addition to the VR model [3]. In effect, the programming interface and verification process is removed from the physical location of the lab itself and transferred as a virtual environment to be displayed within the students’ web browser as discussed by Rohrer and Swing [4].
2. The Pedagogical Model
The virtual laboratory is primarily designed for prelab preparation. The goal is that the student gains some knowledge of the equipment before arriving at their scheduled laboratory time. Once they arrive at the laboratory, the equipment may be used at a greater extent than normal. If needed after the lab session is over, the student will be able to call in and verify/test new ideas. Furthermore the student will be able to conduct assigned or interest driven projects with the equipment outside normal hours.
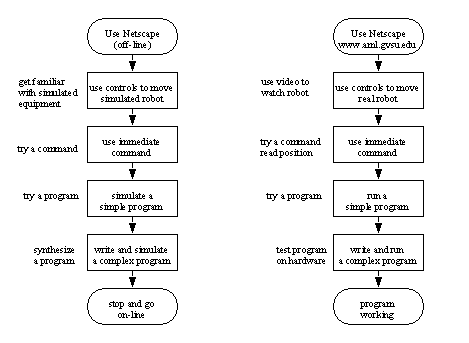
A simple model of the pedagogical sequence (Fig. 1) was developed for the robot to determine how a student would initially use the virtual laboratory. The student would start by using a simulated robot (explanation follows later). The robot could be moved, the position/status read, gripper opened/closed, etc. The student will eventually progress to writing simple programs. When the students confidence is high enough the actual robot will be used. At this point the student should have a fundamental grasp of the basic functions and be prepared for the laboratory.
Figure 1: Prelab Preparation for Robot Usage
3. The Architecture
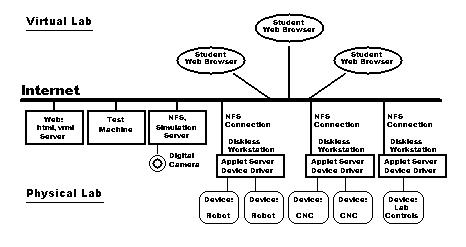
The laboratory is being developed in a modular form using standard hardware and software wherever possible. The student only needs a Web browser for access. On calling into the laboratory [8] the student is able to view the lab with a video camera, or access equipment. The general network computer structure of the laboratory is pictured below (Fig. 2). In the network there are Unix and Windows NT machines connected by ethernet. Two of the machines are file servers, and every machine is a web server. To date, equipment connected to the computers includes,
2 robots (RS-232)
1 lamp (parallel port and special circuitry)
video camera (parallel port)
data acquisition card (installed in computer)
1 CNC lathe (RS-422)
Figure 2: Architecture of the Laboratory
One of the servers, a Windows NT machine, is used to serve the web pages as well as the VRML environments. A Windows 95 machine is used internally within the lab for testing the virtual environments created and can be used to host Java server applications if necessary. A Linux machine is used for student projects, hosting the video feed (Fig. 3), running the most demanding simulation server processes, and as a Network File Server (NFS). Each device within the lab is controlled by a small single-board 486 running as a Linux diskless workstation on an NFS connection to the primary Linux server. Using several machines as we have allows us to distribute the load across multiple workstations. No one machine has to host all the server processes or expansion cards for extra ports. Each of the machines runs a web server in order to serve the various Java applets. As the Java networking security model only allows an applet to connect to the host from which it was served, this is a necessary step. The number of machines in use has allowed us to ensure reasonable response times even at peak lab usage and avoid large numbers of lengthy parallel and serial cables throughout the lab. Each diskless workstation is very small and has its own ethernet connection. This allows us to run short cables from the workstations to the devices and more easily maintain the lab and equipment than with a central server with extra ports and lengthy cables.
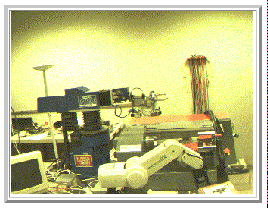
Figure 3: The Video Link
4. The Simple Control Interface
The current prototype [7] of the controller is in two main components. The first components are Java applets (Fig. 4) that a user can download and run in the browser. For example, if a student wants to output a specific voltage value on the DAQ card they can enter a value and click a button. This then makes a connection (via TCP/IP sockets) to a server program in the lab (written in C). The server program interprets the request, executes the command, and returns a status message. In detail the sequence is,
1. The video stream begins and continually updates from the video source
2. The Java applet is loaded from the device host
3. The Java server on the host allows or disallows the connection on a one at a time basis
4. If the user is granted access, the Java applet controls become active
5. Any action through the virtual controls is communicated to the server
6. The server communicates with the device driver
7. The device driver communicates through the appropriate port on the host to the device
8. Any change in the lab is continually displayed on the user’s screen
The student is also allowed to control various environment variables of the actual lab witnessed through the streaming video. Lighting conditions and camera angles can be directly controlled via controls presented on a web page.
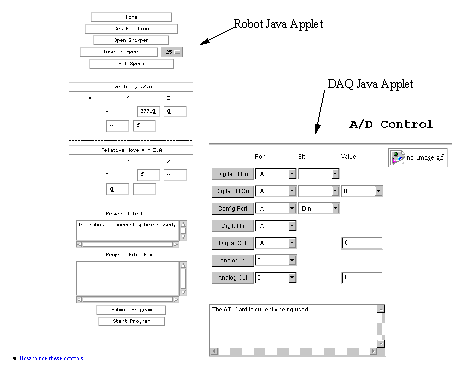
Figure 4: Java Programs for Control of the Robot and Data Acquisition Card
5. Simulation and Execution of Programs
The virtual robot is one of the most challenging parts of the lab to date. But, the VR robot allows the user to truly interact with and change his or her virtual environment. That is to say, the user can cross the “threshold of virtual exploration” [5]. The virtual robot has been constructed using Java and VRML, and it will run inside a standard Web browser.
Java and VRML (Virtual Reality Modeling Language) allow client side (Web browser) environment interaction to virtual environments. Java’s client side program execution paradigm allows complex user involvement, information delivery, and networking capabilities and VRML allows realistic geometry modeling. The latest version of VRML, 2.0, allows environment objects and conditions to be manipulated externally through Java applets using the Extended Authoring Interface (EAI) [1]. These latest technologies, when combined, are the backbone of a usable virtual environment delivery system (Fig. 5) [8].
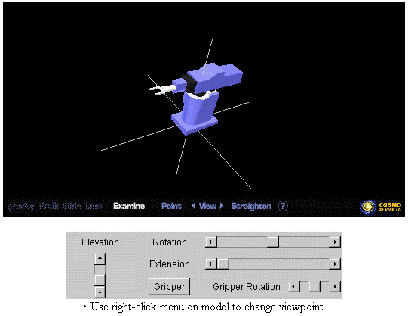
Figure 5: The Virtual Robot Using Java and VRML
In the simplest mode the user can move the sliders and observe the motion of the robot. For more complex usage the user can submit programs (Fig. 6) to be simulated on the virtual robot.
Figure 6: Java Applet for a Robot Program Simulation
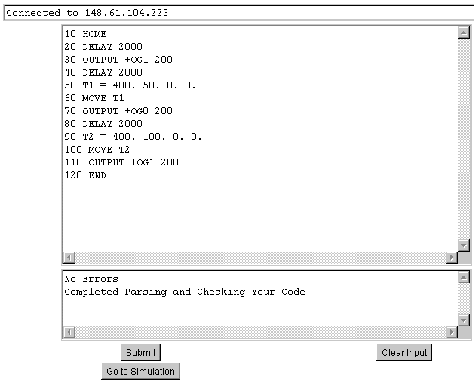
When the student begins the robot program simulation, a Java applet is brought up on the first of three pages. This applet presents a programming environment where code is entered for checking. When submitted, the code is sent to a Java server where it is parsed, lexicographically checked, and analyzed for any obvious programming errors. Two tools, JavaCC and JJTree, were used to create the lexer/parser in Java. [Writing the parser/lexer and the servers and simulators in Java allows us to package a smaller version of the virtual environment for home use without a network connection.] The errors are returned to the student’s applet in an error window. The student refines the code until no errors are returned. Each connection and its programming interface are tracked by the server based on the user’s IP address.
Once the server communicates to the applet that the code is error free, an option on the user’s screen to bring up the next page becomes active. When the next page is loaded, a VRML model of the device is displayed as well as a Java applet which communicates with the original server. This applet receives a set of motion vectors with which to manipulate the VRML model. Using VRML 2.0 and the External Authoring Interface (EAI), a Java applet is able to step the VRML model through the program the student entered moments before. The Java applet also allows any user input called for in the device program. Finally, once the simulation is satisfactory, the student may submit the entered code to the real device. This is accomplished within the server by simply transferring the original user entered code to the server and device driver running on the host connected to the actual device. Again, a live video feed is displayed to the student. This last step of verification allows only one student at a time. In summary,
1. The user(s) selects the device
2. The Java applet containing the programming interface is brought up on the screen
3. The user enters his or her program
4. The user checks the code by submitting it to a server
5. If the code is correct, a new web page is brought up with a VRML model of the device
6. A new Java applet communicates with the server to receive a set of motion vectors for the VRML model
7. The user starts the simulation and is given the opportunity to give user input as appropriate
8. The Java applet feeds motion instruction to the VRML model
9. Once completed, the user submits the code to the actual device (only one user at a time)
10. The server sends the original code to the device host which runs the device through its program
11. A new web page is brought up with the video stream displaying the actions of the programmed device
6. Conclusions
We have described our current progress on an Internet accessible laboratory for Integrated Manufacturing. At the time of writing (January 1998) we are four months away from the first course offering, but we have already tested and developed most of the major components as outlined in the paper. By the summer of 1998 the laboratory will support a number of fundamental laboratories in robotics, remote data monitoring and CNC machining. In addition we will be able to incorporate other applications such as a database. The final environment will be capable of acting as a unified workcell when the student writes programs in Java, C/C++, Visual Basic, LabVIEW, etc.
References
[1]
C. Marrin. “Proposal for a VRML 2.0 Informative Annex: External Authoring Interface Reference” http://reality.sgi.com/cmarrin/vrml/externalAPI.html. Aug. 2. 1996.
[2]
C. Potter, R. Brady, P. Moran, C. Gregory, B. Carragher, N. Kisseberth, J. Lyding, and J. Lindquist “EVAC: A Virtual Environment for Control of Remote Imaging Instrumentation” IEEE Computer Graphics and Applications, Vol. 16, No. 4, July 1996
[3]
R. T. Azuma. “A Survey of Augmented Reality” Presence: Teleoperators & Virtual Environments, MIT Press Journals, Vol. 6, No. 4, Aug 1997, pp. 355-385.
[4]
R. Rohrer and E. Swing. “Web-Based Information Visualization” IEEE Computer Graphics and Applications, Vol. 17, No. 4, Jul/Aug 1997, pp. 52-59.
[5]
S. Fisher "Viewpoint Dependent Imaging: An interactive stereoscopic display." Processing and Display of Three-Dimensional Data, S. Benton, Editor, Proc. SPIE 367, 1982.
[6] Howarth, D., “Performing Data Acquisition over the Internet”, Sensors, Vol. 15, No. 1, Jan., 1998.
[7] Barli, S., Brogdon, C., Molema, S., Welch, C., “Interactive Machine Control Website”, http://www.aml.gvsu.edu/~ihcws.
[8] Karlesky, M., “Automated Manufacturing laboratory”, http://www.aml.gvsu.edu.