1. EGR 209: Statics and Mechanics of Materials
1.1 Philosophy
• The only way to learn statics is by solving problems.
1.2 Resources
1. Read the textbook chapters as indicated, and try suggested problems, they should serve as a reasonable approach to the topic.
2. Compare your solutions (after they are completed) to other students.
3. When stuck, ask the professor detailed questions. Points 2 and 3 will help you learn to overcome problems yourself, instead of depending upon others.
4. It is not recommended until all else fails, but books may be found in the library or purchased. If you decide to use another source, read a few problems in any book you are considering to make sure they suit your style.
1.2.1 Bibliography
1.1 Bedford, A., Fowler, W., “Engineering Mechanics Statics”, Addison-Wesley Publishing Co., Inc., 1995.
1.2 Beer, F.P., Johnston, E.R., Statics & Mechanics of Materials, McGraw-Hill, 1992.
1.3 Gere, J.M., Timoshenko, S.P., Mechanics of Materials, fourth edition, PWS Publishing, 1997.
1.4 Hibbeler, R.C., Engineering Mechanics: Statics and Dynamics, 6th edition, MacMillan Publishing Co., New York, USA, 1992.
1.5 Pytel, A., Kiusalaas, J., Engineering Mechanics; Statics and Dynamics, Harper Collins, 1994.
1.6 Sousta-Little, R.W., Inman, D.J., Engineering Mechanics; Statics, Prentice-Hall, 1997.
1.3 Assigned Homework
• The assignments are to be done INDIVIDUALLY from beginning to end. My experience shows that study groups are of great help, and will help a student get by many small problems quickly. But students who never do any problems individually (i.e., assignments) always do poorly when they must solve problems themselves on exams.
• Stassen’s Ten Commandments for Assigned Calculations. The following format requirements must be met before an assignment will be accepted or given credit.
1. The problem must be clearly identified at the top left of the page. The name of the author must be placed at the upper right-hand corner of the front page.
2. All calculations must be shown and a clear “heading” must be given with each step of the calculations.
3. All units must be attended to properly in balanced equations. Answers without units are not valid, except 0, variables, or unitless values such as ratios.
4. Where applicable, references must be given for all uncommon relationships or empirical values obtained from textbooks.
5. Clear diagrams must be provided where necessary.
6. Do not use unnecessary terms like “I” or verbose terms such as “to find”, etc. It is expected that proper and concise statements are made where needed.
7. At the conclusion of each problem the final result must be clearly summarized and indicated.
8. Where necessary a conclusion should be drawn or a final comment made. Sometimes a recommendation is necessary and should be included in the report.
9. Reports must be written on one side of letter size paper. Only in the case of graphic solutions can “odd” paper sizes be used, but these must be folded to size.
10. Calculations should progress in a logical and sequential manner to the final result.
**** NOTE: A good maxim for overall appearance is that the work should be ready for typing, or done in a package such as mathcad.
1.3.1 EGR 209 Textbook Problems
• The list below should be final for fall 1998 (any corrections will be announced during class).
Book Read Sec. Description Problems
Suggested Required
SLI 1.1-1.6 Definitions, units 1-9
SLI 2.1-2.3 Forces & vectors 2, 4, 13 15(WM), 16(MC)
SLI 2.4-2.5 3D Forces 48, 51, 55
SLI 2.6-2.7 Matrices/equations 67, 70 64 (MC)
SLI 2.8 Dot Product 78, 84 93(use fig 2-92) (MC)
SLI 2.9-2.10 Particles 105, 110 108(WM), 113(MC)
SLI 2.11 Springs and indet. 114, 115 115(WM)
GT 1.1-1.2 Axial Stress 2-1,2-2,2-5
GT 1.3-1.5 Stress/Strain 3-4,3-6,4-1,5-6
GT 1.6 Shear Stress 6-2,6-10 8-4(MC)
GT 2.1-2.3 Axial Strain 2-1,2-13,3-8 3-10(MC)
GT 2.4 Indeterminate Probs
GT 2.6 Oblique Stress Planes 6-10 6-18(MC)
SLI 3.1-3.2 Scalar Moments 6, 9
SLI 3.3 Vector Moments
SLI 3.4-3.5 Moment About Point 26, 38
SLI 3.6 Moment About Line 57
SLI 3.7 Couples 64 68(MC)
SLI 3.8 Moving Forces 74
SLI 3.9-10 Moving Forces 83 82(WM pin at corner)
GT 3.1-3.4 Torsional Deflection 3-4, 4-7 3-11(MC)
GT 3.5-3.6 Torsion Strains 5-5 5-6(MC)
SLI 4.1-4.3 Center of Mass 5, 18
SLI 4.4 Pappus and Guldinus 26
SLI 4.5 Composite Bodies 41, 48 38(WM)
SLI 4.6 Distributed Loads 52, 59 50(MC)
SLI 5.1-5.4 Rigid Bodies 6, 9, 10
SLI 5.5 2D Equilibrium 13, 20 43(MC), 43(WM)
SLI 5.6-5.7 3D Equilibrium 69, 80
GT 1.7-1.8 Design and Safety
GT 2.9 Cyclic Loading
GT 2.10 Stress Concentration 10-6, 10-7 10-9(MC)
GT 3.7 Torsional Power Shafts 7-6 7-7(MC)
GT 3.11 Torsional Stress Conc. 11-4 11-5(MC)
SLI 6.1-6.5 Method of Joints 7, 16 8(MC), 8(WM)
SLI 6.6 Method of Sections 32, 48 47(MC)
SLI 6.8-6.9 Method of Members 81, 92 94(MC)
SLI 7.1-7.2 Internal Forces 4, 17
SLI 7.3-7.4 PVM Diagrams 21, 22 33(MC)
SLI 9.1-9.4 Second Moments 1, 8
SLI 9.5-9.6 Parallel Axis/Gyration 22, 29
SLI 9.7 Composite Areas 37 43(MC)
GT 5.1-5.6 Beam Design 4-4, 5-8 4-6(MC), 5-17(MC)
GT 5.8 Transverse Loading 8-3 8-10(MC)
SLI 8.1-8.2 Friction 11, 51 58(MC), 58(WM)
SLI 8.3 Wedges 73, 84
SLI 8.5 Belts 108
1.3.2 EGR 210 Textbook Problems
• This is the final problem list for Fall 1998
Book Sections Description Problems
TG 1.1-1.6 Stress/Strain Suggested: 2-1,2-2,2-5,3-4,3-6,
Suggested: 4-1,5-6,6-2,6-10
Required: 8-5(mathcad)
TG 2.1-2.3 Axial Strain Suggested: 2-1,2-13,3-8
Required: 3-10(mathcad)
TG 2.6 Oblique Stress Planes Suggested: 6-10
Required: 6-18(mathcad)
TG 2.9 Cyclic Loading Suggested:
Required:
TG 2.10 Stress Concentration Suggested: 10-6, 10-7
Required: 10-9(mathcad)
TG 3.1-3.4 Torsional Deflection Suggested: 3-4, 4-7
Required: 3-11(mathcad)
TG 3.5-3.6 Torsion Strains Suggested: 5-5
Required: 5-6(mathcad)
TG 3.7 Torsional Power Shafts Suggested: 7-6
Required: 7-7(mathcad)
TG 3.11 Torsional Stress Conc. Suggested: 11-4
Required: 11-5(mathcad)
TG 4.1-4 PVM Review Suggested:
Required:
TG 5.1-5.6 Beam Design Suggested: 4-4, 5-8
Required: 4-6(mathcad), 5-17(mathcad)
TG 5.8 Transverse Loading Suggested: 8-3
Required: 8-10(mathcad)
1.4 Bridge Building Competition
Objective: To use simple materials to construct a bridge with the highest strength to weight ratio.
Scope:
1. Students will be expected to build a prototype as well as a final bridge design.
2. Students will be expected to produce a report explaining their design strategy.
Rules:
A list of acceptable materials and the official rules will be provided in class.
Evaluation:
1. All bridges will be checked for conformance to rules.
2. A ratio of failure load to the weight of the bridge will be used to judge performance.
3. Grading will be based on the report.
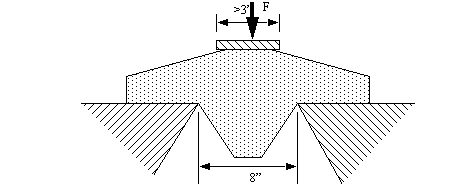
The Test Stand:
The bridge will be mounted between two 1”x6” bars approximately 8” apart.
The bridge will be loaded on the upper surface until failure by a ram that is between 2 to 3 inches wide and long. The top loading area must be no larger than 3 inches by 3 inches at the center of the bridge.
A computerized testing machine will be used to load the bridges and produce stress-displacement graphs. The bridges will be loaded until failure. Failure will be measured using engineering judgment. A catastrophic failure will be complete and self evident. A graceful failure will be when the structure is still standing, but will evidently failure. A ratio of failure load to weight ratio of the bridge will be used to rank the performance.
Hints:
1. Heavy is not necessarily better (an ant would outperform a human with the strength to weight ratio.
2. Triangles form stable supports in a solid structures. You should be able to identify a visible path for the force to flow to the ground.
3. Try building prototypes first to test the structure.
4. Consider various beam types. Most bridges that win have beams made of special beam sections.
5. Buckling will be a major concern. The buckling load calculation can be found in the textbook. Basically in compression, beams should be shorter, or have stabilizing (zero force) members, or be made thicker.
6. One of the most common points of failure is joints in tension. These require more care in design and construction.
7. Careful construction will increase the strength. When loaded the geometry of the bridge will change. Small distortions will become a source of failure.
1.5 Beam Building Project
Details will be provided in lectures.
1.6 How to Send and Receive email
1. You will need your user name and password to access your e-mail account.
Username: Usually first six letters of your last name and the first letter of your first name.
Examples: John Farris ---> farrisj
Ron Smith ---> smithr
Lefty Moskowitz ---> moskowl
Password: Your student number, usually your social security number
If you do not know your pass word type "reset" at the login prompt and follow the instructions. Your pin is the four numbers representing the month and day of your birthday. For example if you were born on September 18 your PIN is 0918.
2. Open Netscape Communicator by double clicking on the Netscape Communicator Icon on the desktop.
3. Input User information into Netscape Communicator.
A. Under the Edit pull down menu select Preferences.
B. A pop up window will appear and with a sub menu titled Category. Single click on the "+" sign to the left of the Mail & Groups category. This will reveal more choices.
C. Single click on the Mail Server sub group and input boxes will appear to the right.
D. Enter the information below in the correct box.
Mail server user Name: Your River user Name
Out Going Mail server: river.it.gvsu.edu
Incoming Mail server: river.it.gvsu.edu
Note: "Leave messages on server after retrieval" box should be checked.
E. Single Click on the Identity sub category under the mail and groups category. Enter your name and email address in the appropriate box. Your e-mail address is your river user name followed by "@river.it.gvsu.edu"
F. Click on the OK button at the bottom of the pop up window to close the window.
4. Viewing incoming e-mail and sending e-mail.
A. Under the Communicator pull down menu choose Messenger Mailbox. This will bring up a new widow that displays your messages. To read a message simply click on the message.
B. To send a message select New Message under the Message pull down menu and fill in form.
C. Send a message to the lab instructor to show mastery of the e-mail system
1.6.1 How to Browse the Web
1. Open Netscape Communicator by double clicking on the Netscape Communicator Icon on the desktop. The Icon is shown below.
2. The Location shown at the top of the page is the name and location of the file displayed. use the mouse and the keyboard to enter in the locations and files listed below to explore other internet sites.
http://engineer.gvsu.edu: Information about the engineering program at GVSU.
http://patent.womplex.ibm.com: Patent information.
http://www.evworld.com/: Information about electric vehicles.
http://www.sdp-si.com: Information about standard mechanical parts. Order a catalog here.
http://bignerds.com/: student site
yahoo.com: search site.
http://www.mmsonline.com/: Modern machine shop magazine.
1.6.2 How to Download Files from the Web
1. Downloading pictures or images from the internet.
A. Pictures or images can be saved to incorporate them into documents or your own web page. To save an image simply position the cursor over the information and click the right mouse button. This will cause a pop-up menu to appear. Click on the Save Image as... button. Another dialogue box will appear. Specify the name of the file you would like to save the image as and its location in the pop up menu. Finally click on the Save button. Do not forget the name and location of the file!!!!!
2. Downloading files from the internet.
A. Some links on web pages are files that require your computer to have software loaded to view the files. The web browser will ask what software you would like to use to open the file or where you would like to save the file. For security reasons always save the file before running the file. As an example go to the site http://www.engineer.gvsu.edu/faculty/default.htm and click on John Farris, then click on EGR 101 Information and finally on Download Border. Try to save this file to your floppy disc.
1.6.3 How to Store Files on river and Publish a Web Site
1.6.3.1 - Overview
When you register for classes the computer administers give you 5 megabytes of storage space on the river web server. You can store files, back up files, share files with colleagues and publish your web page in this space. By placing files in your "public_html" directory on river, you can publish them to the world. If your river user name is "smithm", then your web pages will be found on the web at www2.gvsu.edu/~smithm. For example, if you put a file "homework1.htm" in your public_html directory, then you can view it from your browser (e.g., Netscape) at www2.gvsu.edu/~smithm/homework1.htm.
If no file is specified, the browser will attempt to display the file "Welcome.html" from your public_html directory. Because of this, people usually name their Home Page file "Welcome.html".(note capitalization) If Welcome.html does not exist a list of files in the public_html directory is displayed.
You publish web documents by transferring them to your river account using FTP. FTP stands for "File Transfer Protocol", a standardized way that has evolved for one machine to send files to another. The steps to do this are described below.
1.6.3.2 - Setting disc space on the river server (this step is only done once!!!!)
A. Double click on the river Icon to connect to river.
B. Enter your river user name and pass word.
C. Enter "Z" to access the Unix shell.
D. Type "makeweb" at the Unix prompt. This command creates your public_html directory.
E. Type "exit" to leave the Unix shell and type "exit again to leave river.
1.6.3.3 - Transferring files with FTP
Once public_html is created, use an FTP program to transfer files from your local machine to river. You should have an FTP (Windows) program somewhere on your machine if you are a PC user. Use the FTP program to transfer your web page document from your local directory to your public_html directory on river.it.gvsu.edu(the remote directory). One easy to use FTP program is WS_FTP 95 LE. It is already installed on the computers in all GVSU computer labs.
1.6.3.4 - Using WS_FTP 95 LE
A. Double click on the "WS_ftp 95 LE" Icon on the desktop.
B. Enter the information below except your river pass word. The program will prompt you for the password. If you enter your password at the prompt, the program will remember your password and it will be available to subsequent users.
Host Name/Address: river.it.gvsu.edu
Host type: Automatic Detect
User ID: (your river username)
Password: (your river password)
C. After a successful connection is made a window divided into two sections will appear. The left side shows the contents of your local machine and the right side shows the contents of the river machine. To transfer a file to your public_html directory on river:
In the right side window click on the public_html folder. This will direct the files transferred into your public_html folder.
Highlight the files you want to transfer in the left hand window and then click on the right facing arrow key between the windows to initiate the transfer. The file will appear in the right hand side window when the transfer is complete.
Files can be downloaded from your river space to your local machine by highlighting the file in the right side window and clicking on the arrow that points toward the left.
1.6.3.5 - Creating an html file
A. Downloading template
The easiest way to create a home page or html document is to modifying an existing one. A simple template can be found by going to the site http://www.engineer.gvsu.edu/faculty/default.htm, clicking on John Farris, then clicking on EGR 101 Information and finally on View, edit and download web page template. This will bring up a simple, generic web page that you can customize.
B. Modifying template
To modify the template go under the File pull down menu and select the Edit Page option. This will launch Netscape composer program which will allow you to modify the page. Before modifying the page you must save the file to the hard drive or floppy drive of your local machine. This is done by selecting the Save As... option under the File pull down menu. Be sure to enter a file destination on your local machine!!!!
After the file has been saved the text can be modified much like the way text in a word processor is modified. Practice modifying text by customizing the header. Save the file after each modification.
C. Adding a picture to your web page
To insert a picture:
Position the cursor where you want to add the picture To insert a picture:
1. Position the cursor where you want to add the picture
2. Click on the Insert pull down menu and select Image.
3. Enter the file name of the image you would like to insert.
4. Click on the OK button. Note the picture may not appear on your page. Do not panic yet.
D. Adding a link
A link is simply some text that will display cause your browser to jump to another web page or file when the text is clicked upon. To insert a link:
1. Highlight the text that you want to include in the link
2. Click on the Insert pull down menu and select Link.
3. Enter the file name or web address of the link you would like to insert.
4. Click on the OK button.
E. Adding an e-mail link
A mail link is link that allows people to send you e-mail. To modify the e-mail link on the bottom of the page:
1. Right click on the "E-MAIL ADDRESS" text.
2. Select Link Properties.
3. Enter your e-mail address after "mailto:". For example my link reads mailto:farrisj@gvsu.edu.
4. Click on the OK button.
1.6.3.6 - Publishing Your Web Page
To publish your web page so that others may view it follow the following steps:
1. Save the file you are modifying on your local machine as Welcome.html. The w must be capitalized.
2. FTP the Welcome.html file to your Public_html directory using directions presented earlier
3. FTP any image or other files that are referenced by your Welcome.html file to your Public_html directory. If this is not done the pictures or other files will not be displayed.
4. To check your web page, open Netscape communicator and type in the address of your web page. You may need to click on the Reload button at the top of the window to get the most recent copy of your Welcom.html file to be displayed.
1.6.3.7 - Glossary
Browser: A Browser is the software that lets the user access web pages on the internet. Examples of browsers are Netscape and Microsoft Internet Explorer.
FTP: File Transfer Protocol, a protocol computers use to transfer pretty much any type of file to one another.
HTML: HyperText Markup Language, a language that is used to create web pages. From Netscape, you can view the actual HTML file that is used to create the web page you see by choosing "View" and then "Source". For more information, see "A Beginner’s Guide to HTML".
HTTP: HyperText Transfer Protocol, a protocol web servers (such as www2.gvsu.edu)and browsers (such as Netscape) use to transfer web documents.
URL: Uniform Resource Locator, an addressing system that allows you to uniquely address a file on the internet. Assumes addresses are of the form protocol://server/path/filename. An example is http://www2.gvsu.edu/~stuindex/users.html.This indicates we are addressing a web document (http://) that is on the server called www2.gvsu.edu. The file on that server can be found down the path called ~stuindex (a weird UNIX way of naming a path, or series of folders), and the name of the file is users.html.
Web Server: A machine on the internet that is able to publish web documents. decision
1.7 Creating Web Pages
• The instructions below should help with the general procedure of creating a web page. Additional help can be obtained from the course instructor, or from the lab assistants in Henry Hall.
• The general steps are,
1. Get a computer account on ‘claymore.engineer.gvsu.edu’ from Prof. Jack. This account will have a prototype web page that you can edit.
2. Go to a laboratory (HRY 113 or EC 616), or home computer and run ‘Netscape Gold’. Go to ‘claymore.engineer.gvsu.edu’ and look for your account under ‘students’. You should be able to find a page that starts with ‘YOUR_NAME_GOES_HERE’.
3. In Netscape (with your home page showing), select ‘edit’ from the tool bar, or under ‘file’ select ‘edit’ or ‘edit page’. You will be asked if you want to save the page. Create a ‘temp’ directory on the computer. This directory will be used to temporarily hold your web page files. Make sure that the files will be saved in the ‘temp’ directory, and then ‘save’ the files. An editor will start on the screen.
5. The editor behaves much like Microsoft Word, with some subtle differences. At this point add your name, and change your email address to your river account.
6. To upload the changes you have made to the website, under ‘file’ select ‘publish’. You will need to indicate the destination as ‘ftp://claymore.engineer.gvsu.edu/home/YOUR_NAME/public_html’. You will also need to enter your user name and your password (DO NOT SAVE THE PASSWORD: SOMEBODY ELSE CAN GET ACCESS TO YOUR ACCOUNT). You should see a message that indicates files are being uploaded successfully.
7. Use Netscape, not the editor, to see if the changes have occurred. Your changes may not show up on the browser. This is because Netscape does not reload pages every time to look at them. Pages are stored for up to 1 month, and reused when you look at them. There are two ways to update the screen before this time click on the reload button.
8. Next we will links to your home page. First, run Mathcad, and create a simple file, and then save it in the same folder/directory you saved. Use a file name that is all lower case such as ‘test.mcd’: any upper case letters cause problems in Windows 95.
9. Get your home page back in the Netscape editor. Someplace type the word ‘GVSU’. Use the mouse to select what you just typed, and then click on the link button. For the link name enter ‘http://www.gvsu.edu’, and apply the change. This will now be a link to the Grand Valley home page. For your mathcad file type something like ‘Mathcad file’, highlight it, and add a link to ‘test.mcd’. This link will connect to your Mathcad file.
10. Publish the file, but this time click the option ‘include all files in folder’.
11. Test the page.
• Some tips are,
Windows will not allow multiple applications to open the same file at the same time. If you seem to be having trouble opening a file, make sure it is not open in another application.
As you add other files to your homepage, put them in the ‘temp’ directory. This will make all of the procedures simpler.
Try to make your web pages small, and link them together. This will decrease download time and make browsers happier.
Avoid using excessive images. Anything over 10K will make it very slow downloading over modem. Anything over 100K makes modem downloading painfully slow.
When putting images on the web page use ‘jpg’ for photographic images, and ‘gif’ for line images. ‘jpg’ images can be compressed more than ‘gif’, but lines will become blurred.
To link to other files or web pages there will be a ‘link’ command. If you want to add a file that is in your ‘temp’ directory, just put the name of the file in the ‘URL’ field.
Watch upper/lower case. This is a major cause of web page problems.
1.8 Statics Review Topics
Forces
2D
cartesian
polar
concurrent/coplanar/parallel
3D
right hand axes and position rotations about axis
direction cosines
projected
cartesian
Topics
resultants
forces with magnitude and unit vector
projecting forces with dot/scalar products
angles between forces with dot products
two force members
Moments
Calculating
shortest distance
perpendicular components
cross/vector product
Couples
movability
equivalent force couple pairs
Equilibrium
Particle
concurrent forces/parallel forces
force triangles
Rigid bodies
free body diagrams
action/reaction
supports, decomposition, and indeterminate problems
pulleys/springs/rollers
sum of forces/moments
Method of members
Trusses
Supports/tension/compression
Zero force members
Method of joints
Method of sections
Friction
Dry friction/dynamic friction
Slip/tip
Wedges
Belts
Mass properties
Center of mass/gravity/centroids
Centroids
integration
composite bodies
Second Moment of Inertia
integration
parallel axis theorem
composite bodies
polar moments of inertia
Internal forces
Shear force and bending moments
PVM diagrams