24. Lab 5: Position Control with an EncoderTo use proportional and integral gain control to position a motor using an encoder. Rotational position is often measured with potentiometers. The devices typically are low cost and provide reasonable accuracy (typ. 1%) but they have limited ranges of rotation. Encoders are more expensive devices that allow unlimited ranges of motion. An optical encoder is shown in Figure 24.1 An optical encoder. In this device two pairs of optical emitters and detectors are directed through a disk with openings. By counting the number of times the light beam is broken the distance of rotation is measured. Two light beams are used to detect the direction of rotation. 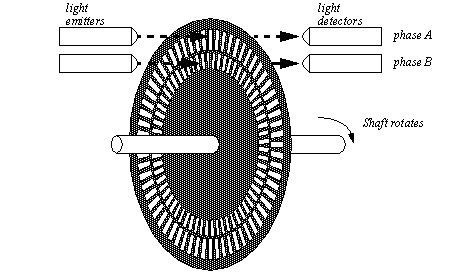
Figure 24.1 An optical encoder A very low resolution encoder disk is shown in Figure 24.2 Encoder disk. The dashed line indicates the position where the light beams cut across the disk. As the disk rotates the beams are broken at staggered intervals. 
Optical encoders can operate at high speeds with a longer life because there is no mechanical contact. Mechanical encoders use a rotating disk with metal rings in patterns similar to those in optical encoders. As the disk rotates mechanical contacts are opened and closed. These mechanical contacts are prone to ’bouncing’ as they make and break contact, and hence they do not work well for higher rotational speeds. Typically the contacts bounce time is less that 10ms. Although limited in speed, mechanical encoders are popular because they generally cost less than similar optical encoders. An quadrature input pattern from an encoder is shown in greater detail in Figure 24.3 Quadrature Encoders. If we were to simply count the rising edges on one of the inputs we would be able to measure a total distance covered. However we must also use the second phase to determine the direction of motion. This method still uses one of the phases for the count. When a positive edge is encountered the counter is incremented if the other phase is true. However, if the other phase is false then the counter is decremented. 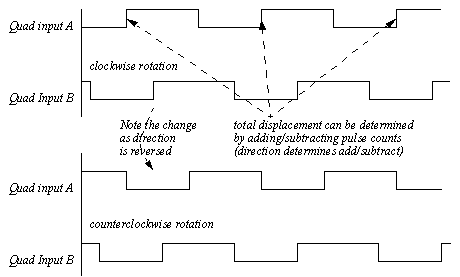
Figure 24.3 Quadrature Encoders The previous method is simple to implement, but less accurate. A more accurate method looks at the current and previous state of both quadrature inputs. Consider the example in Figure 24.4 Quadrature Encoders as binary inputs where the two phases are binary inputs. If the last input value was 00 and an updated value is 10 then the motion is clockwise, if the updated value is 01 then the motion is counterclockwise. 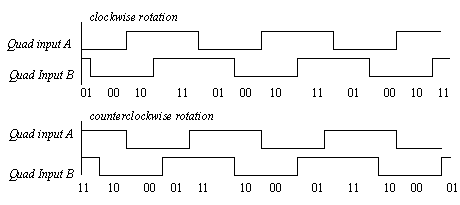
Figure 24.4 Quadrature Encoders as binary inputs A program to read position and velocity input from an encoder is given in Figure 24.5 Subroutines for reading position using an encoder. The program uses pins 0 and 1 on port B as encoder inputs. In this case the program counts upon both the positive and negative edges of both phases. This is done by comparing the current encoder position to the previous encoder position. When the inputs change the encoder value is either incremented or decremented, depending upon the preious values. 
Figure 24.5 Subroutines for reading position using an encoder A position control system is shown in Figure 24.6 Position control system. This system uses the H-bridge from the previous laboratory to drive a motor, which in turn drives an encoder used for position feedback. 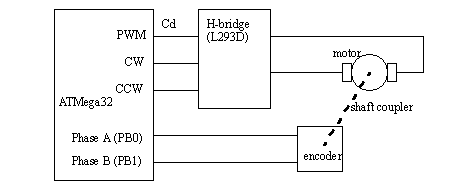
Figure 24.6 Position control system The block diagram for the control system is shown in Figure 24.7 Position control feedback loop. This control system will use a desired position for the system, in terms of the encoder position. An interrupt driven subroutine will be used to implement the feedback controller. It will calculate the system error by subtracting the encoder counter from the desired position. This will then be passed through a proportional and integral function. The result will be corrected for the deadband and output to control the motor as a PWM signal. 
Figure 24.7 Position control feedback loop All of the functions in the control system have been implemented in previous laboratories, except for the integration term. To integrate in a program we will need to add new values to previous values, using a known time step, as shown in Figure 24.8 Numerical integration. A subroutine to implement the proportional-integral controller is shown in Figure 24.9 Proportional integral controller. The integration subroutine also includes a crude limiting function to prevent the integral value from becoming excessively large. 
Figure 24.8 Numerical integration 
Figure 24.9 Proportional integral controller Please note that the interrupt subroutines given in a previous lab use the same timer (1) as the PWM output. As a result new version using counter 0 is given in Figure 24.10 Interrupt subroutine using counter 0. 
Figure 24.10 Interrupt subroutine using counter 0 1. Write a list of steps describing the procedure you are going to follow to carry out the experiment. 2. Provide a description (table) of the data (information) you are going to collect during the experiment. 3. Draw the block diagram of the test setup and sequence of flow. 4. Write a program to implement a control loop with encoder feedback for position control. The program should have the following: a) A proportional and an integral gain value for the controller. b) A method to collect the instantaneous output of the motor (feedback signal) and store it for use in monitoring motor performance vs. time. c) A part that ensures compensation of the motor dead-band. computer with an WinAVR compiler ATMega32 board with an L293D (or L298) Push-pull four channel driver 1 encoder (Grayhill series 61B 16 position) 1. Connect the control system and the motor using an L293D to drive the motor and an encoder as shown in Figure 24.11 Connecting the Encoder to the ATMega or Figure 24.12 Connecting a mechanical encoder to the ATMega32. Note the motor used in this lab may be a 3V motor, so the power supply voltage may differ from previous labs. 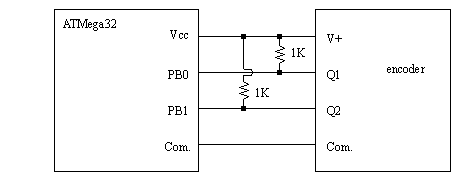
Figure 24.11 Connecting the Encoder to the ATMega 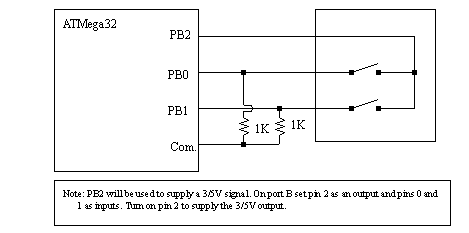
Figure 24.12 Connecting a mechanical encoder to the ATMega32 2. Test the program developed for the prelab. (Note: Remember to build and test in pieces whenever possible.) Determine all necessary parameters, such as the deadband limits. Note: if the motor positive and encoder positive directions are opposite, then the motor will rotate forever. This problem can be solved by reversing the motor leads. 3. For the proportional and integral gains use values of Kp = 1, Ki = 1. 4. Produce a calibration curve relating motor output position (degrees) to commanded position. 5. Supply different set points of motor positions and measure the steady state position. Also observe the response speed. After the motor settles, attempt disturbing the motor position (gently) and record your observations. 6. Repeat step 3 for different values of Kp and Ki. 7. Plot the results on a single graph. Results should show motor performance in time. |