10. Tutorials - Advanced ControlLogix
10.1 Instructions
10.1.1 Manipulating Memory
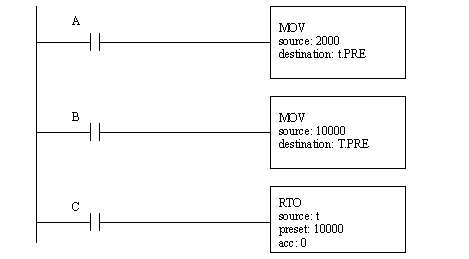
1. Enter and try the following program, it will directly influence timer preset values in memory. Try testing the basic operation. Then, set the preset to 2 seconds. Then cause the timer to pass the 2 second preset, note the result, but don’t reset the timer. Set the preset to 10 seconds, and continue the timer increment.
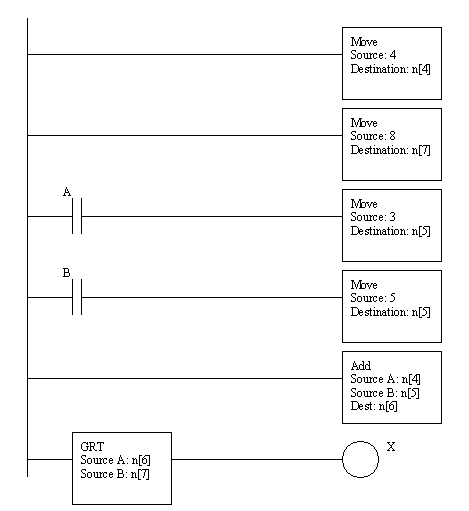
2. Write a program that adds two numbers. If the sum is greater than 8 then an output will turn on. Enter the ladder logic and run the program. Watch the values displayed, and notice how applied voltages to inputs ‘00’ and ‘01’ change the values.
10.1.2 Math
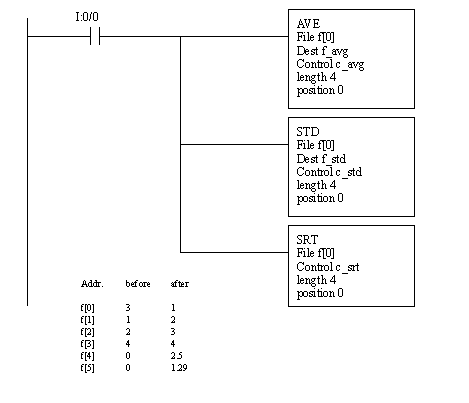
1. Enter and run the program below. (Note: ‘f’ will need to be defined as an array, and values can be entered into the ‘f’ array directly from RSLogix using the tag editor).
10.1.3 File Algebra
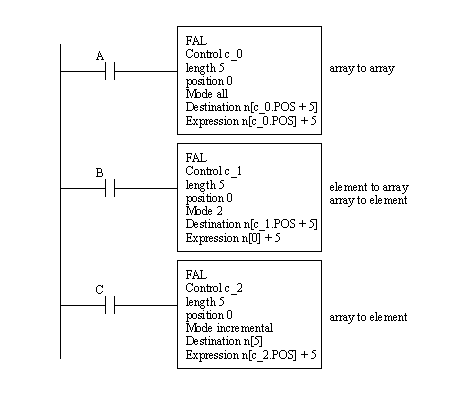
1. Enter and run the following ladder logic.
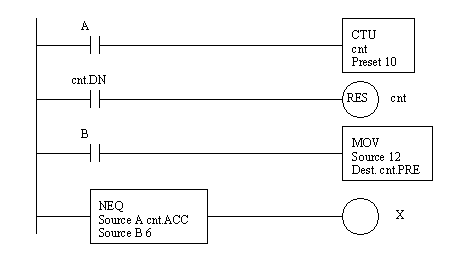
10.1.4 Comparison Functions
1. Enter and run the following ladder logic.
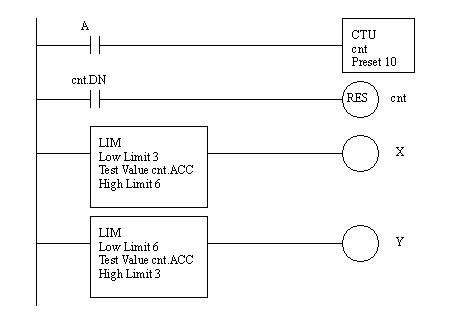
2. Modify the last ladder logic program to match the one below. Run the program.
3. Write a program that uses the other types of comparison functions.
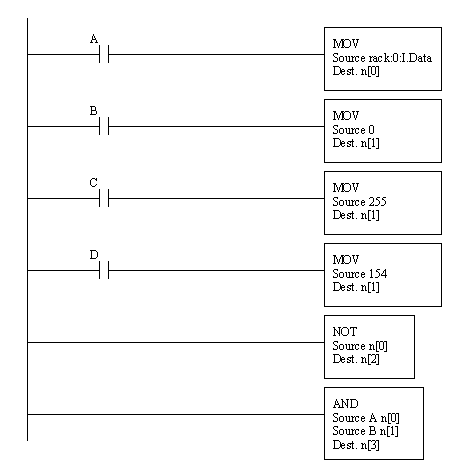
10.1.5 Boolean Functions
1. Enter and run the following program.
2. Try other Boolean logic functions in the previous program. Try changing the numbers written into n[1].
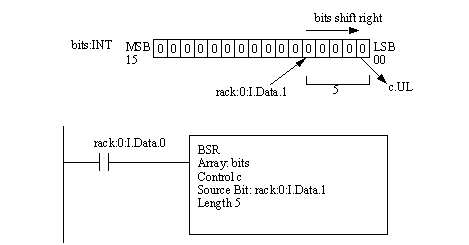
10.1.6 Shift Registers
1. Enter and run the following ladder logic.
2. Modify the previous program to make lights flash across the outputs (like christmas tree lights).
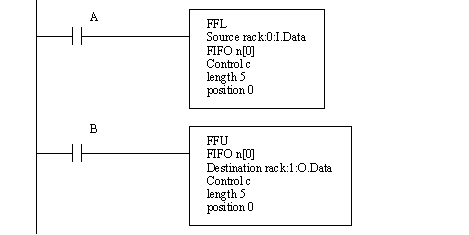
10.1.7 Stacks
1. Enter and run the program below. (Note: ‘n’ is an array of DINTs.)
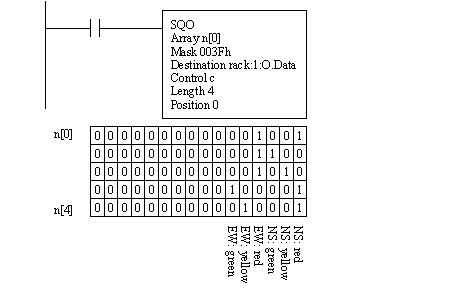
10.1.8 Sequencers
1. Enter and run the program below.
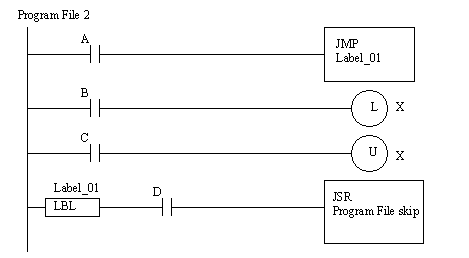
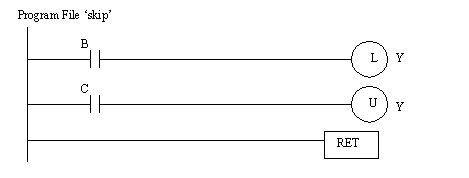
10.1.9 Jumping and Subroutines
1. Enter and run the programs below. The routine ‘skip’ can be created by right-clicking on ‘Main Program’ and selecting ‘new routine’. Make sure the Type is ‘ladder diagram’.
10.2 Structured Text (ST)
0. Review the document “Logix 5000 Structured Text“ (1756-pm007_-en-p).
1. Right click on the ‘Main Program’ and select ‘New Routine’. Call the subroutine ‘test’ and set the type to ‘structured text’. Double click on the newly created ‘test’ and a structured text window will pop up.
2. Enter the following program.
3. Modify the main routine to call the subroutine. Set the outputs to be aliases for the output lights.
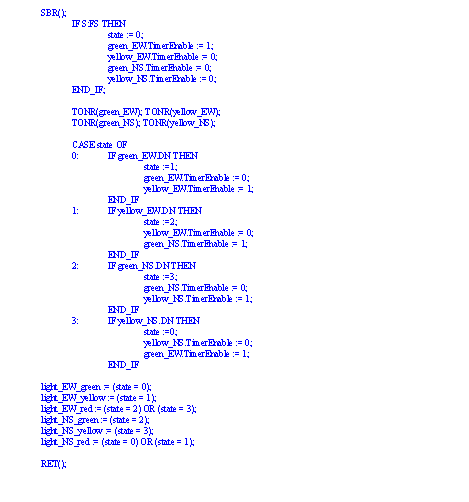
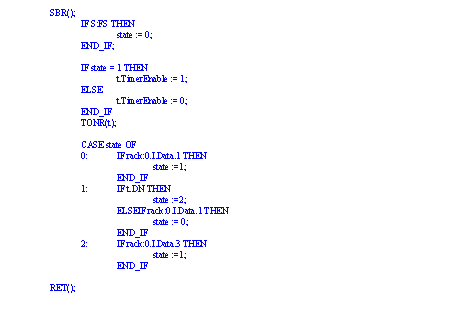
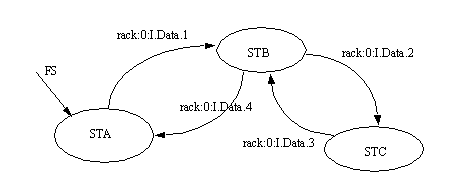
4. The Structured Text program implements the following state diagram. Enter the program and verify the operation. (Note: you will need to create a timer ‘t’ of type ‘FBD_TIMER’.)
10.3 Sequential Function Charts (SFCs)
0. Review the document “Logix5000 Controllers Sequential Function Charts“ (1756-pm006_-en-p).
1. Create a Sequential Function Chart program with the name ‘test_sfc’.
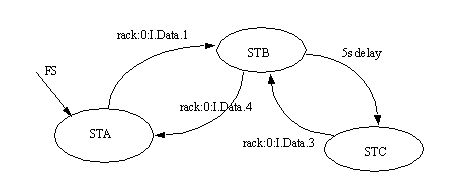
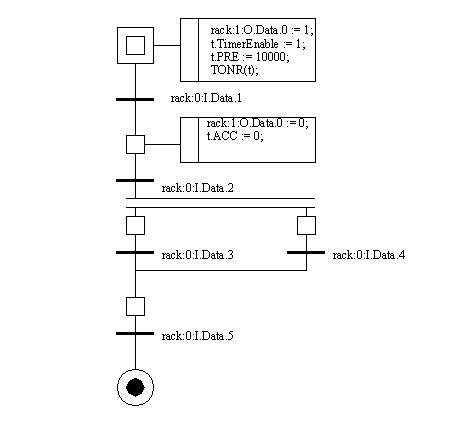
2. Enter a diagram that looks like the one below. This is done by first laying out the general structure of the steps and transitions. The right clicking on the steps allows you to add transitions. (Note: you will need to create a timer ‘t’ of type ‘FBD_TIMER’.)
3. Write a program that implements the following state diagram.
10.4 Function Block Diagrams (FBDs)
0. Review the document “Logix5000 Function Block Diagrams“ (1756-pm009_-en-p).
1. Create a new function block diagram program called ‘test_fbd’.
2. Enter the following logic and test it.
10.5 Simulated IO (For Softlogix only)
1. Add a SIM module to slot 3 of the virtual rack.
2. In project under I/O configuration add a generic 1789 module with the parameters below.
name “SIM”
input “assembly instance = 1”
input size = 2
output “assembly instance = 2”
output size = 1
config “assembly instance = 16”
config size = 0
RPI = 100ms
3. Enter and test the following logic. Inputs and outputs are available on the virtual rack.
10.6 Analog IO
0. Review the document ““ ().
1. Create a simple ladder logic program and make sure that all four IO modules are defined. For the analog IO module make sure all of the inputs and outputs are configured for voltage inputs. Download the program (make sure it is running). The light on the front of the analog module should also be on.
2. Open the ‘Controller Tags’ and look at the various inputs and outputs on the analog IO card.
3. Using a power supply (NOTE!!!! be very careful not to exceed 10 V) apply a voltage to the inputs. If not sure where to connect, check the manuals at the AB website. Vary the voltage while watching it with a DMM. The memory location for the card inputs should change.
4. For the outputs enter a value in the output memory value (hint: start small < 256). Connect a DMM to the analog output and determine the relationship between the value and the output. Increase the value and determine the maximum range. Next, find the minimum acceptable value.
10.7 Serial IO
0. Review the document “Logix5000 Controllers ASCII Strings“ (1756-pm013_-en-p).
1. Set up the serial port on the PLC for 9600,N,1. Write a program that will write a string ‘Hi ‘, once every second.
2. Connect a PC serial port to the PLC. Run Hyperterm (or equiv.) and make sure the communication settings match. Note: problems may occur if RSLinx is still trying to use the serial port.