7. Laboratory Activities
7.1 Lab 1: System Wiring
Objective:
To wire an advanced control system and write combinatorial ladder logic programs.
Electrical Description:
This lab will involve wiring 115Vac from a building supply. Some special items must be noted.
1. DO NOT CONNECT THE SYSTEM UNTIL all wires have been connected and checked.
2. Make sure the ground is connected to all devices.These are typically color coded as green, or have a ground symbol. Note: power should not flow through the ground, it is only for emergencies to draw current out of the cases of electrical equipment, and into the ground beneath the building. In other words the ground and common are not the same thing.
3. Normally the AC has 2 wires (for a single phase). For consumer applications we need to make sure the polarity is correct, so that the ‘hot’ (black) wire is switched off, making electrical shocks less likely. Note: in reality, even if these wires are backwards the power will still be delivered to the load.
4. After connecting the power to the devices, it is a good idea to plug them in and check operation before proceeding to connecting other devices.
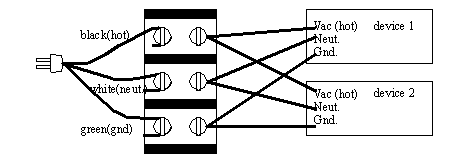
5. Try not to daisy chain power connections (like a string of christmas lights), but connect the power cord to a terminal strip (power bus), and then connect to each device to the terminal strip. (see the figure)
6. Do not leave loose, or exposed wires. These will only lead to short circuits, electric shocks, or other problems. Tighten the wires. If doing this for permanent jobs, the wire should also wrap around the screw. Note: leads with banana plugs or ALIGATOR CLIPS ARE PARTICULARLY PRONE TO CREATING SHORT CIRCUITS.
Inputs and outputs also require a few notes:
1. A PLC rarely has an internal power supply for inputs or outputs. You must always connect an external power supply for inputs or outputs.
2. The ground and common are terms that are badly confused/misused. A true ground is an electrical connection to the ground beneath a building that will draw away current if there is an electrical fault. A common is a reference voltage for all parts of a circuit, typically 0V. When connecting devices such as sensors and actuators we want to connect them to a common. This problem is normally overlooked, but when we have systems with mixed power sources (eg. 115Vac, low voltage DC) we must separate these. Do not connect the common to the ground. BE WARNED, many low voltage devices (such as power supplies, sensors, etc.) show the common as a ground.
3. Remember for relay outputs there is no common, the output is just a switch.
The system is wired to include an estop that will cut the power to the outputs, but allow the plc and inputs to continue working.
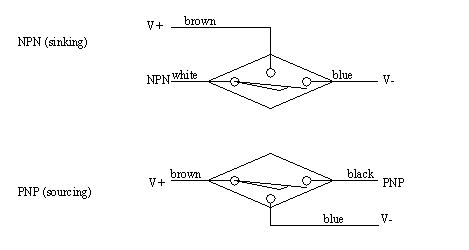
The sourcing and sinking sensors to be used for the lab are shown with their conventional systems, as shown below.
Pre-Lab (Done individually)(NOTE: These, and all other Pre-labs will be checked before every lab. A mark of zero will be assigned when prelab materials have not been completed before the start of the laboratory):
1. Review the manuals for the input and output modules for the Flex-IO modules.
2. Prepare a wiring diagram using software. AS A MINIMUN, the wiring diagram should contain the following elements.
3 PNP proximity sensors
2 AC proximity sensors
start and Estop inputs to disconnect outputs
3 solenoid outputs for pneumatics
2 output lights
a power supply and requirements for various
all required safety circuitry
3. Write a simple ladder logic program for a task of your own (individual) choosing. Describe the task briefly in words, and then develop a Boolean equation. Other techniques, such as truth tables may be useful. The program should use some/all of the inputs and outputs described in step 1.
Resources: SoftLogix 5800 Software, and Ethernet/IP hardware manuals (www.ab.com)
Equipment:
As provided
Procedure:
1. Connect the circuit as required in the prelab. If necessary, make revisions to the wiring diagram for the final documentation.
2. Each individual on the team should enter and test their ladder logic program.
Minimum Submission:
Note: Design sheets must be used, although printouts may be used as alternates.
1. All prelab work
2. Your individual wiring diagram, and the diagram used by the group, with all revisions made.
3. Your individual program WITH COMMENTS. In addition the program should be tested to PROVE that it works as designed.
7.2 Lab 2: Introduction To Programming
7.2.1 Lab 2a: Introduction to SoftLogix Controllers
Objective:
To learn the basic operation of Allen-Bradley SoftLogic controllers or ControlLogix Processors.
Pre-Lab: None.
Resources: RSLogix, ControlLogix, and Ethernet/IP software/hardware manuals (www.ab.com)
Equipment:
As provided
Procedure:
1. Follow the SoftLogix tutorial later in the notes.
Submission:
1. A pass grade will be assigned to students that complete the tutorial and print out the final program in the tutorial.
7.2.1.1 - Basic Lab Structure
The lab is organized into stations (A to F) with a shared network. Each of the devices at the stations has a network address based on the station number. Station A has addresses in the 10s, B in the 20s, C in the 30s, D in the 40s, E in 50s and F in 60s. The list below gives these addresses for each station.
Station A:
Hub: 192.168.1.11
CPU: 192.168.1.12
FlexIO Rack: 192.168.1.23
Panelview Plus 600: 192.168.1.24
To setup
1. reset the hub and change the settings to DHCP and the address
2. Set the PC and virtual machine to DHCP and restart communication
3. Set the browser to 192.168.1.1 and turn off DHCP
4. Change the PC and VM to static addresses
5. Setup bootp to give out addresses.
Wiring Setup
1. Add:
Disconnects one before, one after fuse
Add fuse
add grounds
Saftey relay circuitry with estop and start
PLC power for compact logix and micrologix
After checking and basic power up
2. Add:
DC power supply
Input card
Sensors
7.3 Lab 3: EthernetIP Controlled IO
Details Provided later
7.4 Lab 4: (Tentative) Sequential Control Program
Details provided later
7.5 Lab 5: Sequential Logic Control
Objective:
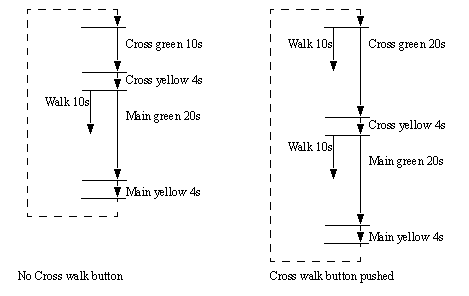
Develop a PLC program that will control a miniature set of traffic lights. These lights will go through a normal sequence, but will have pedestrian cross walk buttons that will activate a cross walk signal when pressed. When done the student should understand the design and implementation of time dependent control circuits.
Pre-Lab: (due at the start of lab period)
1. Draw a state transition diagram for the traffic lights given the process description below.
2. Write the ladder logic model for the state transition diagrams.
3. Develop an exhaustive test table that will test all of the possible transition states for the traffic lights.
Process Description:
We want to develop a controller for a set of traffic lights that is at the cross of Main St. and a less used Cross Rd. The lights under two possible sequences as shown below. In the normal sequence the green for cross is shorter with no cross walk light. If a cross walk button is pushed while the Main light is green or yellow the Cross green light will be on longer with a walk sign.
Equipment:
SoftLogix processor
Output lights
Wires
Procedure:
1. The instructor will describe how to connect the PLC, power supply, buttons, etc at the beginning of the laboratory period. As a group you will connect the circuits. Components used will include push buttons and red/yellow/green output lights.
2. As a group, enter and test the ladder logic for pre-lab 2 and conduct tests in pre-lab 3. The instructor must check the performance.
Submission:
1. Pre-lab and updated laboratory materials.
7.6 Lab 6: PanelView HMIs
Objective:
To learn the advanced programming functions and interfacing.
Pre-Lab: (due at the start of lab period)
None.
Equipment:
ControlLogix, Panelview600Plus
Procedure:
(Note: for all tutorials, monitor the contents of the PLC memory to understand what is happening.)
1. Follow the ‘Panelview600Plus’ tutorial.
2. Follow the ‘Advanced ControlLogix Programming’ tutorial.
Submission:
A program that reads an analog input and prints it on the HMI.
7.7 Lab 7: Project Review Week
See Project Description Handout
7.8 Lab 8: Analog Control
Objective:
To explore analog inputs and outputs on PLCs and mathematical calculations.
Pre-Lab: (due at the start of lab period)
1. Write simple programs to read an input voltage and output the same analog voltages from the PLC.
2. Develop the ladder logic to read an analog voltage, perform a calculation, and output the result as an analog voltage. The equation is,
Process Description:
Analog inputs and outputs are done with multipurpose cards in the PLC rack. To control these cards there is some overhead required to set voltage ranges, scales, values, etc. This can be done by setting values in the PLC memory, or by using built in setup functions.
Equipment:
SoftLogix controller and FlexIO rack with an IE4XOE2 analog IO module
Computer with RS-Logix programming software
Voltmeters
Power Supplies
Procedure:
1. Configure the PLC as normal. Ensure that when setting up the the card the inputs and outputs are set to the -10V to 10V range. The card will also require a 24V supply: refer to the installation manual for additional details.
2. Test the analog output values using a multimeter. Change the output value (Ch0OutputData) and measure the output voltage. Repeat this for multiple values and record the results in a table. Draw a graph. Please note that when ‘validating’ you should take multiple readings at the ends and middle of the data range with special attention to the regions with the greatest amount of change. Values should be compared with ideal in a graph or table.
3. Supply an input voltage between (but not beyond +/-10V) and record the input voltage and integer value in a table. Then graph the values.
4. Test the program written for prelab step 1.
5. Test the program written for prelab step 2 and test with a multimeter and voltage supply. Use a number of values to confirm.
Submission:
1. Pre-lab and updated laboratory materials.
2. The documentation should contain details of ALL of the settings not evident in the program.
3. Detailed test results for the input/output calculation.
7.9 Lab 9- PID Control
Objective:
To explore PID control.
Pre-Lab: (due at the start of lab period)
1. Write simple programs to read and output analog voltages from the PLC and perform PID control of a motor speed.
Process Description:
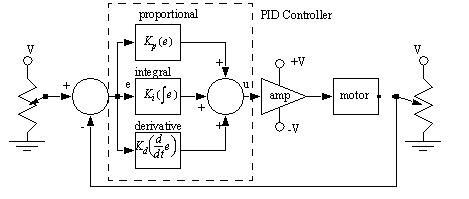
The basic equation for a PID controller is shown below. This function will try to compensate for error in a controlled system (the difference between desired and actual output values).
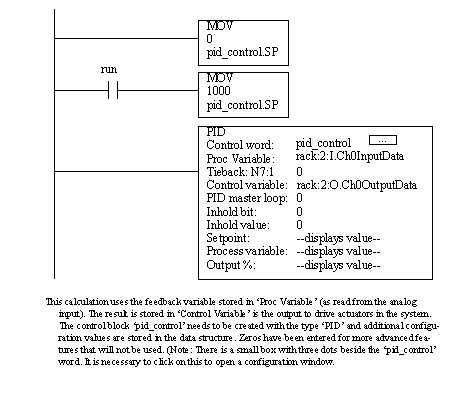
The figure below shows a basic PID controller in block diagram form.
The PID calculation is effectively a calculation in the PLC. One basic method of PID control is i) read voltage, ii) do PID calculation, iii) set output voltage. (Note: it is also common to get a self contained PID card for the PLC that deals with all inputs and outputs). The ladder logic below shows a PID control function.
Equipment:
SoftLogix controller and FlexIO rack with an IE4XOE2 analog IO module
Computers with RS-Logix programming software
Voltmeters
Power Supplies
Motors and drives
Procedure:
1. Connect the PLC to a motor driver (Ultra 100, Ultra 5000 or series 160 VFD).
2. Test the analog output control of the motor by changing output voltage values. Record these with the analog inputs from the tachometer in a table.
3. Use the PID control program to control the motor. Note: you will need to set up parameters for the PID control memory. By default the values such as scaling and alarms are all off. Note: Make sure that the PID control memory contents are reported.
Submission:
1. Pre-lab and updated laboratory materials.
2. Detailed settings for all analog, PID, and VFD components. These should be done so that a technician could reprogram the equipment.
7.10 Lab 10: Communications
Objective:
To explore serial communications with a PLC.
Background:
Serial communications can be done using an RS-232 interface, a very common interface. On the CompactLogix CPU there is one RS-232 interface that we can use for serial communication.
Pre-Lab: (due at the start of lab period)
1. Visit the Keyence website and look at the product documentation for the BL-600 series of barcode scanners. One of these will be connected to the serial port on the front of the CompactLogix processor. Note that these require a special cable with wire to provide 5V to power the sensor. Also, the sensor will need to be configured using software also available from the website.
2. You will need to write a ladder logic program to write the string ‘LON’, including carriage return and line feed, to start the barcode scanner. (Note: do not look directly into the laser: it is a bad idea and you may experience some sort of blindness.) Your program should also read the barcode string returned. The reader should be triggered by a normal input, such as a proximity sensor.
3. The program should compare the barcode to at least two values and detect a pass fail condition. The barcode and the test condition should be displayed on the HMI. If the test fails one pneumatic cylinder should be fired, if not a second will be fired.
4. Develop all wiring and pneumatic diagrams.
Equipment:
CompactLogix controller
RS-232 Communication cable
Custom cable for BL-600 sensor
Keyence BL-600 series barcode scanner (e.g. BL-651)
Procedure:
1. Make a cable to connect the barcode scanner to a 5V source, and a computer. Note: See the manual.)
2. Connect the barcode scanner to a PC and run the configuration software to setup the scanner. This may require some trial and error effort. Test the sensor using the ‘Monitor’ to verify that you can read bar codes.
3. In RSLogix5000 Set the communication port parameters to match the sensor, and set the port control to ‘USER’. This will allow the PLC to access the serial port.
4. Enter/download your program and verify the operation.
Submission:
1. Pre-lab and updated design work.
2. Detailed settings for all of the components including the barcode reader so that a technician could reprogram the system.
7.11 Older Laboratories
7.12 Lab - DH+ Communications
Objective:
To explore to and between PLCs.
Pre-Lab: (due at the start of lab period)
1. Write two programs to run on a PLC-5 and a Softlogix PLC. When a button is pushed on one PLC (node #1), it should send data to another PLC to turn on an output. The message should be passed using the DH+ network. Write a second program that uses DH+ to run on a PLC so that when a button is pushed it requests data to set an output.
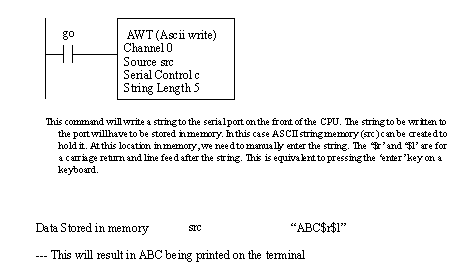
2. Write a program to send a message out the RS-232 port on the SoftLogix (to a connected PC running a terminal program) when an input is active.
Process Description:
As with the previous use of analog input and output cards, we need to set up blocks of memory that contain communication information. These blocks indicate what is to be sent and where.
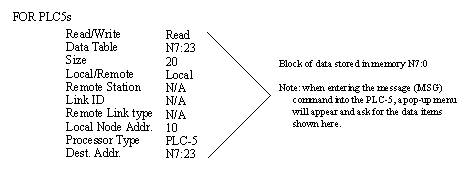
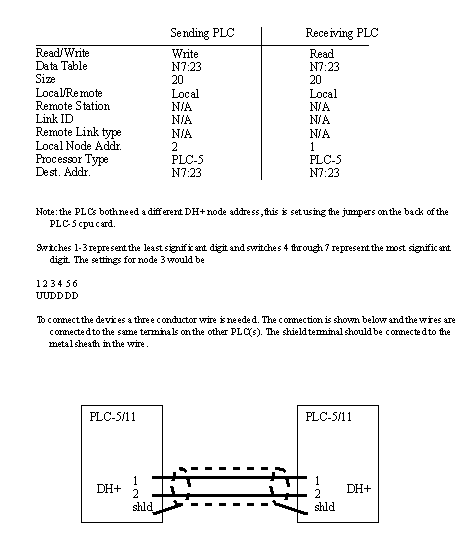
The Data Highway Plus, DH+, network uses a single path to connect numerous devices. To use this the block of memory below must be used to set up the information to be sent or received.
When PLCs communicate, one PLC must write contents of its memory to a second, or one PLC must request contents of memory from a second. The program below shows the basic steps involved in communication.
Equipment:
PLC-5s
RS-232 Communication cables
Data Highway cables
Screw drivers
2 Computers
Procedure:
1. (single teams) Have two computers available. One will be used for programming the PLC, and the other will be used as an ASCII terminal. Enter and download the program to the PLC as normal. Disconnect the serial cable, and connect it to the other PC. Run ‘hyperterm’ and test the program.
Submission:
1. Pre-lab and updated laboratory materials.
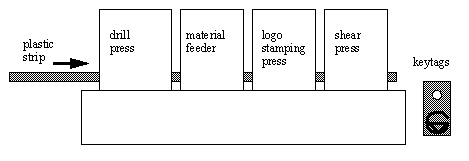
7.13 Lab: Keytag Maker
• Parts A, B, C, and D: These four parts are complimentary, and each week there will be four groups that will rotate through all four labs.
• Group Size: 3 students, 4 rotating stations
• These laboratories will be used to pull together 4 individual control systems into a complete manufacturing control system. Although each group will solve a different control problem, each laboratory will end with all stations in a fully functioning control system.
• These four labs will all use an Allen-Bradley PLC-5 to control the stations.
• The descriptions below will be used to develop a design and ladder logic before arriving at the laboratory. All laboratories are to be done on design sheets like those found in the course notes, or equivalent.
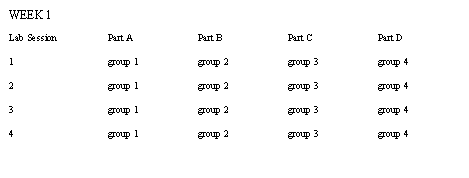
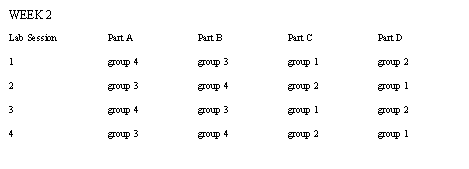
• The basic schedule for the first lab is shown below for the first and second weeks.
• NOTE: In this lab three of the stations use the hole detect to start an operation. Even when the operation is done the hole in the keytag will remain. You must write your program so that after the press has retracted the process will not start immediately. Only after the hole is gone will the program start looking for a new hole. You might want to add another state that waits until the hole is gone.
7.13.1 Part A: Shear Press
Objective:
A PLC will be used for control of a hydraulic cylinder that will shear off keytags.
Pre-Lab:
1. Examine the other components in the lab and determine what is required for proper operation of the shear.
2. Design the controls for the press.
3. Develop the ladder logic required for operation
Process Description:
The shear press will detect when the material is in place for shearing when a hole is detected by an optical sensor mounted. When sensed it will set a bit true in memory (B3:0/0) that will cause the material feeder to stop. A pneumatic cylinder will be actuated to clamp the strip. At this point shearing will begin by advancing the hydraulic cylinder until a hydraulic cylinder advanced limit switch is actuated. At this point the advance solenoid will be turned off, and the return cylinder solenoid will be actuated. This will continue until the retracted limit switch is actuated. At this point both the hydraulic solenoids are turned off. Finally the pneumatic solenoid is released, and the material feeder is allowed to continue.
PLC Outputs:
An AC Output card to output 120Vac.
pneumatic solenoid to clamp material
PLC Inputs:
An AC Input card to accept 120Vac.
hydraulic cylinder retracted limit switch
hydraulic cylinder advanced limit switch
hydraulic power on
Procedure:
1. Make the electrical connections between the PLC and the shear station.
2. Enter the Ladder logic, and test the module by itself.
3. Integrate the components with the other parts of the system and produce parts.
Submission:
1. Pre-lab and updated laboratory materials.
7.13.2 Part B: Feeder Positioning
Objective: a PLC will be used to position a material transport system driven by a motor.
Pre-Lab:
1. Examine the other components in the labs and determine what is required for proper operation of the feeder.
2. Design the controls for the material feeder.
3. Develop the ladder logic required for operation
Process Description:
The feeder uses a motor to advance the material strip. The feeder will continue to advance the material until the drill press orders the feeding to stop by setting flags true.
PLC Outputs:
A relay output card
PLC Inputs:
An AC Input card
control power on (master power for the station)
automatic mode on (must be on for PLC control)
Procedure:
1. Make the electrical connections between the PLC and the feeder station.
2. Enter the Ladder logic, and test the module by itself.
3. Integrate the components with the other parts of the system and produce parts.
Submission:
1. Pre-lab and updated laboratory materials.
7.13.3 Part C: Stamping Press Control
Objective: a PLC will be used to control an stamping press.
Pre-Lab:
1. Examine the other components in the lab and determine what is required for proper operation of the press.
2. Design the controls for the press.
2. Develop the ladder logic required for operation
Process Description:
The stamping press will detect when the material is in place for stamping (embossing) when a hole is detected by an optical sensor mounted. When sensed it will set a bit true in memory (B3:0/01) that will cause the material feeder to stop. A pneumatic cylinder will be actuated to clamp the strip. At this point stamping will begin by advancing the hydraulic cylinder until a hydraulic cylinder advanced limit switch is actuated. At this point the advance solenoid will be turned off, a two (or more) delay (0.5s) is required to allow the embossing to occur. After this the return cylinder solenoid will be actuated. This will continue until the retracted limit switch is actuated. At this point both the hydraulic solenoids are turned off. The pneumatic solenoid is released, and the material feeder is allowed to continue.
PLC Inputs:
An AC Input card to accept 120Vac.
hydraulic cylinder retracted limit switch
hydraulic cylinder advanced limit switch
control power on (master power for the station)
auto mode selected (must be on for PLC operation)
hydraulic power on
PLC Outputs:
An AC Output card to output 120Vac.
pneumatic solenoid to clamp material
Procedure:
1. Make the electrical connections between the PLC and the press station.
2. Enter the Ladder logic, and test the module by itself.
3. Integrate the components with the other parts of the system and produce parts.
Submission:
1. Pre-lab and updated laboratory materials.
7.13.4 Part D: Variable Feed Drill
Objective: a PLC will be used to control a variable feed drill
Pre-Lab:
1. Examine the other components in the lab and determine what is required for proper operation of the drill.
2. Design the controls for the drill.
3. Develop the ladder logic required for operation
Process Description:
The drill press will detect when the material is in place for drilling when a hole is detected by an optical sensor mounted. When sensed it will set a bit true in memory (B3:0/02) that will cause the material feeder to stop. A pneumatic cylinder will be actuated to clamp the strip. At this point drilling will begin. When the drill is done the pneumatic solenoid is released and the material feeder allowed to continue.
The drill will be controlled using an analog output card for feed velocity, and using digital inputs to measure position. For moving down (drilling) the analog output should be +2V, -10V is used for retracting, and 0V is used for no motion. The ladder logic below will make the analog output card drive the drill to advance when a bit is set, and retract when a second bit is set, otherwise the drill will be idle.
PLC Inputs:
A DC Input card to accept 12Vdc.
hole detected sensor
An AC Input card to accept 120Vac.
drill retracted limit switch
drill advanced limit switch
control power on (master power for the station)
auto mode selected (must be on for plc operation)
PLC Outputs:
An AC Output card to output 12Vdc.
pneumatic solenoid to clamp material
drill motor start relay
An Analog Output card will be placed in slot 3 to output -10 to +10Vdc and control drill velocity.
drill velocity voltage
Procedure:
1. Make the electrical connections between the PLC and the drill station.
2. Set up the I/O modules. You will need to make sure the analog output card is also set up. When setting it up use the ‘autoset’ values option. This will pick memory locations for the card to use: take note of these. (You will need to do this again when all of the programs are combined.) The use the ‘insert ladder rungs’ program to put the functions you need in the ladder diagram.
3. Enter the rest of the ladder logic, and test the module by itself.
4. Integrate the components with the other parts of the system and produce parts.
Submission:
1. Pre-lab and updated laboratory materials.
7.14 Lab: DVT Vision Systems
Objective: To use a vision system as a PLC sensor
Pre-Lab:
1. Examine the DVT training CD. In particular review ......
2. Follow the DVT tutorial that follows with the CD to prepare yourself to use the units in the lab.
3. Develop a ladder logic program using an SFC to perform the task described below.
4. Develop a wiring diagram (as in lab 5) for the system. This should be done on a computer.
Process Description:
A process will be designed to.....
Procedure:
1. Set up the DVT camera using the DVT software to perform the required inspection.
2. Connect the camera to the PLC so that it may detect pass and fail conditions.
3. Enter and test the ladder logic in the PLC.
Submission:
1. Pre-lab and updated laboratory materials.
7.15 Lab - Simple Motor Control
Objective:
The PLC will be used to control a DC motor, and a simple encoder will be used to detect position.
Equipment:
PC with micrologix programming software
PLC trainer boards
Wires
LEDS
Motors with gear head
Encoder disk
560 ohm resistor
1K resistor
1 uF capacitor
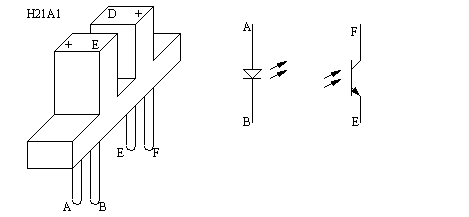
photo emitter/detector pair (H21A1)
Pre-Lab:
1. Develop a state diagram for a program to turn the motor shaft 3 times if button A is pushed, or 6 times if button B is pushed.
2. Develop ladder logic for the motor controller.
System Description:
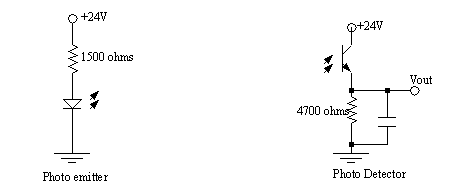
The motor will be driven with 12V, switched by an output relay in the PLC. This will cause rotation at approximately 100rpm. A simple encoder will be made by using a clear disk with blacked-out areas. The disk will rotate with the shaft of the motor. An optical sensor will be used to detect the blacked-out areas. The result will be input pulses that go into the PLC. By counting the pulses we can tell how many times the shaft has rotated. The figure below shows the photodetector circuit.
The light beam will be broken with encoders that have the general pattern given below.
Procedure:
1. Connect the motor, PLC, and any required wiring.
2. Load and test the program for correctness.
Minimum Required Submission:
1. Prelab design work
2. Wiring diagram
3. Program, with comments and test results