2. EGR 345: Dynamic System Modeling and Control - Old Labs
2.1 ASSIGNMENTS
2.1.1 Homework
• Assignments will be given at points throughout the term to reinforce challenging concepts.
2.1.2 Supplemental Writing Skills Requirement
• The official university SWS statement is:
“This course is designated SWS (Supplemental Writing Skills). Completion of English 150 with a grade of C or better (not C-) is the prerequisite. SWS credit will not be given to a student who completes the course before the prerequisite. SWS courses adhere to certain guidelines. Students turn in a total of at least 3,000 words or writing during the term. Part of that total may be essay exams, but a substantial amount of it is made up of finished essays or reports or research papers. The instructor works with the students on revising drafts of their papers, rather than simply grading the finished pieces of writing. At least four hours of class time are devoted to writing instruction. At least one third of the final grade in the course is based on the writing assignments.”
• These requirements will be fulfilled through the laboratory reports for the semester. It will be expected that the level of performance in the laboratory continually improve based upon feedback from the instructor.
• PLEASE NOTE THERE IS A WRITING GUIDE THAT FOLLOWS THE LABORATORY DESCRIPTIONS.
2.2 Old Lab Stuff
2.2.1 Lab 3: Writing Lab Reports
• The purpose of this laboratory is to prepare you for the skill needed for the remaining laboratory reports this semester.
2.2.1.1 - Prelab 3a: Writing Skills
Objective: To give students a perspective on the purposes of writing.
• Theory:
Before starting to write you need to make some clear decisions. These include,
Who are you writing for? Who is your audience?
What does the reader want to know?
What is the objective for the written work?
After answering these basic questions you can plan the layout for the paper.
What are the general divisions for the topics?
Is there a conventional forum for the topics?
What is a logical flow for the work?
What can you tell the reader that they need to know?
What is a reasonable depth or level for the writing?
At this point personal styles will drive writing techniques. For technical work it’s best to follow this general sequence:
1. Determine major questions that need to be researched (lay out what you know in point form)
2. Do research as required (add point form notes and add references for things that aren’t obvious, or may be useful to others interested in the area. It is very helpful to add equations and figures at this point.
3. Review, rearrange, and edit the point form notes. Check to see that they match your writing objectives.
4. Group and divide the notes into sections. Check to see if the sections flow.
5. Go through and convert the point form to sentences, etc.
6. Proof read and fix obvious problems.
7. Give to somebody else to proofread. It is best to use a technical reader.
8. Proof read again, and then format.
9. Skim to check that the general appearance is good.
• Procedure:
1. Read the writing section later in the notes
2.2.1.2 - Prelab 3a: Acceleration Due To Gravity
• Objective:
To estimate the acceleration due to gravity.
• Theory:
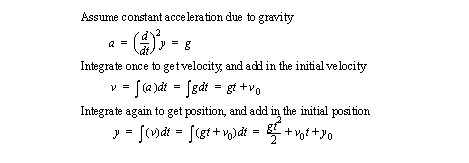
We know from basic physics that acceleration is the second derivative of position. If we are dropping a small object near the surface of the earch gravity is nearly constant. If gravity is giving us a constant acceleration we can integrate this twice to get the following function for height.
• Procedure:
1. Prepare a Mathcad worksheet to calculate acceleration given the time and distance an object has dropped.
2. In the same Mathcad worksheet, prepare a mean and standard deviation calculation for 5 data points.
2.2.1.3 - Experiment 3a: Writing Tutorial
• Objective:
To review methods for writing laboratory reports.
• Procedure:
1. The lab will begin with a discussion of writing skills and writing techniques.
2. Obtain a set of masses, stop watches and year sticks.
3. Drop the masses from different heights and measure the time it takes to reach the floor. Repeat each measurement 4 times and do this for 5 different release heights.
4. The laboratory instructor will then guide you through the steps of preparing the laboratory report for the experiment you have just done.
• Post-lab:
None.
• Submit:
1. The prelab work.
2. The report prepared.
2.2.2 Lab 4: Introduction To Systems Modeling Concepts
2.2.2.1 - Prelab 4a: Introduction to Mechanical System Modeling
• Theory:
• Prelab:
1. Review the theory section.
2. Set up a Working Model 2D example for the acceleration of a block sliding on a surface.
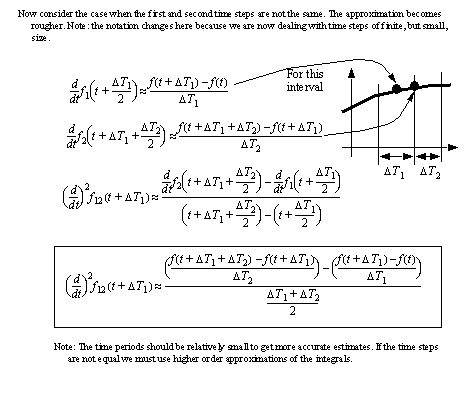
3. Set up a Mathcad document that uses both of the methods for determining acceleration using equal sized time steps, and unequal time steps. Note: To do iterative calculations in Mathcad you can put the equations in a matrix, or write a script.
2.2.2.2 - Experiment 4a: Introduction to Mechanical System Modeling
• Objective:
To determine acceleration using simple measurements.
• Procedure: (groups of 4 should rotate between steps 1 and 2)
1. Set up a dry slope and slide a mass down it. A strobe light will be used to generate equal time divisions. Assign one person to release the mass, and three people to mark positions as the mass slides (on the first, second and third strobes). Measure the positions at each strobe and record. Use the Mathcad document to calculate acceleration.
2. Set up a dry slope and slide a mass down it. There will be three position sensors placed at equal distances (see figures below). The position sensors will be connected to a computer running LabVIEW. Release the mass and measure the times at which is passes the three points on the slope. Use the Mathcad document to calculate acceleration.
• Post-lab:
1. Use Mathcad to estimate the coefficient of kinetic friction between the block and inclined surface for both tests.
2. Verify the calculations by running a simple experiment in Working Model 2D.
• Submit:
1. All Mathcad and Working Model 2D files by posting to web pages
2. A final statement about the overall experiment and the results.
2.2.3 Tutorial 6a: Data Collection with an Oscilloscope and LabVIEW
• Objectives:
1. To collect a single sweep of Tektronix 2230 oscilloscope data.
2. To plot single sweep data on the HC100 digital plotter.
3. To control a Tektronix PS5010 programmable power supply.
4. To control GPIB instruments with LabVIEW.
• Theory:
We need to observe how system behavior changes over time. To do this we can take successive readings and then plot them as a function of time. If we look at the screen of an oscilloscope, the horizontal axis represents time and the vertical axis voltage. One significant problem with any time based sampling device is when to start recording. We use certain settings to trigger the beginning of the beam scan. Each type of signal will require a different type of trigger, and so oscilloscopes have multiple settings to make them adaptable.
We will connect the lab oscilloscope to the computer with an interface card and cable. The interface between the computer and oscilloscope is called GPIB (General Purpose Instrument Bus) and is also known as IEEE-488. It is a networking scheme that will allow more than one device to be connected to the computer by using chains of cables. To interface to GPIB devices, we need a special interface card in the computer and interface software. We will use LabVIEW to communicate with the oscilloscope.
In general, an oscilloscope can sample voltages at rates from 0Hz up to about 1GHz. A typical inexpensive oscilloscope will sample data up to 10MHz. The DAQ card in the computer have the potential to sample up to 100KHz.
Materials/Equipment:
Tektronix 2230 Oscilloscope
Tektronix PS5010 Power Supply
Scope probes
Tektronix HC100 Plotter
Red and Black Banana Jack Plugs (with alligator clips)
PC with GPIB Interface and LabVIEW
Procedure:
1. Before turning on the power to the oscilloscope, you must give it an address as a GPIB device. The address is a number XX set with dip switches. These are found on the side of the oscilloscope and switches 1, 6 and 8 should be set to "1". All others should be set to "0".
2. The oscilloscope is a very flexible device that can be reconfigured for various measurements. To set various parameters, we use the switches on the front panel, near the display. Set the switches on the front to match the descriptions below:
POSITION CURS-SELECT WAVEFORM (in):
1K-4K (in): this sets the speed of the data collection
ROLL SCAN (out): keep the display steady
PRETRIG-POST TRIG (out):
SAVE-CONTINUE (out): scan repeatedly
STORE-NON STORE (out): don’t store the screen
SLOPE (out): deselects the input slope as a trigger
A&B INT (CH 1): selects channel 1 to trigger channel A
A SOURCE (INT): uses an internal clock for the sweep time
A EXT COUPLING (DC): sets the input signal as DC
HORIZONTAL MODE (A): sets channel A for the sweep axis
VERTICAL MODE (CH1): uses the magnitude of channel 1 for height
X-Y (out): do a normal time sweep
BW LIMIT (out):
A AND B SEC/DIV (1 ms): sets the scan divisions on the scope
3. Now set up the power supply and connect it to the oscilloscope so that it will supply a signal. To do this, you need to connect the probe to the oscilloscope (CH1) and then to the positive and common terminals of the power supply.
4. You can now set up a signal to be measured. Turn on the power supply and then program it for 10V on the POS, and 0V on NEG supplies. The OUTPUT should be OFF. Finally, lock the program by pressing LOCK. You may now set up the scan trigger on the oscilloscope. Start the scope scanning continuously in the A TRIGGER mode by pressing P-P AUTO (on). Next you need to ’zero’ CH1. To do this, set the input to GND and use CH1 POSITION to center the trace. Once centered, change the input from GND to DC. The trace on the screen should now reflect the actual input. Set the scale to 2 VOLTS/DIV.
5. Scope is in analog mode.
6. Put scope in store mode by pressing the STORE button.
7. Move cursor and observe values.
8. Connect scope to plotter with GPIB cable and plot waveform.
9. Turn off scope, disconnect from plotter, connect to computer. Set the address dip switches on side so that only switch 1 is set to "1", all others set to "0". Turn on the scope.
10. Run LabVIEW and load GPIB vi. This is found under XXXXXXX. Verify GPIB setting, scope should be device 1.
11. Load the LabVIEW vi for the scope "XXXXXXXXX.
12. Capture a scan of data into LabVIEW.