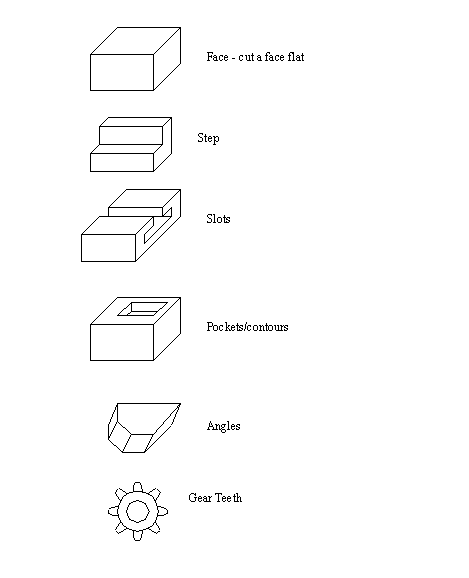
1.1.1 Types of Milling Operations
• Typical operations re pictured below
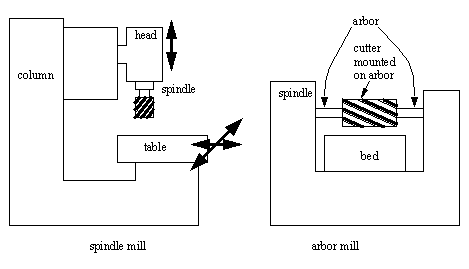
1.1.1.1 - Arbor Milling
• The advantages of arbor milling are,
- The cutter is held more rigidly on the spindle nose
- There is less variation in the arbor torque
- The teeth responsible for surface finish do not encounter the hard mill scale
- Lower power requirements
- Flatter work surface finish.
• For straddle milling
- Two similar side and face cutters are mounted on the same arbor, with spacers to separate them.
- This allows two sides of a part to be cut in a single pass.
• For Gang milling
- Many dissimilar cutters are mounted on the same arbor at the same time.
- When the work is passed under the cutter, multiple cuts are made in a single pass, reducing alignment problems, and decreasing operation time.
1.1.2 Milling Cutters
• The family milling cutters include a number of basic operations, but in general they will cut with some combination of the end and/or the sides.
• The basic types include,
- End Mills - The face and sides at the bottom end of this tool are used for plunge cutting (two flutes) and side and end cuts (four flute).
- Plain - These mills are used to cut with the sides only. They are generally mounted on an arbor.
- Side or Side & Face -
- Face - This cutter is held on a spindle nose.
- Shell and adapter -
- Form -
- T-Slot, Dovetail, Woodruff -
- Slitting Saws -
1.1.3 Milling Cutting Mechanism
• In milling each tooth on a tool removes part of the stock in the form of a chip.
• There are two types of cutting actions,
Peripheral - The teeth at the periphery do the cutting
Face - The teeth on the face of the cutter remove metal.
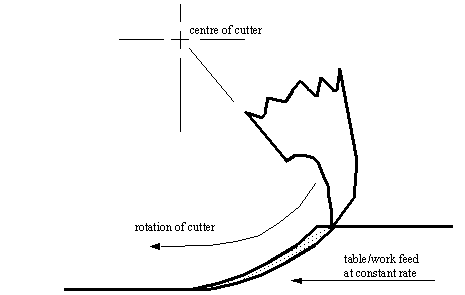
• The basic interface between tool and work is pictured below. This shows a peripheral milling tooth.
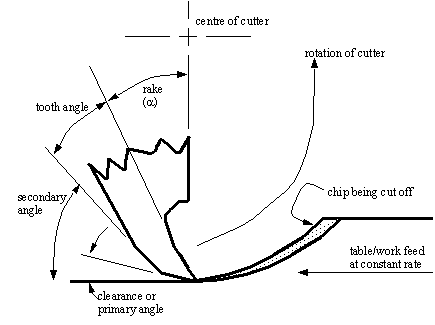
1.1.3.1 - Up-Cut Milling
• The milling method shown above is called up-cut (or conventional) milling. In this case the table is moving towards the cutter, opposing the cutter direction. The basic steps of chip cutting here are,
1. As the tooth makes contact with the surface, the tooth begins to push down. As the tooth continues to turn, it reaches a point at which the pressure has built up to a high level, and the tooth begin to dig in.
2. As the tooth starts to dig, it cuts down, and the metal chip begins to shear off.
3. The tooth continues to cut the chip off, until it reaches the surface of the material. At this point the chip breaks free, and the cutting forces drop to zero.
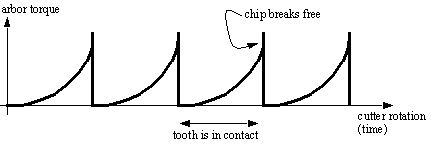
• Because the cutter does not start to cut when it makes contact, and because the advance moves high points past the cutter contact, the surface has a natural waviness.
• If a cutter has straight flutes, then a torque profile for it might look like,
• The peak arbor torque can be smoothed out by using helical cutting blades, so that there is always a cutter in contact at any one time.
1.1.3.2 - Down-Cut Milling
• When the cutter rotation is in the same direction as the motion of the work being fed, it is referred to a Down-cut, or climb milling.
• When this cutter makes contact with the work, it must begin cutting at the maximum torque. As a result, a back-lash eliminator must be used to take play out of the system.
• This method has advantages,
- The cutter forces are directed into the table, which reduces fixture forces, and allows thinner workpieces
- There is less radial pressure on the arbor
- Better surface finishes obtained because there is no “dig-in”