|
|
6.5 LABORATORIES
6.5.1 LAB - TECHNOLOGY AND MANUFACTURING
6.5.1.1 - LAB - Introduction to Metrology and Design of Experiments
Objective: To explore basic measuring instruments and conduct a simple design of experiments analysis.
Pre-Lab:
1. Read section later in the noted on design of experiments.
Materials:
micrometer
calipers
specimen sets
surface plate
height gage
gage blocks
dial indicator
Group Size:
groups of 3
Procedure:
1. A brief presentation on the use of micrometers, calipers and dial indicators will be made at the beginning of the lab.
2. Measure the specified dimension on the parts using the micrometer and calipers. Put both dimensions side by side in a table.
3. Mount a dial indicator and measure the same specimens in step 2, put these values in the table also.
4. A brief presentation on design of experiments will be made.
5. An experiment will be conducted that evaluates the measurement abilities of micrometers. The two variables in question are the variation between two users and the use of the clutch/no clutch. Set up the appropriate chart that varies these two parameters and determines the effect and correlation.
6. A specimen set will be supplied. An SPC analysis of these specimens needs to be done.
Submit: (in standard lab format)
1. The table of values measured by micrometer, calipers and height gages with a description of differences.
2. The design of experiments data, calculations and conclusions.
3. The SPC analysis.
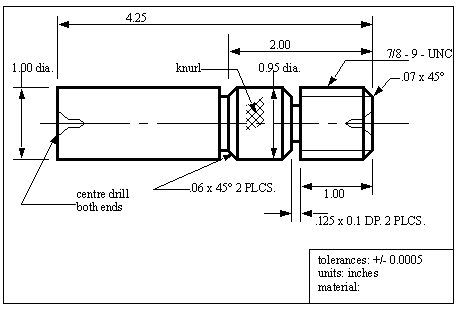
6.5.1.2 - DEMO - Process Planning and Machining Demo
Purpose:
a) To observe a series of Machine Tool operations, in the manufacture of the component shown.
b) To introduce the students to the concept of process planning.
Pre-Lab:
1. Read over the drawing, and the process plan before the laboratory.
Materials:
Lathe and tools for knurling, facing, center drilling, parting (1/8”), UNC threading, turning, 45° form
1” bar stock, brass
Cutoff saw
Micrometer
Component Drawing:
Procedure:
1. Discuss safety in the shops with Mr. Bob Bero.
2. The will make the part above, or something similar.
3. Tour the remainder of the shops.
CAUTIONS:
1. Power will be on in the machine shop.
2. For your safety, refrain from touching any machine buttons or levers.
3. Do not handle swarf (metal chips) from the cutting processes, they are hot, and sharp and WILL cause at least some harm.
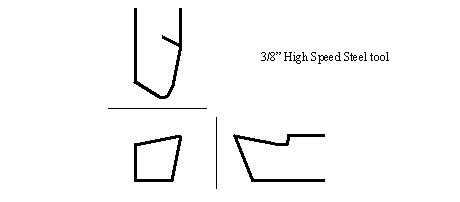
Cutting Tool:
A variety of cutting tools are available in a quick change fixture, but a typical lathe toolbit is shown below.
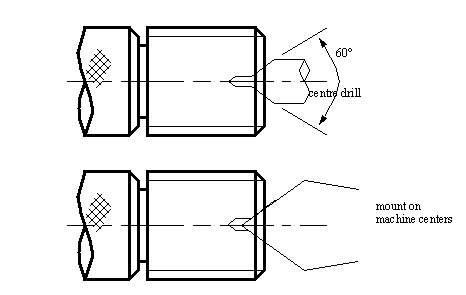
Centre Drill & Machine Centre:
Surface Cutting Speed:
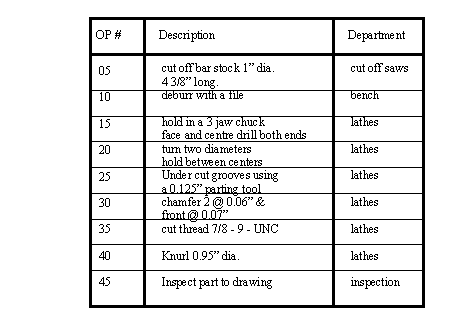
Process Planning Sheet:
Submit:
Nothing
6.5.1.3 - LAB - Paradigm of Technology (tentative)
Objective: To form an opinion on technological change
Pre-Lab:
1. Read the article “XXXX, XXXX and Assault Rifles” by XXXXXXXXX.
2. Write a point form summary of the article.
Materials:
Paradigm Video Tape
VCR/TV
Student provided objects
Procedure:
1. Discuss the article.
2. In groups of about four, select a simple object that has been introduced in the last century. Next, consider the social impact the object has had, including value, life-style and economic changes.
3. View the video tape and take notes about the basic points of the philosophy, evidence that it is realistic.
4. Discuss the video.
5. Discuss the statement - “When somebody says ‘they should have thought of that’ they are talking about the stewards of technology.” Next, identify the stewards of technology.
Submit:
Nothing
6.5.2 LAB - HEAT TREATING OF STEELS AND THE JOMINY TEST
Objective:
To quantify the effects of heating and cooling on the properties of steel.
Pre-Lab:
1. Go to the engineering library and get the ASTM standard ‘A 255 - 85’
2. Read the ASTM A255-85 standard.
3. Review materials on heat treating and steel microstructures from EGR250.
Theory:
Iron is a useful material, but it tends to lack hardness, as a result we can turn it into steel. Steel is made by adding elements such as carbon, silicon, molybdenum, chromium, etc. to iron. These materials do not mix in a homogeneous form and they form quite complex structures. To complicate matter the heating and cooling of the metals causes the alloying elements to form different structures in the iron. Most of these structures tend to have phases that are primarily one type of material, such as ferrous carbide, which has a higher melting temperature. When a single material forms in a region is tends to form a single grain of metal, under the microscope we can look for these regions.
When heated past 1700degF for a few hours, the steel is still solid, but the microstructure normalizes into Austenite, and the alloying elements tend to distribute themselves evenly. After this the structure will take different forms, depending mainly upon how quickly it is cooled. At low cooling rates the iron, carbon and other elements tend to separate out at different rates. As a result a slow cooling rate (such as air cooling) will lead to pearlite. This material has ridges of ferrite and cementite tightly combined to form a pattern like gray mother of pearl under the microscope. Sometimes a pattern will emerge that looks like a fingerprint. A slower cooling rate will result in pearlite with larger features. The slowest cooling rates (especially annealing) tend to lead to large grains of ferrite. Under a microscope ferrite looks shiny and white. A faster cooling rate will lead to a tighter looking combination of elements called Martensite. This looks like a very tight random pattern of light and dark under the microscope. If we can manage to cool the material fast enough to avoid to avoid the formation of other forms we will also have some retained Austenite. This tends to form as sharp spears shaped grains. There are other structures that occur, but they are rarely seen or require electron microscopes, such as Bainite.
The microstructure of a metal can be determined by polishing the surface to make it flat, and then using an etchant to make the surface more visible. A microscope is then used to observe the structure. Careful observation can determine the structure of the metal. We can also use Isothermal transformation graphs (found in materials handbooks) to theoretically estimate what microstructures are present in a material.
The hardness of a material can be measured using a hard stylus that is pushed into the surface of the work. Hardness is a function of how deep the stylus penetrates the surface (We will use the Rockwell C scale).
6.5.2.1 - Part A - End Quenching For the Jominy Hardness
Materials:
heating oven with thermometer
1” 1045 steel bar stock
1” 4140 steel bar stock
quenching apparatus and water source
tongs
surface grinder
stain/marker
Rockwell C hardness tester
ruler/scale
scribe
specimen stand at hardness tester
safety glasses
Procedure:
1. Mr. Bero will heat the bar of steel in a high temperature oven until it is at austenite temperature (this will be approximately 1700°F and take approximately 3 hours).
2. The quenching apparatus will be set up and the water flow adjusted to a specified rate, the temperature will be checked.
3. When all is prepared, the part will be removed from the oven, then placed in the quenching apparatus. Note the end that was quenched.
4. After cooled sufficiently (the following laboratory period), grind more than 0.015” off opposite sides of the bar to make flats for harness testing. Take care not to overheat the metal, as this might change the material properties. Use safety precautions.
5. Stain one side of the bar - this will help locate test points later. On the stained surface, mark off points every 1/16” using the scribe for the first inch from the quenched end, after that mark off points every 1/8” inch.
6. Check the setup of the hardness testing machine.
7. Take hardness test readings in the Rockwell C scale along the flat face of the bar near the scribed points, and record values. It is necessary to support the specimen with a stand when it hangs over the side of the specimen table. Be careful to wait at least 15 seconds when taking readings, even if the readings look done before this time, they are not.
8. Polish and etch the entire flats ground on the opposite side of the bars using the techniques in part b of this lab. Examine the microstructure from the quenched end of the bars.
Submit:
1. Graph the results of the hardness tests.
2. Provide additional details required in sections 8.1.1, 8.1.2 of ASTM A255.
3. Discuss the correlation of hardenability to theory.
4. Discuss the microstructure of the bars.
6.5.2.2 - Part B - Microstructure
Materials:
4 buttons of 1045 steel, marked #1 to #4
4 buttons of 4140 steel, marked #5 to #8
heating oven
tongs
quench bath
cooling tray
water sanding station
diamond polisher and extender fluids
microscope
nitric acid
glass eye dropper
safety glasses
sink and running water
Procedure:
1. Before the lab, buttons #1,2,3,5,6,7 will be preheated to Austenite/annealing temperatures.
2. During the laboratory the buttons will be removed. Air cool buttons #1 and #5. Water quench buttons #2 and #6. Buttons #3 and #7 are left in the oven for an extended period of time for annealing.
3. Once cool, the buttons will be taken to the specimen room where they will be polished on the water sanders. Start with the courser paper, and work to the finer paper. This requires some attention to technique. The process may take a few minutes on each belt. Try not to move in straight lines, a figure eight pattern work well. move to a finer grit of sandpaper until done.
4. When the surfaces are relatively polished, do a finishing pass on the diamond grit polisher. Start with the diamond wheel. Use a drop of extender on the wheel, and move the sample about. This may take more than a minute. When done proceed to the Alumina wheel, and follow a similar procedure.
5. When the surface has a mirror like finish, put a drop of nitric acid on it (USE SAFETY PROCEDURES). The surface should darken, and then you may wash the acid off in the sink.
6. Using a specimen microscope, examine, and draw the microstructures of the materials. Also note the microstructures that are visible. If you find a good example of Pearlite, inform the others in the laboratory.
7. Develop a chart that categorizes the different steels, treatments, and their properties.
Submit:
1. Discuss the microstructures seen in the microscope, and identify phases.
2. Locate appropriate Isothermal Transformation Diagrams for the steels used in the lab and use these to estimate the microstructure.
3. Discuss the relationship between the micrographs and the expected values - refer to the phase diagrams.
6.5.3 LAB - CUTTING
6.5.3.1 - Cutting Forces
Objective: To investigate the relationship of the cutting variables to cutting forces
Theory:
Pre-Lab:
1. Review Merchants force circle.
2. Review the surface roughness measurement section of notes.
Materials:
Lathe
Tool force dynamometer, centerline mount, and gages
Tachometer
Single cutting edge tool
Thin walled aluminum tube mounted in chuck (secured for cantilevered cut)
Profilometer
Safety glasses
Micrometer
Procedure:
1. Ensure that the lathe is set for orthogonal cutting, and that all instruments are functioning. Test the cutting forces by pushing the tool. Test the tachometer by turning on the lathe and synchronizing. Ensure that the cutting tool edge is perpendicular to the rotation of the work.
2. Measure the Inner and outer diameters of the tube.
3. Put on Safety Glasses. Turn on the lathe and Take a cut at the first speed and feed. Use the tachometer to verify speed, and use the strain gages to measure the cutting forces. Remove the chip, and measure the thickness, and observe the surface conditions. Mark it for later reference.
4. Taking the same measurements, make several cuts at different cutting speeds and then at different feed rates.
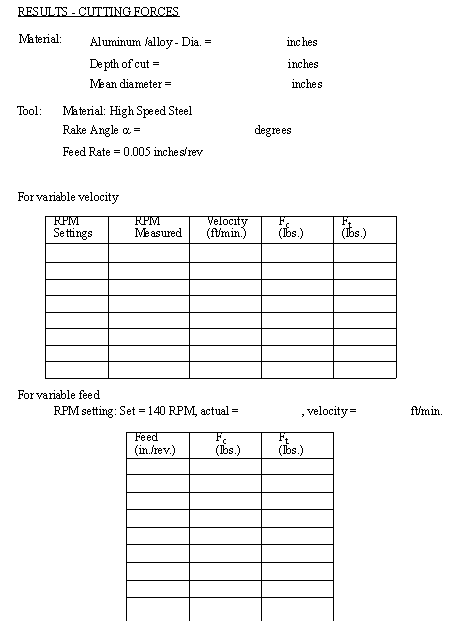
Submit:
1. Estimate the cutting forces, and horsepower required for each cut based on the data.
2. Calculate HPu and correction factors ‘c’ for the different cutting conditions. Compare these to those found in the notes.
3. For variable feed, plot graphs for Fc/feed and Ft/feed on the same graph.
4. For variable speed, plot graphs for Fc/V and Ft/V on the same graph.
6.5.3.2 - Surface Texture
Objective: To investigate the relationship of the cutting variables and surface roughness
Pre-Lab:
Review the textbook and section later in the notes on surface roughness measurements.
Materials:
Mill with fly cutter mounter
flat brass stock
flat steel stock
Profilometer
Safety glasses
Procedure:
1. Test the calibration of the profilometer against a standard.
2. Mount the brass in the mill.
3. Make cuts at different speeds, feeds and depths using the methods of DOE. Measure the surface roughness parallel and perpendicular to the cutter path.
4. Replace the brass with steel. Take 2 cuts using parameters from step 3. Compare the surface roughness values.
5. Replace the tool with a new tool having a rounder cutting radius. Take 2 cuts using parameters from step 4. Compare the surface roughness values.
6. Repeat step 5 with brass.
Submit:
1. The DOE for speeds feeds and tool nose radius.
2. A numerical comparison of the surface roughness when cutting brass/steel and large/small cutter radius.
6.5.4 LAB - PLASTICS
All students are expected to do the Injection Molding lab, and the Vacuum Forming lab. But there will be a choice between the Thermoset Casting, and Composites labs.
6.5.4.1 - Injection Molding
Objective: To be exposed to the basic process and parameters of injection molding using a benchtop machine.
Pre-Lab:
None
Theory:
Typical injection molding machines will take solid thermoplastic materials in pellet form. The pellets are sometimes dried in ovens first, as plastic is hygroscopic, and will absorb water when left to sit for any time. The plastic pellets are poured into a hopper, and into a chamber. This chamber uses a combination of heating and shearing to make a high pressure homogenous molten mixture. The shearing and pressurizing is done using an auger like screw. When the plastic is injected, it is pushed into the mold in one shot. The mold is typically cooled with water channels, and the plastic quickly fills the mold and solidifies. If too much plastic has been injected it will tend to squeeze out of the mold and leave ‘flash’ that looks like thin fins. If the plastic hardens too quickly in the mold you will be able to se flow marks on the surface of the part. If too little pressure was used, the mold will not be filled, and the result will be a ‘short-shot’ part.
The benchtop model we will use in the lab does not use a screw for the plastic, but instead the plastic is heated in a chamber, and a plunger pushes the plastic into the mold. This means that the plastic may not have been completely melted by the heating alone. The plunger is also advanced using supplied air pressure, if the air pressure is lower than normal, there might not be enough shot pressure and a short-shot could result.
Materials:
Benchtop injection molding machine with proper electrical and air supply hook-ups
Tensile test specimen die
High density polyethylene beads
Stopwatch
Marker
Tensile Tester
1” Micrometer
Procedure:
1. Turn on both heaters to the suggested settings and allow to warm up (approx. 1 hour) to 475°F for the barrel, and 500°F for the nozzle.
2. Load the raw plastic into the hopper of the machine.
3. Cycle the machine for about 10 seconds to ensure proper operation. Repeat this until you are getting good parts.
4. Make three specimens at different cycle times, 2 10 and 30 seconds. Mark all specimens for later reference. If the cycle time on the machines is set to a large value, a stopwatch can be used, and the cycles stopped manually at the desired times.
5. Now, using a cycle time of 10 seconds, and make two new parts, this time varying the barrel temperature above and below the suggested temperature by ±25°F.
6. Set the barrel chamber temperature back to 475°F, and this time vary the nozzle temperature for two separate parts by ±25°F.
7. Set the nozzle temperature to 500°F, and make two final shots, varying the air supply pressure down from the maximum by 20psi, then another 20psi.
8. Make and record observations for all of the parts.
9. Measure the dimensions of the thinnest section, and then test the strength of the specimens in the tensile tester.
Submit:
1. A table of values of molding conditions and the expected outcomes.
2. Discussion of the results based on the properties of the plastic used.
3. A reason for the resulting material strengths.
6.5.4.2 - Vacuum Forming
Objective: To explore the process of vacuum forming, and determine the relationship between process parameters.
Pre-Lab:
None
Theory:
If we heat a sheet of thermo plastic material enough it will become pliable. Overheating will melt the sheet. Our objective when vacuum forming is to heat the sheet so that it becomes pliable. While the sheet is still hot, we position it over a mold, and then pull it down onto the mold. We then pump the air out from beneath the sheet to create a vacuum. This vacuum will create a pressure of 0 to 15psi on the plastic. If done quickly enough, the plastic will move down to take the shape of the mold before it hardens. The temperature required to heat the plastic depends upon the type of material. When forming the sheet the original sheet is deformed and typically thinner.
Materials:
12 sheets of polyethylene cut into 12” squares
small scraps of each material for temperature testing
vacuum forming equipment
heating oven
vernier micrometer
vernier calipers
knife or scissors
thermometer
stopwatch
steel scale
Procedure:
1. Position the thermocouple in the oven so that it is far away from the heating elements, but close to where the plastic will be. Preheat the oven to just below a suitable temperature for polyethylene (275°F). The correct temperature for each material can be estimated by using the test scraps of material (they should start to sag just below the suitable temperature).
2. Insert a specimen of polyethylene into the frame and secure - align the 1” grid to marks on the frame so that the following grids can also be aligned. Roll the tray into the oven, heat for 20 seconds or until the material starts to sag, measure and record this time. Measure the temperature of the thermocouple as the sample is being pulled from the oven. Quickly slide the specimen out to the vacuum former, and start the cycle. When the cycle is done, remove the specimen.
3. Set up and conduct a DOE that examines the effects of oven temperature and hold time in the oven.
4. When done Cut down the same center line of each specimen and measure the thickness at critical points (the nose) and the radius in a given tight corner.
Submit:
1. The DOE and conclusions.
6.5.4.3 - Blow Molding
Objective: To explore the process of blow molding, and the effects of process parameters.
Pre-Lab:
None
Theory:
None
Materials:
blow molding machine
raw plastic
micrometer
knife or scissors
stopwatch
Procedure:
1. Set up and run a simple part.
2. Set up and conduct a DOE that examines the effects of temperature and advance time.
3. When done Cut down the same center line of each specimen and measure the thickness in the top middle and bottom ball.
Submit:
1. The DOE and conclusions.
6.5.4.4 - Thermoset Casting (tentative)
Objective: To investigate resin casting, and the effects of heat on setting.
Pre-Lab:
None
Theory:
This lab will use the ‘Alumalite’ two part polymer system. The two parts are measured out in equal volumes and mixed together. Once mixed these parts form long polymer chains. By themselves this would leave a rubbery solid. Crosslinking also occurs which makes these materials stiff. During this process at least some heat is released as bonds are broken and made. In the presence of heat this reaction will occur faster, and polymerization will be more complete. when fully cured the Alumalite will have a beige, or creamy appearance. When not fully cured the result will be a semi-transparent brown, that may still be sticky. This material will tend to gel within a minute, and be solid within two, so speed is required as soon as the two components have been mixed.
Materials:
Alumalite part A and B
Graduated cylinders
Disposable mixing cups
Disposable stirring rods
Plastic gloves
Safety goggles
Apron
Mask if prolonged usage
Rubber mold with thermocouples
Silicone, or other release agent
Heating gun/oven
Stopwatch
Procedure:
1. Place the mold in a freezer to chill it for an hour before use.
2. Estimate the volume of the mold, using a previous part.
3. put on apron, safety goggles, and gloves. If the ventilation is poor, or the work prolonged, use a breathing mask.
4. Taking care to use the proper cylinder for the proper Alumalite component, measure out two equal volumes or parts A and B to each cylinder. The volume should be just over half the required total.
5. Make sure that all mixing, and measuring facilities are ready.
6. Remove the mold from the freezer. Clean the mold, and spray with release agent.
7. Hook up and verify the operation of the thermocouples.
8. Pour the two components into the mixing cup, and mix thoroughly - a brownish mixture will appear in a few second.
9. Pour this into the mold, and start the stopwatch, and start measuring temperature. Use an air jet to keep the surface of the part cooler.
10. At regular intervals (10 seconds) measure temperature, and touch the surface lightly to see if it has solidified. Record the time when the surface becomes ‘solid but tacky’ as the gel time. Record the time when the surface becomes hard as the set time.
10. When satisfied that the process is complete, remove the part and make observations.
11. Repeat the process, but this time at normal room temperature.
12. Repeat the process again, but this time use a an oven to preheat the mold, and a heat gun/oven to speed the process.
Submit:
1. Draw graphs of the heats of the three tests, and draw on lines for gel time, and set time.
2. Draw conclusions about the results of the experiments.
6.5.4.5 - Composites
Objective: This laboratory will expose the student to fibre-resin composite materials. This will include a basic demonstration of construction techniques, and testing of completed parts to estimate material strengths.
Pre-Lab:
None
Theory:
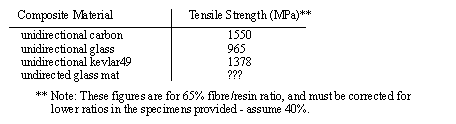
Composite materials provide high strength and stiffness with low weight pieces. In many cases the strength and stiffness to density ratio is about 5 times that of steel and aluminum. In addition these materials are easier to work into complex shapes than the metal equivalents. These advantages are mainly due to the macroscopic combination of high strength fibres, and a low strength binder (resin). Typical materials used for fibres are glass, carbon, and aramid (kevlar). The strength of the composite can be closely approximated by finding the fractional cross sectional area the materials (resin/fibres), and their respective material properties. A weighted sum is done to find the aggregate properties.
Composite parts are made using molds. The fibre cloth is cut to shape while paying attention to the direction of the fibres, for strength. After the fibre has been cut to shape, for the number of layers required, the mold is coated with a parting agent, such as silicone. The resin is mixed just before the layup begins because the resin has a pot life of a few minutes before it hardens. A roller is used to apply a thing layer of resin over the entire surface. The first layer of fibre is applied to the surface, and the roller is used to apply another layer of resin on top. Fibre and resin are alternately applied until the entire part is built up. When this is complete, the part is left to harden (30 minutes to 12 hours). At this time the part should separate cleanly from the mold. The edges are trimmed and the part is complete. Before the part is cured the composite will be weaker. Heat may be used to speed the curing process.
The construction method described above is called wet layup, and is commonly used in small batch composite construction. This method generally produces the poorest composite material properties of all methods. This is due to the manual application of the resin. A ratio of approximately 65% fibre to resin is required throughout the part for optimal strength, but this is difficult to obtain when manual application is used. Secondly, a number of voids (air bubbles) are present in the material. Below 0.5% voids in the material the strength is largely unaffected, but above this the strength drops of 7% for each 1% of voids up to 4% voids in the matrix. Another point of interest is that most composites undergo an elongation of approximately 1 to 5% before they rupture without any plastic deformation.
Materials:
Fiber Glass kit (glass mat, resin and hardener)
Scissors
Gloves
Apron
Safety goggles
Mask
Wax paper (or similar)
Cardboard
Pins
Disposable mixing container
Disposable mixing stick
Disposable brush
Tensile tester
Micrometer
Microscope
Heating Oven
Paper and Pen
Procedure:
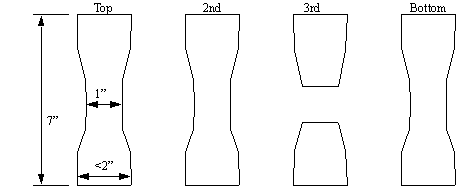
1. On a piece of paper, trace out a tensile test specimen. Cut out this shape as a template.
2. Put on the rubber gloves, apron, and goggles.
3. Use the template and scissors to cut out 10 test specimen layers from the bidirectional glass weave mat. Try to trim these so that they are all the same size.
4. Cut the template so that the entire end, and about 1” of shaft remains. Cut out 16 copies of this template.
5. Now, lay out the larger samples in piles of 1, 2, 3 and 4. With each pile put four of the end pieces. These four pile will be the four tensile test specimens made.
6. Next draw the shape of the test specimens on the cardboard and lay out the wax paper on top. Put the first layers of the samples on top and pin at the ends.
7. Mix about 1 cup of the resin and hardener in the mixing cup. Stir quickly until thoroughly mixed.
8. Dip the brush in the resin, and coat the four specimens. Try to wet the mat, but don’t soak it.
9. Add the next layer of glass mat, and brush on more resin. Continue until all layers are done.
10. Allow the parts to stiffen, and then place in an over to speed curing.
11. Measure the dimensions of the thinnest cross sections of the specimens.
12. Look at the specimens under a microscope and draw what you see. Take special care to look for fibers and air bubbles.
13. Use the tensile tester to find the stiffness, and the ultimate tensile strength.
Submit:
1. Strength of materials calculations regarding the estimated strength of the composites.
6.5.5 LAB - CASTING
Objective: To observe the basic elements of the casting process
Time & Location: Tues., Mar., 2, 2:00p.m., Caulder Arts Building, Allendale
Pre-Lab:
1. Review the casting material in the course notes and the text.
Materials:
1. Styrofoam patterns
2. Mold packing sand - silica or zircon
3. Gates for the patterns
4. Buckets for patterns and sand
5. Bronze ingots
6. Melting furnace, cupola, winch, drop pit, etc.
7. Band saw
8. Specimen polishing equipment and microscope
9. Micrometer and vernier calipers
10. Foam working tools - hot melt glue gun, foam cutters, knives, etc.
Procedure:
1. Prepare the styrofoam patterns by doing and trimming, gluing, etc. You will be given a few basic designs at the start of the laboratory. These designs will include
- a series of balls to determine metal flow
- a thin wall part to determine warping, etc. (measure wall flatness)
- a rectangular piece to be measured for dimensional changes and surface warping (measure the overall dimensions)
- two balls to be examined for microstructure.
2. Glue the patterns to a gate/runner system, also made of styrofoam. The best results will be to have a top mounted runner. Make sketches of every pattern and the gate placement.
3. Heat the bronze in the furnace to at least 1200°F.
4. Measure the dimensions of the parts before placing them in the sand. Partly fill a container with the sand to support the foam core. Make sketches of the part placement in the sand relative to other parts.
5. Orient the top of the runner so that the pattern is resting on the sand bed. and continue to add sand carefully. Care should be taken not to break the foam core when adding sand. A gentle vibration, or tamping will help to settle the sand throughout the filling operation. When done, continue to bump, or vibrate the sand until it is settled.
6. Check to see that the buckets are all ready for a pour. Ensure that the pourer, and all others involved are wearing safety glasses, aprons, and appropriate footwear. Make sure that adequate ventilation systems are on - the evaporated foam will smell.
7. Winch the cupola, now full of molten bronze up, and move it to the pour pit so that it is ready to pour.
8. When casting you must pour the metal once, quickly and steadily. DO NOT HESISTATE - Any hesitation will ruin the part. Pour until the pool of molten metal can be seen at the top of the runner.
9. Let the mold stand for a few minutes to solidify, and then remove the part from the sand Parts may be quenched to speed cooling, but remember to let one of the balls air cool. The sand can be removed by hitting the part carefully with a hammer.
10. Cut one of the large body parts open with a saw, and look for voids and inclusions.
11. Polish and etch one of the internal faces of the balls (one quenched and the other air cooled). Examine the microstructure of the metal near the side, and the center of the mass.
12. Make observations comparing before and after dimensions, as well as other details.
Submit:
1. A general discussion of dimension changes before and after casting.
2. A list of design features, and how well they were cast using charts and other exhibits.
3. A discussion of the microstructure.
6.5.6 LAB - DESIGN FOR DISASSEMBLY (DFD)
Objective: To examine a product to determine how well it is suited to disassembly for recycling.
Pre-Lab:
1. Read the handout “Environmental Aspects of Design”.
2. Read the textbook section on “Design for Assembly, Disassembly and Service”.
3. Review the theory section below.
Theory:
The very nature of any product is that is made of groups of dissimilar materials that have been shaped and connected in a strong manner to serve some function. It is this very connection of dissimilar materials that make the individual materials harder to reclaim at the end of a products life. To complicate matters the consumer often selects a product based on cost of manufacturing, not the total life cycle cost. As a result, most engineering design tools focus on making assembly more efficient using techniques such as Design For Assembly (DFA). Some basic axioms of DFA include,
• For Parts
1. Eliminate/minimize tangling between parts in feeders.
2. Use symmetry to reduce the orientation time during handling
3. If symmetry is not possible, use obvious features to speed orientation
• For Products
4. Reduce the number of parts when possible
5. Build the part in layers from the top on the bottom, using gravity to locate parts
6. Have the already assembled product stable on the work surface
7. Have the work lie in a horizontal plane
8. Use chamfers and fillets to ease mating of parts.
9. Use snap-fits, and other quick fasteners, avoid screws, glue, etc.
Inadvertently, many of the DFA methods also make disassembly easier. For example, axioms 4, 5, 6, 7 will make parts easier to disassemble. Step 9 can also make these easier to disassemble if the right type of connectors are used. Steps 1, 2, 3, 8 can have an ergonomic effect on the worker doing the disassembly work. By themselves these axioms focus on the assembly, but ignore the sorting of the part materials. So, we can add a few simple axioms to speed recycling.
1. Avoid trapped fluids that will leak
2. Mark all non-ferrous materials for easy sorting
3. Make all pieces of single materials
4. Make reusable parts in easily disconnected modules
5. Make all assembly connectors easy to disconnect
Like most design methods, these points are used to guide design, and not control it. Frequently the rules must be put aside because of technical limitations, customer expectations, etc. When possible we need to review designs to estimate where these changes can occur with no serious impact on the products performance, and where they are desirable for environmental and economic gains.
Materials:
Consumer product(s) - (Winter 1997 it was a dish washer)
Basic hand tools
Scrap bins
Procedure:
1. Discuss the basic principles of disassembly and manufacturing.
2. Examine the machine for general issues before disassembly, such as disconnects, and emptying water.
3. Disassembly the machine one component at a time. As each component, or group of components, is removed address each of the following points,
- could the part/assembly be resold as a replacement part?
- is the material obvious?
- how much effort was required to separate the part - eg. tools or access?
- how easy was to part to handle?
- is the part ready for recycling, or do other operations need to be done?
- does the part need to be discarded?
4. Sort the parts by material, and prepare to take to Padnos Scrap Yard.
5. Estimate the fractions of recovered materials by type, and unrecoverable materials.
6. In small groups discuss design changes that would ease recycling.
Submit:
1. 5 different large design changes (with drawings) that would make the product easier to disassemble.
2. Suggest 5 small design changes that would make the parts easier to recycle.
3. Estimate the loss or profit in recycling the dishwasher. Assume your hourly rate is $15/hr.
6.5.7 LAB - WELDING, SOLDERING AND GLUEING
Objective: To join various materials and test joint strength.
Pre-Lab:
1. Review the appropriate material in the course notes and the text.
Theory:
There are three main methods for joining materials i) a filler that solidifies and bonds unmelted bases, ii) a filler and base material are melted and join together, iii) base materials are heated and melt and then solidify together.
Materials:
Arc Welder and rods
Acetylene gas welder and rods
Propane torch and solder
1/4” iron plates
Cyanoacrylate glue
5 minute epoxy
Popsicle sticks
Tensile tester
Procedure:
1. Join the metal and wood samples using the available techniques.
2. Pull the specimens in the tensile tester and observe the failure types and strengths.
Submit:
1. A general discussion of bonding strength.
2. Comparison of bond strength to material strength
6.5.8 LAB - SHEET METAL SHEARING AND DRAWING
Objective: To observe the forces required to deform and shear sheet metal.
Pre-Lab:
1. Review the appropriate material in the course notes and the text.
Materials:
1. Hydraulic press
2. Sheet metal shear
3. 1/16” sheet metal, aluminum and steel
4. Permanent ink marker
5. Steel scales
6. Computer with DAQ card and labview program
7. Sheet metal break
Procedure:
1. Set up the press and select a variety of sheet metal thicknesses. Draw a 1/2” square grid on the sheet metal. Measure the thickness of the sheet.
2. Use the press to draw the metal. Note the maximum force, and the area under the force/displacement curve as the deformation energy. Look at the now deformed squares on the piece and estimate the strain in each square, along the cross section of the part.
3. Shear various piece in the shear, and record the forces. Note, you will probably need to measure the angle of the blade to the work and the thickness of the sheet.
4. Examine the edges of the sheared pieces with a magnifying glass or microscope. Identify where the material sheared. Compare the shear forces to theory.
5. Use the sheet metal break to bend pieces of sheet metal. When bending carefully record the angle bend to, and then the angle the piece springs back to. Measure the bend radius and sheet thickness, then compare the results to theory.
Submit:
1. A full lab report including all data, observations, calculations, and final results.
|
|