Jack, H., Ray, J, Karlesky, M., Kuieck, B., Devos, R., “A Virtual Reality Robot”, ASEE North Central Section Conference Proceedings, Lansing, April, 2000.
A VIRTUAL REALITY CONTROLLED ROBOT
by Hugh Jack, Jeff Ray, Mike Karlesky, Brian Kuieck, Ryan DeVos, Padnos School of Engineering, Grand Valley State University
Abstract
A new engineering laboratory building is under construction at Grand Valley State University. To support the groundbreaking ceremony a robot was designed and built. The robot is a mid-sized (7 ft. reach) backhoe controlled by a hand mounted virtual reality glove.
The robot was built as a course project for EGR450 - Manufacturing Control Systems. An interdisciplinary team of one electrical and two mechanical engineering students designed and built the robot. The robot was built using hydraulics to actuate the links using solenoid valves. Potentiometers were used for joint position feedback. The robot was controlled by a Basic Stamp II computer. The Basic Stamp II in the robot was connected to a personal computer using an RS-232 connection. The PC used Java subroutines to convert the position of a Nintendo Power Glove to a robot position, and handle serial communications. The Nintendo Power Glove was interfaced to the personal computer using a 68HC11 microcontroller.
The robot was built and tested over a four week period and worked successfully. This paper will describe the process, experiences and final system.
1. Introduction
Construction of the Fred M. Keller Engineering Laboratory Building was started in the summer of 1999, and will be completed in the fall of 2000 [1]. A ground breaking ceremony was held to mark the beginning of the project. To make the occasion memorable, a group of students were selected to design and build a groundbreaking robot as a course project for EGR40 - Manufacturing Controls [2]. The students were selected because of their technical knowledge and problem solving skills. One of the students was Mike Karlesky, an Electrical Engineering student. The other two students, Brian Kuieck and Ryan Devos, were Mechanical Engineering students.
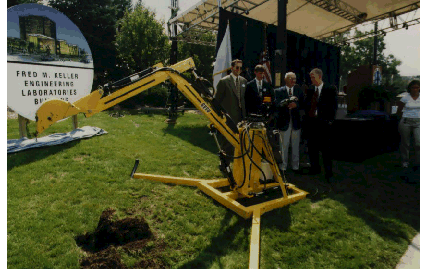
The students did most of the design work and constructed all of the hardware and software. The conceptual planning for the project began months before the groundbreaking ceremony. Initial plans included concepts such as mobile vehicles and explosives. Eventually the design that prevailed was a robot that would be controlled by a virtual reality glove. The glove interface had already been developed as part of a senior project [3], so the robot design and build was the only major task. The idea of building the robot to resemble a backhoe came later. The robot is shown in Figure 1 holding a scoop of earth from the groundbreaking ceremony.
Figure 1. The Robot on Ground Breaking Day Pictured with M. Karlesky, R. Devos, F. Keller and B. Kuieck
2. The Mechanical Robot
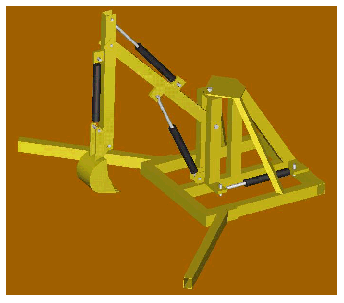
The robot was designed to operate as a backhoe. A solid model of the robot, shown in Figure 2, was created before construction began. The solid model was used to determine the reach of the robot, find potential collisions, and determine the required cylinder stroke. The robot was also designed so that it would fit into a freight elevator and pass through doorways.
The robot is a jointed spherical, or articulated with four rotational joints. The base of the robot remains stationary while the first three joints control the position of the end effector (scoop). The last joint rotates the scoop to dig or drop earth. The robot has a maximum reach of approximately 7 feet, which extends well beyond the center of the square base. When a load is applied at the scoop the moment is large enough to cause the robot to tip. To counteract the tipping moment two members were added in a ‘Y’ configuration and ground anchors were added to the back side of the base.
The construction of the robot is mainly welded steel plates and tubing. Steel tubing was used for the structural members, and oriented to maximize the strength. The pin joints in the robot are steel pins in greased holes.
Figure 2. Solid model of the final mechanical design.
The robot is driven by hydraulic cylinders. This allows very large loads to be applied, but it does limit the rate of motion. And, if multiple axes are moving at the same time the speed of an individual axis will be reduced. The stroke of the cylinders was selected so that at maximum and minimum extension the robot would still be in a valid configuration. The hydraulic power unit includes a pump, reservoir and flow/pressure regulator. The entire unit is quite small and is mounted on the base of the robot. Each joint of the robot is driven by a single hydraulic cylinder. Each cylinder is controlled by three-way hydraulic valves.
The mechanical components of the robot were built over a period of approximately two weeks of intense effort by the mechanical engineering students. Many of the materials were purchased from local metal suppliers (tubing and plates) and farm supply companies (cylinders). The construction was all done in the engineering machine shop with one exception. The robot was painted in the garage of one student. Ironically, the new building will have a paint shop that would have allowed the students to paint the robot on campus.
3. The Robot Controller
The robot is controlled by a Basic Stamp II chip [4]. This is a computer available as a single DIP (Dual In-line-Package) with 20 inputs/outputs. BASIC programs are downloaded to the Basic Stamp II over an RS-232 interface. A program was written that moves the robot to desired joint positions. The program receives desired joint angles via an RS-232 interface. It then actuates the hydraulic valves to move the robot to the desired joint angles. Potentiometers on the robot are used to read the position of the joint angles. The robot program also monitors the motion for potential error conditions. If a joint travels out of range or a motion is not completed in a given time the robot will enter a fault state. A four button manual control was also added to the robot to allow simple control of the robot for basic maintenance and testing (and in case the virtual controls didn’t work.) Other inputs and outputs include a start button, an E-stop button and a warning light.
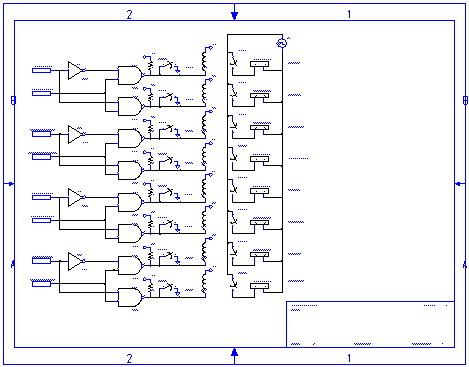
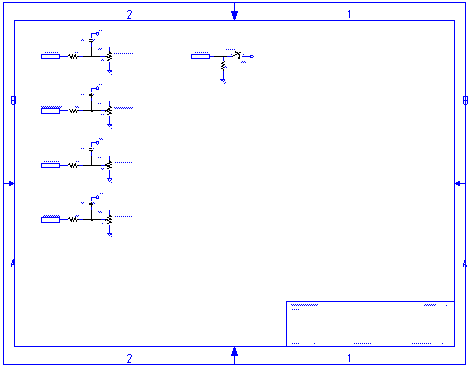
To actuate the hydraulic cylinders on the robot there are three-way valves controlled by two solenoids. Each of the solenoids is switched by 115Vac. Only one of the two solenoids can be energized at any time to advance or retract a cylinder. If neither are energized the cylinder will stay in place. Solid state relays are used to switch the solenoids as shown in Figure 3 (Note: they are shown as electromagnetic relays.) The relays are necessary because the output from the Basic Stamp II is 5Vdc and less than 20mA, but the solenoids require 115Vac at over 100mA. A small amount of digital logic was added to prevent both solenoids from being actuated simultaneously.
Figure 3. Electrical Schematics for Hydraulic Control
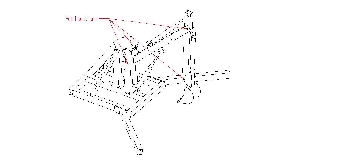
The robot position is determined with potentiometers mounted at the positions shown in Figure 4. The potentiometers were selected to simplify the controller (as opposed to encoders) while still providing enough accuracy for the application. The Basic Stamp II can determine the position of the potentiometer using an RC time constant. The circuits shown in Figure 5 allow the position of the potentiometer to be read to an accuracy of approximately 1-2 degrees. Limit switches were also attached to the robot so that the controller could stop before a hard mechanical stop.
Figure 4. Illustration of pot locations used in measuring bucket position.
Figure 5. Electrical Schematics for Potentiometers
Mike Karlesky completed the robot controller hardware in about one week. The speed of the work was due to his previous work with the Basic Stamp II computer in similar applications.
4. System Architecture
A diagram of the complete control system is shown in Figure 6. The entire system is driven by a Nintendo Power Glove. A Motorola 68HC11 microcontroller is used as an interface to the glove. The 68HC11 reads the position and orientation of the glove, finger flexing (a fist), and buttons pressed. All of these events are passed to a personal computer over an RS-232 interface. The personal computer converts the glove position to a set of joint angles for the robot, and these are transmitted to the robot over another RS-232 connection. The robot controller will try to drive the robot to the desired joint angles by switching the hydraulic solenoids on and off.
Figure 6. Control System Architecture
5. The Power Glove
The Nintendo Power Glove has two major components. The first component contains three main parts; a keypad, resistive sensors to detect strain in the glove fingers caused by fist closure, and two ultrasonic transducers mounted about 3 inches apart. The second major component is an array of three microphones set at right angles. The glove does not contain the circuitry needed to generate and decode the ultrasonic signals needed to determine position and orientation of the glove. A program was found on the Internet that allows a 68HC11 microcontroller to act as the glove driver and signal decoder. The glove controller was already developed before the project for a senior project being done for Jeff Ray (the project is for a virtual reality design system[3].) The 68HC11 program will report the glove data to a personal computer over an RS-232 connection.
Software for the personal computer was written in Java and runs in a JVM (Java Virtual Machine.) The basic operation of the software is shown in Figure 7. As expected the glove requires a calibration operation to set the reference position. After that the software enters a continuous loop of polling the glove data from the 68HC11, converting it to robot positions, and forwarding it to the Basic Stamp II in the robot. The glove position is cartesian, and it is converted to a robot joint positions using some basic trigonometric calculations. The glove is not precise and readings from the glove contain noise. Therefore a filter routine does a running average of the cartesian position of the glove to smooth out sudden changes due to noise. Without the filtering routine the robot will often jerk or move without reason.
Figure 7. Flowchart for PC Software
6. The Project Execution
The students in the project were selected for their abilities and knowledge. The project was proposed to them four months before the groundbreaking ceremony (one month before the class started.) There was approximately one month of conceptual planning. Based on work that was being done with the Nintendo Power Glove, it was decided to use the glove to drive the system. This led naturally to the concept of controlling a robot for digging. The embodiment of the robot as a backhoe followed soon after. Many of the required materials were already available, so a modest budget of $2,750 was prepared and approved by the university. After the budget approval, parts were ordered and construction began. Construction of the mechanical components began 6 weeks before the groundbreaking day, and was complete within two weeks. After that the robot electrical work took one week, and the final system integration with the Nintendo Power Glove took one week. This left two weeks for testing (and play!). Limited space was a major challenge to the project. As a result the robot was housed in a doorway that had to be closed when the robot was in use.
The groundbreaking site was not available for final testing until the day before the ceremony, when electrical power was connected. At that time the students took the robot to the site, connected it, and found that it ran as expected, until they took the first scoop of earth - the scoop bent back! The scoop was removed from the robot and taken back to the shop where plates were welded on to reinforce it. It was repainted and remounted on the robot early the next morning.
Before the ceremony they demonstrated the robot to Fred M. Keller, the major contributor for the building, and then taught him how to use the glove (see Figure 8.) And, during the ceremony, Mr. Keller and the students used the robot to dig the first scoop of earth.
Figure 8. The Robot Scooping Earth
Acknowledgements
The project was a great success because of the support and assistance the students received from Bob Bero. Paul Plotkowski provided the opportunity and support to make the project possible. Fred M. Keller has generously provided support for a new engineering laboratory building that will allow more student design projects like this one.
References
[1] http://www.engineer.gvsu.edu/lab.html.
[2] Devos, R., Karlesky, M., Kuieck, B., “Project Report”, http://claymore.engineer.gvsu.edu/~devosr/egr450, 1999.
[3] Beilfuss, S., Curtis, P., Karlesky, M., Sanford, M., “Virtual Environment for Design”, Senior Projects at GVSU, http://www.eod.gvsu.edu/~sanfordm/VEED/VEED.html, 1999.
[4] http://www.parallaxinc.com.