7. Databases
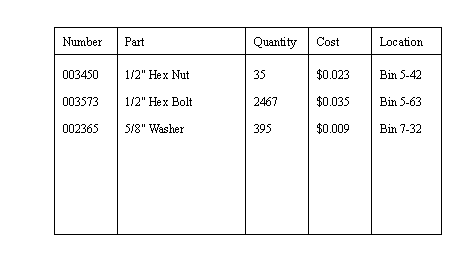
Databases are used to store various types of information in a manufacturing enterprise. For example, consider an inventory tracking system. A simple database might contain a simple list of purchased parts. Each part is a line in a database table, as shown in figure X.1. If a new inventory item is added, a new row is added to the table. If parts are added or removed to the inventory, the quantity value for one of the rows is changed. The total inventory cost can be calculated by multiplying the quantity and part costs together, and summing these for all rows. The tables are often designed to suit the way a particular business runs.
Figure X.1 - A Simple Inventory Table
A more complex database will be made up of many tables that relate items together. For example a more complex database might have separate tables for customer data, supplier data, purchased inventory, work in process, finished inventory, etc. The purchased inventory table might refer to a supplier number that identifies a supplier in the supplier table. The formal name for a database that uses related tables of information is ’relational’.
In modern applications a database (server) will run on one computer, but be shared by many other computers (clients) that access it through networks. Client programs might be highly variable. For example a worker on the shop floor may only be able to view order information. A shop floor supervisor might be able to change order status, personnel tables. A salesperson might be able to enter new orders, and check on order status. It is also possible to access the database directly and make special inquiries using a special command language called Structured Query Language (SQL).
In summary, database allow information to be;
- stored and managed in a central location
- shared with many other computers
- structured and accessed quickly
- searched for patterns and matches
7.1 SQL And Relational Databases
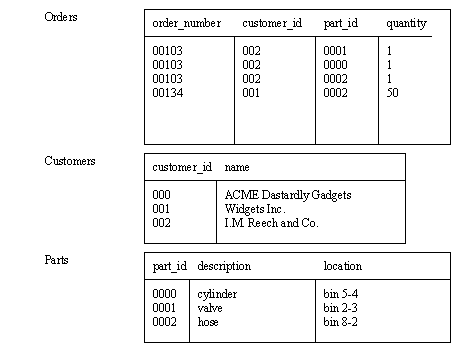
Structured Query Language (SQL) was developed to provide a common interface language for accessing relational databases. The key concept behind relational databases is that all information is stored in tables. The example in Figure X.2 illustrates a customer order tracking system that uses three tables. Consider the first table called ’Orders’, it contains four rows, each with an order number. The first three rows are for the same order, and order number. In this case all three entries are also for the same customer, but it involves three different parts. The entries in the ’customer_id’ and ’part_id’ columns can be used to lookup more information from the two other tables.
Figure X.2 - An Order Tracking Database
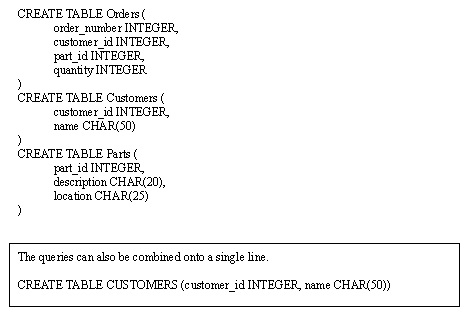
The tables in Figure X.2 can be created using the SQL commands in Figure X.3. One command is needed for each table. Each command starts with ’CREATE TABLE’ followed by the name of the table. After this the columns of the table are defined. In the case of the ’Orders’ table there are four columns. Each column is given a unique name, and a data type is defined. Once these commands have been used the tables will exist, but be empty with no data in them.
Figure X.3 - The SQL Commands to Create the Tables in Figure X.2
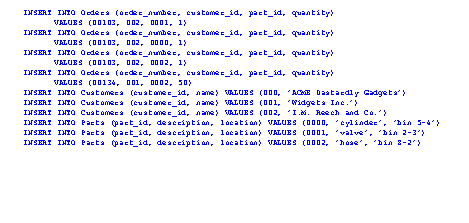
Figure X.4 shows SQL commands to enter data into the tables. In all cases these statements begin with ’INSERT INTO’, followed by the table name. After that the data fields to fill are named, followed by the actual values to insert. The column names are provided so that the values can be supplied in a different order, or omitted altogether. In this example all of the values are provided for all ’INSERT INTO’ statement, but this is not necessary.
Figure X.4 - Entering Data Into The Tables
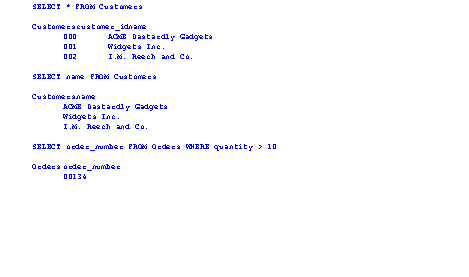
Once data has been entered into the database it can be recalled using a simple ’SELECT’ statement. In the first example the ’*’ indicates to select all data values ’FROM’ the ’Customers’ table. The second example shows only listing the ’name’ values from the ’Customers’ table. Finally the third example shows the listing of ’order_numbers’ from the ’Orders’ table where the ’quantity’ of parts is greater than 10.
Figure X.5 - Simple Database Query Examples
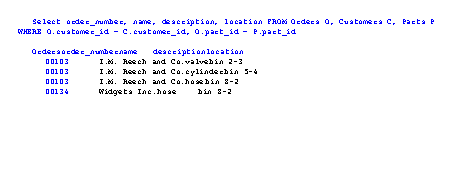
It is possible to make database queries where the results are merged from many different tables. The example in Figure X.6 shows a query that is to list values for ’order_number’, ’name’, ’description’ and ’location’. These are to be merged from three tables ’Orders’, or ’O’, Customers, or ’C’, and ’Parts’, or ’P’. Finally, the conditions for a match follow the ’WHERE’ statement. The conditions are the ’customer_id’ field in the ’Customer’ and ’Order’ tables must match., and the ’part_id’ field must match in the ’Order’ and ’Part’ tables.
Figure X.6 - A More Advanced Query
The SQL queries are easily used when interacting with a command interface. Although, it is more common for these commands to be used from within computer programs that call the database to make automatic queries.
7.2 Database Issues
• Databases handle problems of,
- data locking (only allow one user to modify at once)
- data sharing (other users can view)
- searching
- etc
• Database design
- first order normal, etc.
- flexibility
- verification
7.3 Laboratory - SQL for Database Integration
Purpose:
To learn the basic command language, SQL, that is used to interact with relational databases.
Overview:
Databases store information in tables. The users can use or manipulate this data to suit other purposes. The fundamental language for interacting with the databases is SQL. This lab will offer a simple introduction, and then go on to interface with the database using C programs in the following lab.
Pre-Lab:
Read the SQL and database material.
In-Lab:
First Time Installation:
1. Check to see if the database is installed. One way to do this is to look for the database server using ’which postmaster’. If it is not installed it can be installed from the Redhat distribution CD, or by downloading it from www.postgresql.org.
2. Log in as root with ’su - root’ and edit the file ’/var/lib/pgsql/.bashrc’ to include the following lines. (Note: the .bashrc file may not exist, but it will be created by the editor.)
PGLIB=/usr/lib/pgsql
PGDATA=/usr/lib/pgsql/data
export PGLIB PGDATA
3. Change the ownership of the postgres directory to the user postgres with the command ’chown postgres /usr/lib/pgsql’.
4. Log in as the user ’postgres’ - An account called ’postgres’ is normally defined in most modern Linux distributions, but the account password is disabled. To log in the first time you must be logged in as root, then log in as postgres with ’su - postgres’. You can change the password so you can log in directly as postgres in the future. To do this, log in as root and then use ’passwd postgres’. Verify that you are logged in as postgres before continuing with ’whoami’.
5. Set up the databases with the command ’initdb’. This will set up all of the needed files and directories.
6. At this point the database should be ready for use. In an earlier chapter you turned on database support, so you should not need to do so again. But you can always force the database to start with the ’pg_ctl’ function. You can also check to see if the ’postmaster’ program is present in the process list (i.e. ’ps -auxw’).
7. Use ‘createuser <YOUR_LOGIN_NAME_GOES_HERE>’ to add yourself as a valid database user. Answer ‘y’es when asked if you are allowed to create databases. And answer ‘y’es when asked if you can create new users. These choices will allow you full control over the database. Note: ‘destroyuser <YOUR_NAME>’ can be used if you need to remove a user.
8. Log out from the postgres account with ’exit’.
Before Use:
1. Start the database when logged in as postgres with ’postmaster &’. This should start the database server. You can check to see if it is accepting connections with the command ’netstat -a | grep postmaster’. If the postmaster program is listed the database is ready for use.
2. The database can also be set up to run automatically each time the computer is rebooted by adding it to the ’system V’ initialization list. But, this step is not necessary unless setting up a permanent database.
Creating and Using a New Database
1. Create a new database with ‘createdb test’.
2. Connect to the database with ‘psql test’. This is a simple program that allows interaction with the database using typed commands. Type ‘\h’ to see a list of commands.
3. Create a new database table using the SQL command below. This program requires that you end each line with a ‘\g’.
CREATE TABLE grades (name CHAR(10), grade CHAR(3), year INT)\g
6. Display the table (it is empty) with the command below. Note: upper and lower case values are used to make the SQL commands stand out.
SELECT * FROM grade
7.Add data with the commands below. After adding each datapoint, print out the table values. (Note: using the up and down cursor keys will allow you to recall previously entered commands.)
INSERT INTO grades (name, grade, year) VALUES (‘egr 101’, ‘D’, 1997)
INSERT INTO grades (name, year, grade) VALUES (‘egr 101’, 1998, ‘B+’)
INSERT INTO grades (name, grade, year) VALUES (‘egr 103’, ‘A’, 1999)
INSERT INTO grades (name, grade, year) VALUES (‘egr 209’, ‘B+’, 1999)
INSERT INTO grades (name, year) VALUES (‘egr 226’, 1999)
INSERT INTO grades (year) VALUES (2000)
8. When done use ’\q’ to disconnect from the database.
9. Follow the tutorials in the ‘/usr/share/doc/postgres/html’ directory.
10. Develop a database (of your own design) that will keep customer information, and inventory levels.
Submit (individually):
1. A completed customer information database.
7.4 Laboratory - Using C for Database Calls
Purpose:
To access a database using a simple C program.
Overview:
The program listing in Figure X.8 can be used to access the Postgres database. It uses a database access library called ’libpq’. This library of functions allows SQL database queries. The results of the query can then be easily retrieved.
In this example the program begins with an attempt to connect to the database using the function ’PQconnectdb’, and the status of the connection is then checked using ’PQstatus’. An SQL query is passed to the database using the ’PQexec’ command, and the results are returned into the ’PGresult’ structured called ’res’ in this example. The results can be checked using ’PQresultStatus’, and retrieved using the ’PQgetvalue’ function. The ’PQntuples’ function returns the number of matching results.
After each query the results structure should be released using ’PQclear’, and when all database access is complete the connection to the database should be terminated with ’PQfinish’.
#include <stdio.h>
#include <stdlib.h>
#include <pgsql/libpq-fe.h>
int main(){
char grade[3];
char query_string[256];
PGconn *conn;
PGresult *res;
conn = PQconnectdb("dbname=test");
if(PQstatus(conn) != CONNECTION_BAD){
printf("Enter a grade: ");
scanf("%2s", grade);
sprintf(query_string,
"SELECT name FROM grades WHERE grade = ’%s’", grade);
res = PQexec(conn, query_string);
if(PQresultStatus(res) == PGRES_TUPLES_OK){
int i;
for(i = 0; i < PQntuples(res); i++)
printf("name = %s \n",
PQgetvalue(res, i, 0));
} else {
printf("The query failed \n");
}
PQclear(res);
PQfinish(conn);
} else {
printf("Could not open the database \n");
}
return 0;
}
Figure X.8 - C Program for Database Access (dbtest.c)
all: dbtest
CC = gcc
CFLAGS = -Wall
LIBS = -lpq
dbtest: dbtest.c
$(CC) $(CFLAGS) dbtest.c -o dbtest $(LIBS)
Figure X.9 - Makefile for Database Program
Pre-Lab:
1. Examine the database program in the Overview section.
In-Lab:
1. Enter the program and makefile given in the Overview section. Use ’make’ to compile the program, and run it to verify that it does access the database.
2. Write a program that allows jobs to be entered into the customer information database created in the previous laboratory.
Submit (individually):
1. The C program to access the customer information database.