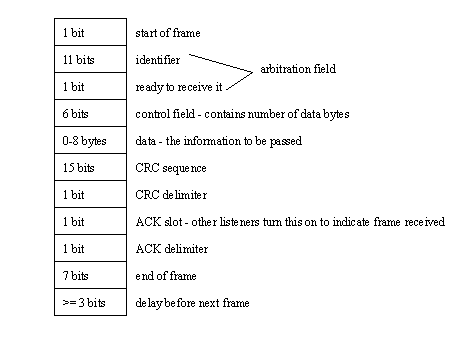
13.2.0.1 - Data Highway
Allen-Bradley has developed the Data Highway II (DH+) network for passing data and programs between PLCs and to computers. This bus network allows up to 64 PLCs to be connected with a single twisted pair in a shielded cable. Token passing is used to control traffic on the network. Computers can also be connected to the DH+ network, with a network card to download programs and monitor the PLC. The network will support data rates of 57.6Kbps and 230 Kbps
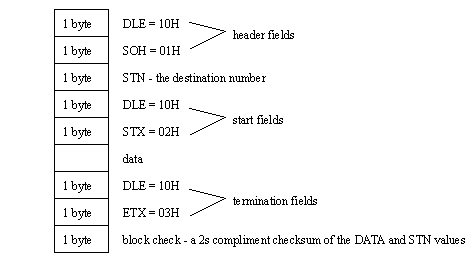
The DH+ basic data frame is shown in Figure 22.22. The frame is byte oriented. The first byte is the ’DLE’ or delimiter byte, which is always $10. When this byte is received the PLC will interpret the next byte as a command. The ’SOH’ identifies the message as a DH+ message. The next byte indicates the destination station - each node one the network must have a unique number. This is followed by the ’DLE’ and ’STX’ bytes that identify the start of the data. The data follows, and its’ length is determined by the command type - this will be discussed later. This is then followed by a ’DLE’ and ’ETX’ pair that mark the end of the message. The last byte transmitted is a checksum to determine the correctness of the message.
Figure 22.22 - The Basic DH+ Data Frame
The general structure for the data is shown in Figure 22.23. This packet will change for different commands. The first two bytes indicate the destination, ’DST’, and source, ’SRC’, for the message. The next byte is the command, ’CMD’, which will determine the action to be taken. Sometimes, the function, ’FNC’, will be needed to modify the command. The transaction, ’TNS’, field is a unique message identifier. The two address, ’ADDR’, bytes identify a target memory location. The ’DATA’ fields contain the information to be passed. Finally, the ’SIZE’ of the data field is transmitted.
Figure 22.23 - Data Filed Values
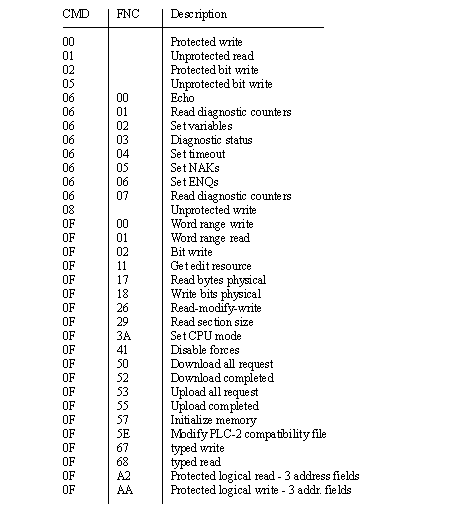
Examples of commands are shown in Figure 22.24. These focus on moving memory and status information between the PLC, and remote programming software, and other PLCs. More details can be found in the Allen-Bradley DH+ manuals.
Figure 22.24 - DH+ Commands for a PLC-5 (all numbers are hexadecimal)
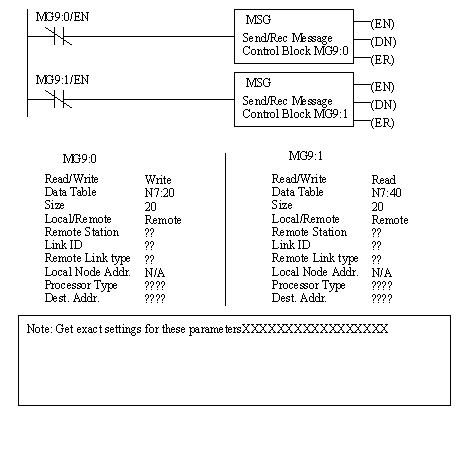
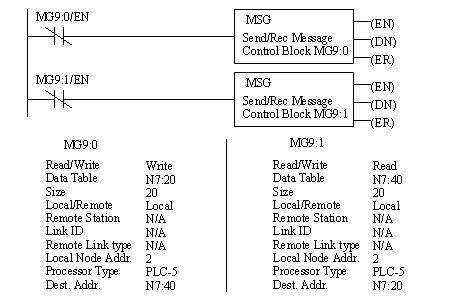
The ladder logic in Figure 22.25 can be used to copy data from the memory of one PLC to another. Unlike other networking schemes, there are no ’login’ procedures. In this example the first MSG instruction will write the message from the local memory ’N7:20’ - ’N7:39’ to the remote PLC-5 (node 2) into its memory from ’N7:40’ to ’N7:59’. The second ’MSG’ instruction will copy the memory from the remote PLC-5 memory ’N7:40’ to ’N7:59’ to the remote PLC-5 memory ’N7:20’ to ’N7:39’. This transfer will require many scans of ladder logic, so the ’EN’ bits will prevent a read or write instruction from restarting until the previous ’MSG’ instruction is complete.
Figure 22.25 - Ladder Logic for Reading and Writing to PLC Memory
The DH+ data packets can be transmitted over other data links, including ethernet and RS-232.
13.3 Practice Problems
1. Explain why networks are important in manufacturing controls.
ans. These networks allow us to pass data between devices so that individually controlled systems can be integrated into a more complex manufacturing facility. An example might be a serial connection to a PLC so that SPC data can be collected as product is made, or recipes downloaded as they are needed.
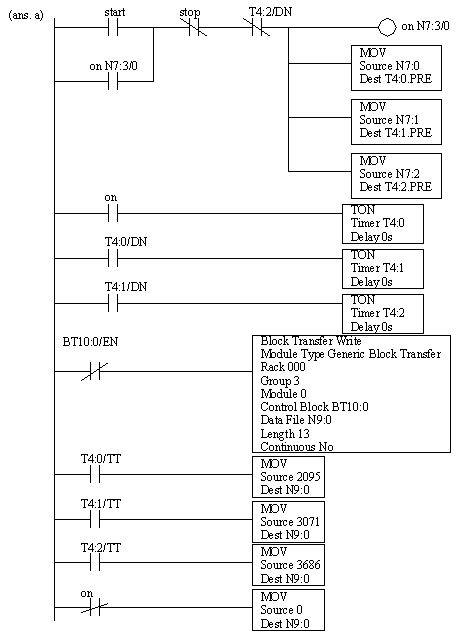
2. We will use a PLC to control a cereal box filling machine. For single runs the quantities of cereal types are controlled using timers. There are 6 different timers that control flow, and these result in different ratios of product. The values for the timer presets will be downloaded from another PLC using the DH+ network. Write the ladder logic for the PLC.
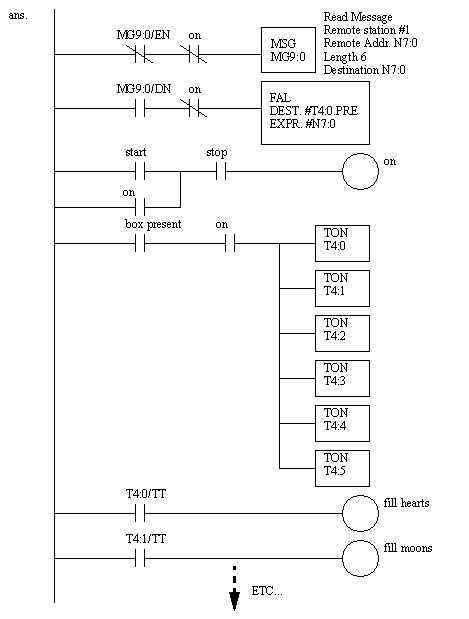
3. a) We are developing ladder logic for an oven to be used in a baking facility. A PLC is controlling the temperature of an oven using an analog voltage output. The oven must be started with a push button and can be stopped at any time with a stop push button. A recipe is used to control the times at each temperature (this is written into the PLC memory by another PLC). When idle, the output voltage should be 0V, and during heating the output voltages, in sequence, are 5V, 7.5V, 9V. The timer preset values, in sequence, are in N7:0, N7:1, N7:2. When the oven is on, a value of 1 should be stored in N7:3, and when the oven is off, a value of 0 should be stored in N7:3. Draw a state diagram and write the ladder logic for this station.
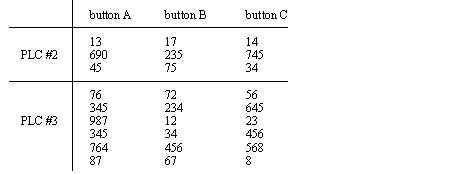
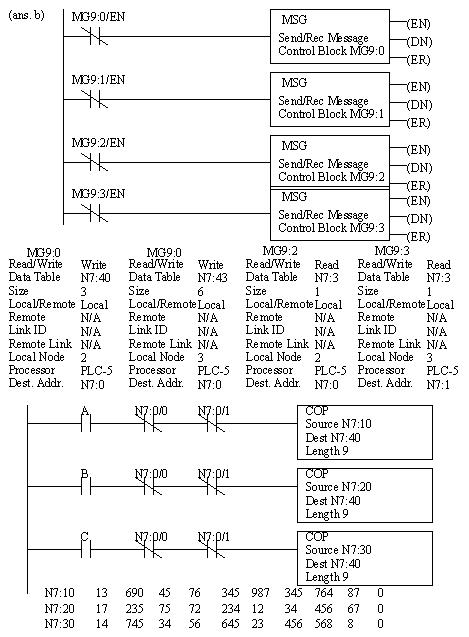
b) We are using a PLC as a master controller in a baking facility. It will update recipes in remote PLCs using DH+. The master station is #1, the remote stations are #2 and #3. When an operator pushes one of three buttons, it will change the recipes in two remote PLCs if both of the remote PLCs are idle. While the remote PLCs are running they will change words in their internal memories (N7:3=0 means idle and N7:3=1 means active). The new recipe values will be written to the remote PLCs using DH+. The table below shows the values for each PLC. Write the ladder logic for the master controller.
4. A controls network is to be 1500m long. Suggest three different types of networks that would meet the specifications.
(ans. Controlnet, Profibus, Ethernet with multiple subnets)
5 How many data bytes (maximum) could be transferred in one second with DH+?
(ans. the maximum transfer rate is 230 Kbps, with 11 bits per byte (1start+8data+2+stop) for 20909 bytes per second. Each memory write packet contains 17 overhead bytes, and as many as 2000 data bytes. Therefore as many as 20909*2000/(2000+17) = 20732 bytes could be transmitted per second. Note that this is ideal, the actual maximum rates would be actually be a fraction of this value.)
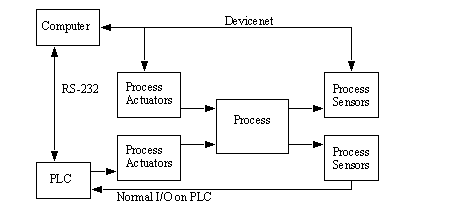
13.4 Laboratory - Devicenet
Purpose:
To be introduced to a software based PLC, interfacing with devices using devicenet and practical sensors.
Overview:
In previous coursework you have used PLC-5 processors. The software based PLC is very similar. The most noticeable difference is that Inputs and Outputs will appear in integer memory instead of the normal I:1 and O:0 blocks of memory.
The program to be developed for this laboratory should......
Pre-Lab:
1. Develop the ladder logic for the system described in the Overview.
In-Lab:
1. Follow the Softplc and Devicenet tutorial.
2. Implement a control system to .....
Submit (individually):
1. Program listings and prelab design work.
13.5 Tutorial - SoftPLC and Devicenet
Objective: By the end of this tutorial you should be able to do the major steps required to connect a devicenet network and program a SoftPLC to control it. It will end with the connection and programming of a Panelview 550 display.
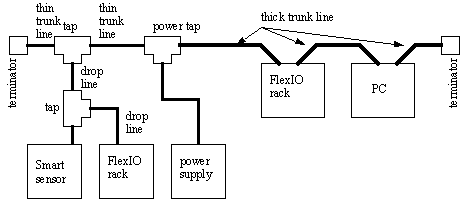
1. Gather the components below. These will be used to build the Devicenet for the rest of the tutorial. When finding components the labels on the back are a good source of information. The information on the front of the devices is not normally useful.
- A PC with a PCIDS devicenet scanner card and software installed
- Devicenet Flex I/O rack on a din rail including,
24VDC adapter 1794-ADN
Relay output 1794-DWB
24Vdc source input 1794-IV16
24Vdc sink input 1794-IB16
- a Sola 24Vdc power supply with a power cable attached
- a Sola 24Vdc power supply with a power tap (1485T-P2T5-T5) attached
- a devicenet capable photoswitch (42GNP-9000-QD)
- 2 normal photoswitches (42GRP-9000-QD)
- 4 Devicenet cable mini connector to wires (1485R-P3M5-C)
- a light stack with red/amber/green
- a central terminal Devicebox (1485P-P4T5-T5)
- 3 network taps
- a stop pushbutton
- 2 terminator resistors
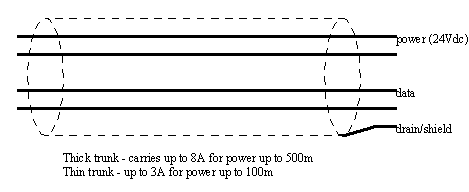
- thick wire trunk line
- wires for connection
- Panelview 550 touch screen display
2. Wire up the network below (note: we will add more of the components later).
3. Start the “RS Networx for Devicenet” software. When it starts it might show a diagram of previously programmed devices on the network. We need to get a current list of devices on the network. To do this pick “Selection” “Online”. This will scan the devices on the network and get their current configurations. After this the diagram on the screen will be current.
4. Next, we want to map the data from each of the Devicenet nodes to a location in the SoftPLC memory. Double click on the PCIDS card on the screen. Click on the “scanlist” tab (you may have to upload parameters). Make sure that all of the devices appear on the scanlist. Use the “Input” and “Output” tabs to map these devices to specific input and output memory. Notice that this is organized in words (16bits). You will want to make a note of these values, because you will use these when programming the PLC. When done select “Apply” and then “OK”. Exit the program and save the changes. At this point a file has been set up that tells the SoftPLC what devices are on the Devicenet, and what to do with them.
5. Move the pointer to the bottom right of the screen. You will see a black dot near the time. Click twice on this (Note: when the SoftPLC is running this will be green). A screen entitled “Softlogix 5 Status Monitor” will popup. Click on “Config” and then “Start SoftLogix 5”. The SoftPLC should now be running. Click “OK” to dismiss the screens.
6. Start the “RS-Logix SL5 English” software (Note the ‘SL’). Start a “New Project”, the programming window should appear. You should now be ready to tell the SoftPLC that you will be using devicenet. Double click on “Processor Status” and on the pop-up window scroll across and select the “Dnet” tab. For the output file enter “9”, for the input file enter “10”, for the diagnostic file enter “11”. Dismiss the window and look at the memory locations under data files, there should now be I/O words there under N9, N10, N11. The input and output memory set in the RSNetworx program will be put in this memory.
7. Write a simple ladder logic program to read to smart optical sensor and output a value to the relay card. If you need help finding which inputs are which, try running a simple or empty program, and watching the memory.
8. Connect the other photooptical sensors and the light stack to the Flex I/O rack and write a more sophistocated program.
9. Connect the PanelView display, and reconfigure the devicenet network. Use the Panel Builder software to create a visual interface, and then download it to the touchscreen. Write ladder logic that uses it for input and output.