3.4 Instruments
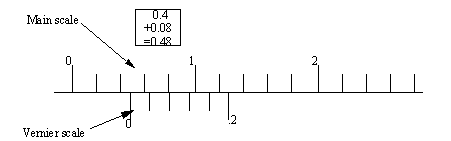
3.4.1 Vernier Scales
• Vernier scales have normal scale components, but also incorporate a small secondary scale that subdivides major increments.
• This secondary scale is based on a second scale that is one increment shorter than a main scale. If the secondary scale is compared to the main scale, it will indicate relative distance between two offsets.
• The scale pictured above would normally be on an instrument, and the main and vernier scales would slide relative to each other. The ‘0’ on the vernier scale would be used to take the reading from the main scale. In this example the main scale would read a value that is between 0.4 and 0.6. (Note: it is not considered good practice to round this to 0.5)
• The vernier scale can then be used to find the internal division, by looking for where the divisions in the top and bottom scales align. In this case the second internal division aligns with 1. Using the values on the vernier scale, we can see that the value for this division would be 0.08. The value from the vernier scale is added directly to the main scale value to get the more accurate results. 0.4+0.08 = 0.48.
• On imperial sliding vernier scales the main scale divisions are 0.050” apart, and on the vernier scale they are 0.049”, giving a reading of 0.001” per graduation.
• On metric sliding vernier scales the main scale divisions are 1mm apart, and the vernier scale they are 0.98 mm, giving a reading of 0.02mm per graduation.
• Angular vernier scales are used on protractors, and are identical in use to linear vernier scales. The major protractor scales have divisions of 1 degree, and the vernier scale is divided into 5 minute intervals. One interesting note is that the vernier scale has two halves, one in the positive direction, and one in the negative direction. If reading from the left division, on the main scale, the right vernier scale should be used. And, when measuring from the right hand division on the major scale, the left vernier scale should be used.
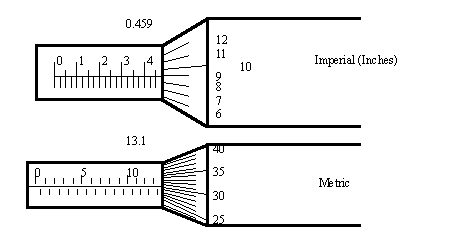
3.4.2 Micrometer Scales
• This is a very common method for measuring instruments, and is based on the thread principle.
• In effect, as a thread is turned, a large motion on the outside of the thread will result in a very small advance in the position of the thread.
• The micrometers pictured above have major scales, as well as minor scales. The major scales are read first, and the micrometer scales are read second and the readings added on.
• The metric micrometer above reads 13.5 = 13.5mm on the major scale, and 31 = .31mm on the thimble, for a total of 13.81mm
• The Imperial scale above shows a micrometer reading of 4.5 = .45” on the main scale, and 9 = .009” on the thimble, for a total of .459
• On imperial micrometers the divisions are typically .025” on the sleeve, and 0.001” on the thimble. The thread used has 40 T.P.I. = a pitch of 0.025”
• Metric micrometers typically have 1 and 0.5 mm divisions on the sleeve, and 0.01mm divisions on the thimble. The thread has a pitch of 0.5mm.
• A vernier micrometer has the scales as pictured above, but also a vernier scale is included to provide another place of accuracy.
• Depth micrometers have an anvil that protrudes, out the end, and as a result the scales are reversed to measure extension, instead of retraction.
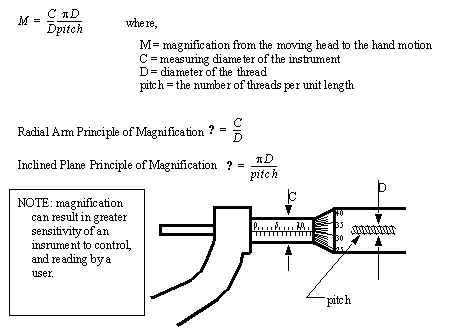
3.4.2.1 - The Principle of Magnification
• The operation of micrometers is based on magnification using threads.
• A large movement on the outside of the micrometer thimble will result in a small motion of the anvil.
• There are two factors in this magnification. First, the difference in radius between the thread, and the thimble will give a change in sensitivity relative to the difference in radii. Second, the pitch of the thread will provide a reduction in motion.
• The basic relationship can be seen below,
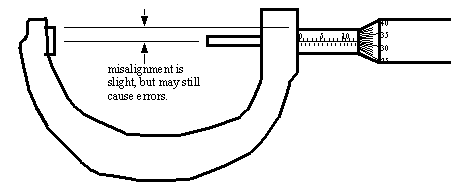
3.4.2.2 - The Principle of Alignment
• Basically, the line of the physical measurement should be such that it is coincident with the measurement axis of the instrument.
• If the measurement is out of line, it may lead to misreadings caused by deflections in the instrument.
• micrometers are generally better than sliding vernier calipers when considering this principle.
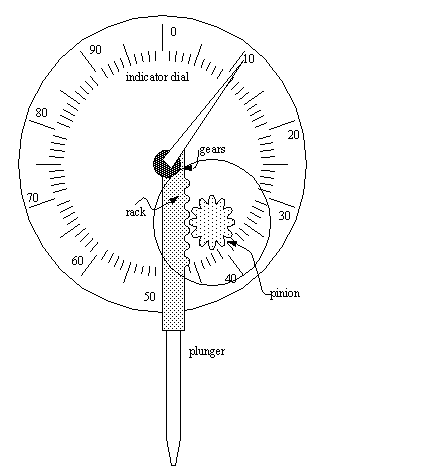
3.4.3 Dial Indicators
• Converts a linear displacement into a radial movement to measure over a small range of movement for the plunger.
• The radial arm magnification principle is used here.
• these indicators are prone to errors caused by errors that are magnified through the gear train. Springs can be used to take up any play/backlash in the rack and pinion to reduce these errors.
• The gears are small, but friction can result in sticking, thus reducing accuracy
• A spring is used on the rack to return the plunger after depression.
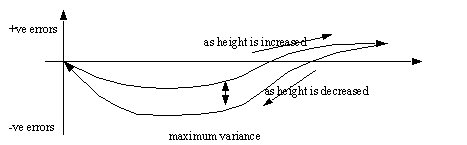
• The problems mentioned earlier will result in errors in these instruments. If the dial indicator is used to approach a dimension from two different sides, it will experience a form of mechanical hysteresis that will bias the readings. An example of this effect is given below.
• In the graph shown, as the dial indicator is raised in height (taking care not to change direction), the errors are traced by the top curve. As the height of the dial indicator is decreased, the bottom curve is traced. This can be observed using gauge blocks as the known heights to compare the readings against.
• The causes of this hysteresis are bending strain, inertia, friction, and play in the instrument.
• Applications include,
- centering workpices to machine tool spindles
- offsetting lathe tail stocks
- aligning a vise on a milling machine
- checking dimensions
• These indicators can be somewhat crude for accurate measurements, comparators have a higher degree of sensitivity.
3.4.4 The Tool Makers Microscope
• Quite basically this is a microscope. But, it has lines added to the optics for visual reference, and micrometer dials, and angular verniers added to the stage to measure distances.
• Parts are put on the stage, and the microscope is focused. The stage can then be rotated, and translated precise distances to allow visually referenced measurements
• Such a microscope might have two micrometer heads for x-y translation of the stage. In addition, the stage can be rotated, and angular positions measures.
3.4.5 Metrology Summary
• We can discuss various instruments, and what they are used for.
Table 1: Fill in more later
|
Feature
|
SizeRange
|
Accuracy
|
Instrument
|
Comments
|
|
Angle
|
90°
|
yes/no
|
square
|
|
|
|
85°-95°
|
--
|
cylindrical square
|
|
|
outside distance
|
|
|
|
|
|
depth
|
|
|
|
|
|
|
|
|
|
|
|
|
|
|
|
|
|
|
|
|
|
|
|
|
|
|
|
|
|
|
|
|
|
|
|
|
|
|
|
|
|
|
|
|
|
|
|
|
|
|
|
|
|
|
|
|
|
|
|
|
|
|
|
|
|
|
|
|
|
|
|
|
|
|
|
|
|
|
|
|
|
|
|
|
|
|
|
|
|
|
|
|
|
|
|
|
|
|
|
|